

Are you a bookworm who loves to have a collection of bookmarks? Or do you want to make a thoughtful and handmade gift for your friends and loved ones? If so, then this easy DIY project is perfect for you! In this article, we will show you how to create laminated bookmarks that are not only functional but also stylish and durable.
When it comes to making bookmarks, the options are endless. You can use cardstock, chipboard, or even cardboard from old cereal boxes. But if you want a long-lasting and professional-looking bookmark, laminating is the way to go. Laminated bookmarks are not only more sturdy but also easier to clean and maintain, making them perfect for avid readers or those who love to carry books in their handbags.
To create laminated bookmarks, you will need a few supplies. Firstly, you will need sheets of laminating pouches or sheets. You can easily find these in any craft store or online. Secondly, you will need a laminating machine or thermal laminator to seal the sheets together. If you don’t have access to a laminating machine, many print stores offer laminating services for a small fee.
Once you have your supplies ready, it’s time to get creative! You can design your own bookmark using various techniques such as stamping, embossing, or using stencils. If you’re not confident in your artistic skills, you can also use pre-made designs or clipart. Don’t forget to add your initials or a personal touch to make the bookmark truly yours.
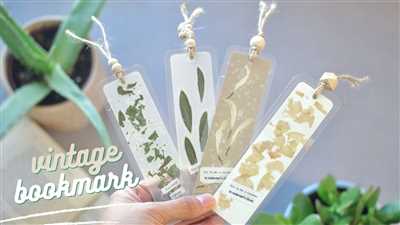
After you have created your design, cut the bookmark to your desired size. It’s recommended to use a paper trimmer or a rotary cutter for precise and clean cuts. Add a hole at the top using a hole puncher, which will allow you to attach a ribbon or tassel for decoration. You can also add some extra embellishments such as sequins, beads, or even dried flowers to make your bookmark unique and eye-catching.
Now comes the fun part – laminating the bookmark! Carefully feed your bookmark into the laminating pouch or sheet, making sure there are no air bubbles or wrinkles. Run it through the laminating machine or thermal laminator, following the manufacturer’s instructions. Once laminated, trim off any excess laminate around the edges, leaving a small border to ensure a secure seal.
And that’s it – your laminated bookmark is ready to use! It’s now sturdy, water-resistant, and can withstand everyday wear and tear. Whether you’re using it for yourself or giving it as a gift, laminated bookmarks are a practical and thoughtful choice. So why not create a bundle of bookmarks for a book-loving friend or make a fresh batch for your personal collection? Happy crafting and happy reading!
Craft Project: How to Make Laminated Bookmarks
Are you looking for a fun and easy craft project that also makes a great gift? Look no further than making your own laminated bookmarks! With just a few materials and some creativity, you can create beautiful and durable bookmarks that will bring a smile to anyone’s face.
To make these laminated bookmarks, you will need the following supplies:
- Cardstock sheets
- Laminating machine or thermal laminating pouches
- Scissors or die-cutting machine
- Designs or stamps
- Decorative papers or stencils
- Ribbon or yarn
First, start by choosing your design for the bookmark. You can create your own unique designs or use pre-made designs from a catalogue. Use cardstock sheets to give your bookmark stability.
Next, use scissors or a die-cutting machine to cut out the desired shape for your bookmark. You can go with a traditional long rectangular shape or try something more unusual like a hexagon or a flourish shape.
Once you have your shape, it’s time to add some flair. You can use stamps, stencils, or decorative papers to add patterns, flowers, or lines to your bookmark. Get creative and make each bookmark one-of-a-kind.
After decorating your bookmark, it’s time to laminate it. If you have a laminating machine, follow the instructions to feed your bookmark through and create a protective layer. If you don’t have a laminating machine, you can use thermal laminating pouches instead.
If you want to add a little extra something to your bookmark, consider creating a shaker style bookmark. To do this, create a small window in your bookmark and add some sequins or other small embellishments inside. Seal the window with a laminate sheet or packing tape for a unique effect.
Once your bookmark is laminated, trim off any excess laminate, leaving a small border around the edges. Then punch a hole in the top of the bookmark and thread a ribbon or yarn through to create a tassel or a decorative attachment.
And voila! You’ve made your own laminated bookmark. These handmade bookmarks are not only beautiful but also durable, making them the perfect gift for book lovers of all ages. You can make a bunch of them and give them as a set or include them in a gift bag with some books.
So next time you’re looking for a craft project, why not try making laminated bookmarks? It’s a DIY project that’s fun, easy, and will bring a smile to anyone’s face.
Easy DIY Bookmarks

If you’re a bookworm like me, you probably can’t resist the joy of finding a new bookmark for your collection. Instead of spending money on expensive bookmarks from a catalogue, why not create your own? DIY bookmarks are not only fun to make, but they also make great gifts for fellow book lovers.
One easy project for creating your own bookmarks is using laminating film. To start, gather some supplies: cardstock or cardboard, scissors, a hole puncher, and your favorite designs or images to use as the bookmark decoration. Laminating film can be found at your local craft store or online, and it comes in different finishes such as matte, glossy, or even holographic.
To make the bookmarks, begin by cutting the cardstock or cardboard into the desired bookmark shape. You can choose traditional rectangular bookmarks, or get creative with unique shapes like hexagonal or diamond. Next, use the hole puncher to create a hole at the top corner of the bookmark, where a ribbon or tassel can be added for extra decoration.
Once you have your bookmark shape ready, it’s time to laminate. Place the bookmark between the laminating film sheets, making sure all edges are aligned. Run the laminating pouch through a thermal laminator, following the machine’s instructions. If you don’t have a laminator, you can also use self-adhesive laminating sheets or clear packing tape to protect your bookmark.
After laminating, trim the excess film around the bookmark, leaving a small border. You can also use decorative edge scissors to give your bookmark a unique look. If you want to add some pizzazz, consider using stencils or embossing designs to personalize your bookmarks even further.
Get creative with your bookmark decorations! You can use stickers, washi tape, or even dried flowers to create a mini garden on your bookmark. If you have a die-cutting machine like a Sizzix or a Cricut, the possibilities are endless. You can cut out shapes or letters from scrapbooking paper or fabric to decorate your bookmarks.
Once your bookmarks are ready, you can store them in a folio or in a dedicated corner of your bookshelf. You can also make a mini notebook or a monthly calendar with your handmade bookmarks, so you never lose track of your reading progress.
DIY bookmarks are not limited to reading purposes; they can also be used as decorations. For example, you can create Halloween-themed bookmarks with spooky designs, or make Valentine’s Day bookmarks with hearts and roses. The sky’s the limit!
If you’re a passionate crafter, why not turn your bookmark-making hobby into a small business? You can sell your unique creations online or at craft fairs. People love handmade items, and bookmarks are a perfect gift for any book lover.
So, next time you feel the need for a new bookmark, don’t just settle for what the store has to offer. Take some time to create your own laminated bookmark, and enjoy the process of making something with your own hands. Happy crafting!
Multiplicity Crafts
At Multiplicity Crafts, we love all things handmade and we’re always looking for new and creative projects to make. We believe that crafting is a passion that feeds the soul, and that’s why we’re here to share our tips and tricks with you.
One of our favorite crafts is making laminated bookmarks. These bookmarks are not only functional, but they also add a touch of color and decoration to any book.
To make these laminated bookmarks, you’ll need some cardstock, a laminating machine, and some yarn or ribbon. First, cut out a long strip of cardstock in the size and width you prefer. Then, use a corner puncher to round the edges of the strip. You can also use a hexagon or diamond puncher for a unique shape.
Next, choose your design for the bookmark. You can either stamp a design using stencils or a stamparatus, or you can use patterned papers or stickers. Be as creative as you like! If you’re feeling a bit more adventurous, try making a shaker bookmark by adding a tiny pocket and filling it with confetti or tiny sequins.
Once you have your design ready, laminate the strip of cardstock using a laminating machine. Be careful to leave a small border around the edge to prevent the lamination from peeling off. Once laminated, trim any excess lamination and punch a hole at the top of the bookmark for the yarn or ribbon to pass through.
To finish off your bookmark, feed the yarn or ribbon through the hole and tie a knot at the ends. You can also add some beads or charms for extra decoration. Now you have a beautiful and durable laminated bookmark to keep your place in your favorite books.
At Multiplicity Crafts, we have a wide range of other projects too. From handmade greeting cards and gift favors to DIY room decorations and coloring notebooks, there’s something for everyone. We also have a passion for creating unique paper crafts, such as flip books, bunting, and embossing projects.
If you’re looking for a fun and easy craft to try, why not make a laminated bookmark? It’s a great way to use up scrap paper and it’s a wonderful gift idea for friends and family. Plus, you can never have too many bookmarks!
So, come and visit our store or browse our online shop for all your crafting needs. We’re always adding fresh and new designs, so you’ll never run out of ideas. And if you’re in need of some inspiration, our friendly staff will be more than happy to assist you.
SIZZIX

Sizzix is a room that is sure to feed your creativity and embossing needs. This brand offers a wide selection of tools and dies to treat your projects with beautiful designs. Their catalogue is packed with innovative products, including the popular stepper and hexagonal dies. Whether you want to have notebooks, handbag decorations, or monthly calendars, Sizzix has you covered.
One of their featured products is the Sizzix Big Shot die-cutting machine. This versatile tool allows you to create a multiplicity of projects, from notebooks to gift favors. With the Sizzix Big Shot, you can easily laminate your bookmarks to protect them from wear and tear.
Sizzix has a variety of dies to choose from, including the Sizzix Bigz L die, which is perfect for creating large projects such as wedding decorations or party favors. The Sizzix Thinlits die is great for creating intricate designs, while the Sizzix Framelits die comes in handy for creating shaker cards.
When using Sizzix dies, it’s important to be careful and take proper care of them. The Sizzix Multipurpose Platform allows you to use different dies and materials together. Just make sure to use the proper sandwich for your die and follow the instructions in the Sizzix user manual.
To add decorative touches to your projects, Sizzix offers a selection of stencils and embossing folders. You can create a bunting or diamond pattern, add a heart or rose design, or even create a tree or hexagon pattern. The possibilities are endless!
Sizzix also has a variety of accessories, such as the Sizzix Magnetic Sheets, which can be used to store your dies. They also offer a range of color options, from matte to holographic, so you can customize your creations to your liking.
If you’re looking for inspiration, Sizzix has a blog where they share tips and tutorials on how to use their products. They also have a monthly newsletter, where they feature customer projects and offer exclusive deals. So, if you’re a Sizzix fan, be sure to sign up!
In conclusion, Sizzix is a brand that offers a wide range of tools, dies, and accessories to help you create stunning projects. Whether you’re a beginner or an experienced crafter, Sizzix has everything you need to make your projects stand out. So get your Sizzix dies and start creating!
Sources
Here are some sources where you can find materials and tools for creating laminated bookmarks:
- Handbag Window Treat – A website that offers a wide variety of laminating pouches and supplies.
- Organiser November – An online store that sells laminating machines, pouches, and accessories.
- Embossing which Tree – A craft store that carries embossing powders and tools for adding texture to your bookmarks.
- Papers Favors This – A shop that specializes in unique and decorative papers for crafting purposes.
- Crafters Tiny Chipboard – A store that sells chipboard shapes and embellishments, perfect for adding dimension to your bookmarks.
- Large Mini Heart Tips – A blog that offers tips and tutorials on creating laminated bookmarks with heart-shaped designs.
- About Laminated Gift – An online resource that provides information and ideas for creating laminated gifts, including bookmarks.
- Shadow Stencils They – A company that sells stencils for creating shadow effects in your laminated bookmark designs.
- Crafts Really Happy – A website that offers a variety of crafting supplies, including laminating sheets and tools.
- Stamparatus – An innovative stamp positioning tool that can be used to create precise designs on your laminated bookmarks.
- Holographic Arts – A shop that specializes in holographic papers and materials for adding a unique touch to your laminated bookmarks.
- Designs Bookmarks You’re – A blog that features inspiring designs and ideas for creating laminated bookmarks.
- Alinacraft – A craft store that offers laminating machines, pouches, and other supplies for your bookmark projects.
- Sizzix Stepper Bunting – A brand that sells cutting machines and dies, which can be used to create intricate designs for your bookmarks.
- Corner to Cantilever – A blog that shares step-by-step tutorials on creating laminated bookmarks with unique and functional designs.
- Laminating Passion – An online community of crafters who share their laminated bookmark projects and tips.
These sources provide a wide range of options for laminating materials, tools, and inspiration to help you create beautiful and durable bookmarks.


