
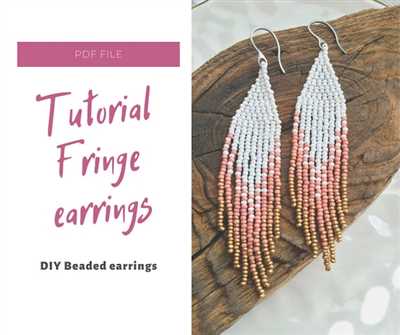

If you’re into DIY jewellery and love to explore various techniques, then beading earrings is the perfect project for you. Beading earrings can be a fun and creative way to work with gemstones, seed beads, and other jewelry materials. In this tutorial, we will show you how to make beautiful beaded earrings that won’t take up too much of your time and are easy to create.
Before we dive into the steps, let’s talk about the supplies you’ll need. You’ll want to have a pair of needle-nose pliers, wire cutters, various sizes of beads (including seed beads and gemstones), earring hooks or posts, and thread. Kernowcraft, an online shop for jewellery supplies, offers a wide variety of bead choices that you can explore to find the perfect ones for your earrings.
Now, let’s get started! The first step is to choose the design for your earrings. Whether you prefer simple and elegant or bold and colorful, there are endless possibilities. Once you have a design in mind, it’s time to start threading the beads onto your thread. Make sure to leave a little bit of extra thread at the end to make it easier to work with later.
Next, use your needle-nose pliers to hold the end of the thread and make a loop. This loop will hold the beads in place and keep them from falling off. It’s important to make sure the loop is secure, so give it a little tug to test its strength. Once you’re satisfied with the loop, cut off any excess thread using your wire cutters.
Now it’s time to attach the earring hook or post to your beaded design. Take the loop you created in the previous step and open it slightly using your pliers. Slip the earring hook or post onto the loop, then close the loop tightly to secure it in place. Give it a little tug to make sure it’s secure before moving on to the next earring.
Repeat these steps for the second earring, making sure to create a matching design. Once both earrings are complete, give them a final inspection to make sure everything is secure and in place. If you have any loose threads or beads, use your pliers and cutters to tidy up the design.
Now you’re ready to show off your beautiful beaded earrings! Wear them with pride and let your creativity shine. Remember, practice makes perfect, so don’t be discouraged if your first few attempts don’t turn out exactly as you envisioned. With time and practice, you’ll be making stunning earrings that everyone will love.
With over forty different beading projects available, anyone can learn how to bead earrings. So why not give it a try and see how much fun it can be? Whether you’re a beginner or an experienced beader, creating beaded earrings is a great way to express your style and add a personal touch to your jewellery collection. Get started on your beading journey today and discover the endless possibilities of this beautiful craft.
DIY Seed Bead Earrings
If you love jewelry and are ready to explore making your own pieces, DIY seed bead earrings are a perfect project for you. Threading tiny seed beads onto wire and creating beautiful designs has never been easier. In this tutorial, we will guide you through the steps of creating your own unique seed bead earrings.
To start, gather the necessary supplies. You will need seed beads, earring backs, wire, needle-nose pliers, and wire cutters. You can find these materials at various jewelry supply stores, such as KernowCraft. Make sure to choose seed beads in different colors to add a pop of personality to your earrings.
First, cut a 10-inch length of wire using the wire cutters. Hold one earring back with the needle-nose pliers and thread the wire through the hole in the back. Make a small loop at the bottom of the wire by wrapping it around the pliers, then use your fingers to shape the wire into a teardrop or any other desired shape.
Next, it’s time to start beading! Thread a seed bead onto the wire and push it down to the bottom of the loop. Repeat this step, adding as many seed beads as you like to create your desired pattern. You can experiment with different colored beads or even add small gemstones for an extra touch of elegance.
Once you have finished beading, make another loop at the top of the wire to secure the beads in place. Use the pliers to bend the wire into a hook shape, allowing it to hang from the earring back. Make sure to close the loop tightly so that the beads won’t come loose.
Repeat these steps for the second earring, and you’re done! You now have a beautiful pair of DIY seed bead earrings that you can proudly wear or gift to someone special. The best thing about this technique is that anyone can do it, even if you’ve never tried beading before.
Seed bead earrings are a fun and versatile project that allows for endless creativity. Whether you prefer a minimalist design or a rainbow of colors, the choice is yours. Experiment with different bead sizes and shapes to create unique and eye-catching designs.
If you’re looking for inspiration, websites like Pinterest and Etsy have a plethora of seed bead earring designs that you can explore. With so many materials and techniques to choose from, the possibilities are truly endless.
So, if you’re ready to get started, grab your supplies and unleash your inner jewelry designer. With a little bit of practice, you’ll be creating beautiful seed bead earrings that are sure to turn heads. Enjoy the process and embrace your creative side!
Beaded Earrings DIY
If you love jewelry and want to add a personal touch to your collection, creating your own beaded earrings is a perfect DIY project for you. With just a few basic supplies and some simple steps, you can make beautiful earrings that will make a statement.
To start, gather all of the materials you’ll need for this project. You’ll want to have a pair of needle-nose pliers, wire cutters, various beads (such as seed beads or gemstones), earring hooks or posts, and beading thread.
Once you have your supplies ready, it’s time to start creating your earrings. First, choose the design you want to create. There are endless possibilities when it comes to bead designs, so explore different techniques and find one that suits your style.
The first step is threading the beads onto your beading thread. Use a needle if you’re working with smaller beads or if they have tiny holes. Make sure to leave a bit of thread at the end for securing the beads.
Next, take your needle-nose pliers and use them to hold the earring post or hook in place. Thread the end of your beading thread through the loop at the top of the earring post or hook and pull it through until the beads are snug against the bottom.
Now that the beads are in place, secure them by stitching the thread around the loop at least seven times. This will ensure that your beads won’t come loose over time.
After stitching the thread several times, cut off any excess and use your pliers to flatten the end of the wire against the earring back. This will hold everything in place and create a clean finish.
If you want to add more dimension to your earrings, you can also create layered designs. Simply repeat the steps above for each layer, threading the beads above the previous layer and securing them in place. This will give your earrings a unique and eye-catching look.
Once you’ve finished making your earrings, take a step back and admire your work. You’ve created a beautiful piece of jewelry that is unique to you. Not only will you enjoy wearing them, but you can also give them as gifts to loved ones.
Remember, creating beaded earrings is a fun and rewarding DIY project that anyone can do. With a little time and patience, you can create stunning earrings that will be the envy of those around you.
So why not give it a try? Head over to your local craft shop or shop online for supplies, and get ready to unleash your creativity. Happy beading!
Explore Gemstone Jewellery Making Supplies With Kernowcraft
At Kernowcraft, we love all things gemstone and jewellery making. If you have a passion for crafting beautiful pieces of jewellery, then you can’t go wrong with our extensive range of gemstones and jewellery making supplies.
Whether you’re new to jewellery making or you’re an experienced DIY enthusiast, Kernowcraft is the perfect place to shop for all your jewellery making needs. We offer a wide variety of gemstone beads in different colors, shapes, and sizes, as well as seed beads and wire for creating stunning designs.
If you’re not sure where to start, our step-by-step tutorials and DIY projects will guide you through the process of making your own earrings. From basic techniques like threading beads onto wire, to more advanced stitching and weaving techniques, we have everything you need to make your own unique pieces.
One of our favorite techniques is creating beaded earrings. With just a few materials and some basic tools like needle-nose pliers and wire cutters, you can make beautiful earrings that will be the envy of everyone. Whether you prefer simple and elegant designs or bold and colorful creations, we have something for everyone.
With Kernowcraft, you won’t be limited to just one type of earring. We offer a wide variety of earring backs, from stud backs to drop earrings, so you can choose the style that suits you best. And with our vast selection of gemstones, you can create earrings that match any outfit or occasion.
Looking for something a little more unique? Why not try our rainbow beaded earrings tutorial? This fun and colorful project will guide you through the process of threading beads onto wire and creating a stunning rainbow pattern. The end result is a pair of earrings that will make a statement wherever you go.
So whether you’re a seasoned jewellery maker or a beginner looking to try something new, Kernowcraft has everything you need to bring your creative vision to life. Explore our gemstone jewellery making supplies today and unleash your creativity!
Explore Gemstone Beads
When it comes to beading earrings, gemstone beads are a popular choice for adding a touch of natural beauty to your designs. Gemstone beads come in a wide variety of shapes, sizes, and colors, offering endless creative possibilities for your projects.
At Kernowcraft, we offer a wide selection of beautiful gemstone beads for all your beading needs. Whether you’re a beginner or an experienced beader, exploring gemstone beads can add a unique and eye-catching element to your designs.
When working with gemstone beads, there are a few key things to keep in mind. First, make sure you have the basic supplies such as needle-nose pliers, wire cutters, beading thread, and earring backs. These tools will be essential for creating your earrings.
Before starting your project, it’s always a good idea to explore the various gemstone bead options available. From colorful seed beads to larger, more vibrant gemstones, there is something for everyone’s taste and style.
When it comes to threading your gemstone beads, there are different techniques you can use. One common method is using a beading needle to thread the beads onto your earring wire, creating a beaded drop. Another technique involves stitching the beads together using beading thread to create a beaded pattern.
Once you have your gemstone beads and tools ready, it’s time to start making your earrings. The first step is to thread your chosen beads onto your earring wire or beading thread. You can use a basic threading technique or get creative with different bead combinations.
As you work, make sure to secure your beads in place with small knots or crimps. This will ensure that your earrings stay intact and hold their shape. If you’re having trouble threading the beads, a pair of needle-nose pliers can help grip and guide the wire.
Once you’ve finished threading your beads, it’s time to attach the earring backs. Be sure to double-check that the earring backs are secure and won’t easily come off. You can use additional tools like pliers to make sure they are tightly fastened.
With your gemstone bead earrings complete, you’ll have a beautiful and unique piece of jewellery to wear or give as a gift. Gemstone beads add a touch of elegance and sophistication to any outfit, and they’re sure to make a statement.
So, if you’re looking to add a pop of color and sparkle to your beaded earrings, explore the wide range of gemstone beads available at Kernowcraft. With over forty years of experience in the industry, they offer high-quality beads and all the supplies you need for your beading projects. Start exploring gemstone beads today and create your own stunning designs!
Shop Jewellery Pliers Cutters >
 “>
“>
When it comes to creating beautiful beaded earrings, having the right tools is essential. Jewellery pliers and cutters are two must-have tools for any beading project. They make it easier to work with various materials, such as wire, gemstones, and beads.
Before you start exploring different earring designs and techniques, make sure you have the right supplies. Jewellery pliers and cutters can be found in various sizes and shapes, so choose the ones that work best for you. Needle-nose pliers are great for holding small beads and wire, while cutters help you trim excess wire or thread.
Once you have your materials and tools ready, it’s time to start creating your beaded earrings. There are countless techniques and designs to choose from, but a basic beading stitch is a good place to start. Threading beads onto wire or thread and stitching them in place will give you a solid foundation for your earring designs.
Step by step, you can follow a tutorial or come up with your own designs. Start by threading a seed bead or a gemstone onto your wire or thread. Then, hold the bead in place with your pliers or fingers. Add more beads, one by one, and continue until you have your desired earring length.
Once you’re done adding beads, it’s time to finish off your earrings. Depending on the design, you can use pliers to create a loop at the top of your earrings for attaching ear wires. If you prefer a drop earring style, you can simply attach a jump ring to the top of your beaded strand.
When it comes to choosing beads for your earrings, the options are endless. You can use seed beads for a delicate and intricate look, gemstones for a pop of color, or even glass beads for a rainbow effect. Combining different types and sizes of beads can create unique and eye-catching designs.
If you’re still having trouble deciding on a design or finding the right supplies, there are plenty of online sources to explore. Websites like Kernowcraft offer a wide range of beading materials, tutorials, and project ideas.
Whether you’re a beginner or an experienced beader, making your own earrings can be a fun and rewarding DIY project. With just a few basic tools and some time, you can create beautiful jewellery that won’t break the bank.
So, if you love jewellery and want to try your hand at making your own earrings, shop jewellery pliers and cutters before you start. These tools will make your beading projects much easier and more enjoyable.
Basic Earring Beading Tutorial

If you’re interested in making your own earrings, beading is a great technique to explore. With just a few materials and some basic steps, you can create beautiful earrings that anyone will love. In this tutorial, we will show you how to make a basic pair of beaded earrings.
Supplies:
- Seed beads (various colors)
- Wire cutters
- Needle-nose pliers
- Earring hooks
- Post backs
Step 1:
Before you begin, gather all your materials and make sure you have everything you need. You can find the supplies at a beading shop or online.
Step 2:
Begin by threading your needle with the beading thread. Make sure it is long enough to hold all the beads you will be using without running out.
Step 3:
Hold the earring hook or post back in one hand. Take the needle and thread it through the small hole on the back of the earring hook or post back. Pull the thread all the way through until the earring hook or post back is snug against the bottom of the thread.
Step 4:
Start adding the beads onto the thread. You can use any colors or designs you want to create a unique earring. You can mix and match different colored beads to create a rainbow or use just one color for a more uniform look.
Step 5:
To create a beaded pattern, thread the needle through the beads in a specific order. There are various beading stitches you can use, such as the peyote stitch or the brick stitch, to create different patterns. For this basic tutorial, we will simply thread the beads onto the thread in the order of our choice.
Step 6:
Continue threading the beads onto the thread until you reach the desired length for your earrings. You can make them as long or as short as you like, but a typical length for earrings is about two to three inches.
Step 7:
Once you have reached the desired length, thread the needle back through the beads from step 4, going in the opposite direction. This will secure the beads in place and make sure they won’t come loose.
Step 8:
When you have finished threading the needle through the beads, tie a knot in the thread to secure the end. You can also add a drop of glue to the knot for extra security.
Step 9:
Using wire cutters, trim the excess thread from the top of the earrings. Make sure to leave a small tail, around a quarter inch, to prevent the beads from coming loose.
Step 10:
Attach the earring hook or post back to the top of the earrings using needle-nose pliers. Make sure it is secure and won’t come off easily.
Step 11:
Repeat all the steps above to make the second earring, ensuring they match the first one in length and design.
Step 12:
Once both earrings are ready, wear them or gift them to someone special. It’s a fun and creative way to show off your DIY skills and have a unique piece of jewelry to wear.
By following these basic steps, you can create a variety of earring designs using different beading techniques and materials. Beading earrings is a versatile and satisfying craft that allows you to create beautiful jewelry in no time. So grab your supplies and get ready to start making those stunning earrings!
Источники: Kernowcraft
How to Make Bead Earrings 10 Steps
Creating jewellery is often a fun and rewarding hobby. Making your own bead earrings is a great way to explore your creativity and design unique accessories. Whether you’re a beginner or an experienced DIY enthusiast, this step-by-step tutorial will guide you through the process of making beautiful earrings using beads and wire.
Step 1: Gather all the necessary supplies. You will need a variety of beads in different colors and sizes, gemstones if desired, wire, earring hooks, needle-nose pliers, and wire cutters.
Step 2: Choose the beads and gemstones you want to use. Bead earrings can be made with seed beads, gemstones, or any other small beads you prefer. Have fun exploring different color schemes and designs.
Step 3: Cut a piece of wire of about thirty to thirty-five centimeters long. This will vary depending on the size and style of earrings you want to make.
Step 4: Thread the beads onto the wire. You can create a pattern or simply mix and match different colors and sizes as you go. The choice is yours.
Step 5: Once you have threaded all the beads onto the wire, use needle-nose pliers to create a loop at the end of the wire. This will prevent the beads from sliding off.
Step 6: Attach the earring hook to the loop you just created. Make sure it is secure and won’t come off easily.
Step 7: Repeat steps 3 to 6 for the second earring.
Step 8: Take a moment to admire your work! You now have a lovely pair of handmade bead earrings ready to wear or give as a gift.
Step 9: If you want to add extra flair to your earrings, you can attach smaller beads or gemstones to the bottom of the earring design. This will give them a more elegant and colorful look.
Step 10: Don’t be afraid to experiment and try out different techniques. Beading and jewelry making offer endless possibilities for creativity. Have fun and enjoy the process!
There are many online sources and shops where you can find the materials needed for beading, such as bead backs, wires, and gemstones. Kernowcraft and DIY Jewelry Making are great places to start if you’re unsure where to shop.
Keep in mind that making bead earrings does require some basic beading and threading skills. However, even if you’re a beginner, with a little practice, you’ll soon be creating stunning earrings that won’t be mistaken for store-bought ones!
Sources
When it comes to beading earrings, there are various sources you can explore for materials, tutorials, and designs. Here are some of the sources you can turn to:
| 1. Local Bead Shop | If you’re new to beading, visiting a local bead shop is a perfect place to start. Often they have a wide range of beads, gemstones, and tools, as well as helpful staff who can guide you in your bead shopping. |
| 2. Online Beading Shops | There are many online shops that specialize in beading supplies. These shops offer a wide variety of beads, wires, pliers, and other materials needed for earring making. |
| 3. DIY Blogs and Websites | If you prefer to learn beading techniques and designs on your own, there are plenty of DIY blogs and websites that offer step-by-step tutorials. These tutorials can guide you through the basic beading technique to create beautiful earrings. |
| 4. Beading Magazines | Beading magazines often feature different earring designs and provide instructions on how to make them. They’re a great source of inspiration and can also help you learn new techniques. |
| 5. Online Beading Communities | Joining online beading communities or forums can connect you with experienced beaders who can offer advice and tips. You can also share your own creations and get feedback from fellow beaders. |
| 6. YouTube Tutorials | YouTube has a vast collection of beading tutorials where you can find step-by-step videos on how to make different types of earrings. Watching someone work can make it easier to understand the process. |
| 7. Kernowcraft | Kernowcraft is an online supplier of gemstones, beads, and jewelry-making tools. They offer a wide selection of high-quality materials, making it a great source for finding unique and beautiful beads for your earrings. |
By utilizing these sources, you’ll have the materials and knowledge to create your own stunning earrings. Be sure to explore and find what works best for you!


