

Are you looking for a successful budgeting system that will help you take control of your finances? If so, then you need to try using cash envelopes. With this DIY option, you can easily track and limit your expenses by assigning a specific amount of cash to each category.
Here are the steps to make your own cash envelopes:
- Step 1: Print Out the Envelope Templates
- Step 2: Cut Out the Envelopes
- Step 3: Fold and Write
- Step 4: Fill the Envelopes with Cash
- DIY Cash Envelope Option 1- Print & Fold Envelopes
- Step 1: Print the DIY Cash Envelopes
- Step 2: Cut it out, fold it up to make envelopes
- Step 3 Write the budgeted amount and category on the front
- Step 4 Stuff the envelopes with your cash
- Free Cash Envelopes
- So let’s recap the steps you need to take to start using the cash envelope system
- Sources
Step 1: Print Out the Envelope Templates
Firstly, you need to download and print out the free printable envelope templates. These templates are available from various sources online and come in a variety of designs. Choose the one that you like the most and will make you excited to use on a daily basis.
Step 2: Cut Out the Envelopes
Once you have the templates printed out, it’s time to get out your scissors and start cutting. Carefully cut out each envelope template along the designated lines.
Step 3: Fold and Write
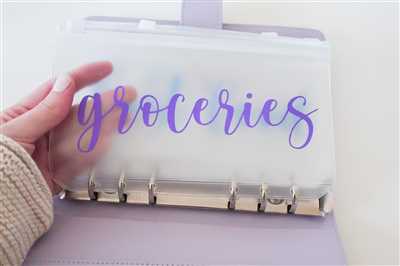
After cutting out the envelopes, it’s time to fold them into shape. You will notice that each template has folding lines marked. Follow these lines and create neatly folded envelopes. Once folded, use a pen or marker to write the category name on the front of each envelope, such as “Groceries”, “Entertainment”, or “Eating Out”.
Step 4: Fill the Envelopes with Cash
Now that you have your cash envelopes ready, it’s time to fill them up with the budgeted amount of cash for each category. Take the amount of cash you need for each category and stuff it into the corresponding envelope. This will help you visually see how much money you have left in each category.
By following these simple steps, you can easily create your own cash envelopes and start moving towards a more organized and successful budgeting system. Let’s print out the templates, cut them out, fold and write on them, and finally, fill them with the cash you need. With this system, you will have a better understanding of your expenses and be able to stay within your budgeted amount. So, why wait? Start making your cash envelopes today and take control of your finances!
If you found this article helpful or have any other tips to share, please leave a comment below. Good luck with your cash envelope system!
DIY Cash Envelope Option 1- Print & Fold Envelopes
If you need a system to budget your expenses and keep track of your cash, cash envelopes can be a successful option. There are different ways to make your own cash envelopes, and in this article, we will explain the first option: printing and folding envelopes.
Before you start, you will need a few things:
- Printables: You can find free printable cash envelope templates online. There are many sources available, so choose the ones that best fit your needs.
- Printer: Make sure you have a printer and enough ink and paper to print out the templates.
- Scissors: You’ll need scissors to cut out the printed envelopes.
- Glue or tape: This will be used to secure the envelope flaps.
- Cash: Of course, you will need cash to put inside the envelopes.
Now let’s move on to the steps:
- Find and download the printable cash envelope templates that you want to use. There are different designs and categories available, so choose the ones that match your style and budgeting needs.
- Print the templates on your printer. Make sure to select the correct paper size and adjust the print settings to ensure a clear and crisp output.
- Cut out the printed envelopes along the outer lines.
- On the outside of each envelope, write the category or purpose for the cash. For example, you could have envelopes for groceries, gas, entertainment, etc.
- Fold the envelope along the dotted lines and secure the side flaps using glue or tape.
- When you receive cash, open the envelope corresponding to the budgeted category and place the cash inside. This will help you keep track of the amount of cash you have left for each category.
With this DIY cash envelope option, you can make your own envelopes that are tailored to your specific budgeting needs. It’s a simple and cost-effective way to stay organized and accountable for your expenses. Give it a try and let’s start budgeting!
Step 1: Print the DIY Cash Envelopes
To start the process of creating your own cash envelope system, you will first need to download and print the DIY cash envelope printables. There are several sources online where you can find free printable cash envelope templates.
When choosing a template, consider how many envelopes you will need and how you plan to categorize your expenses. There are options with pre-printed categories, as well as blank templates that allow you to write in your own categories.
Once you have chosen a printable, open the file and print it out. Make sure to print it on a sturdy paper or cardstock so that your envelopes will be durable.
After printing, take a moment to write down the category or amount on the front of each envelope. This will help you stay organized and keep track of your budgeted cash. For example, you can write “groceries” or “$100” on the outside of the envelope.
Next, cut out each envelope template along the outer lines. Fold the template as indicated in the instructions provided with the printables. You can use a ruler or bone folder to help you achieve clean, crisp folds.
By following these steps, you are now ready to move on to the next step in the process of creating your successful cash envelope system.
Let’s recap the process so far:
- Download and print the DIY cash envelope printables.
- Choose a template and open the file.
- Print the templates on sturdy paper or cardstock.
- Write the category or amount on the front of each envelope.
- Cut out each envelope template along the outer lines.
- Fold the templates as instructed.
Now that you have your cash envelopes ready, it’s time to start filling them with the allocated amounts for each category of expenses. This will help you stay on track with your budget and make conscious spending decisions.
If you have any questions or need further clarification on any of the steps, feel free to comment below and we will be happy to assist you.
Step 2: Cut it out, fold it up to make envelopes
Now that you have your budgeted amounts for each category, it’s time to start the process of creating your cash envelope system. In this step, we will be cutting out and folding the printable envelopes.
1. Download and print the free cash envelope printables. You can find these online or create your own using a template.
2. Cut out the envelopes along the outer edges. You should have one envelope for each category or expense you have budgeted for. Make sure to cut along the lines carefully to ensure a clean edge.
3. If you want, you can write the category or expense name on the front of each envelope using a pen or marker. This will help you easily identify each envelope when you start using the system.
4. To fold the envelopes, start by folding the sides inward towards the center. Then, fold up the bottom flap and secure it with glue or tape. You can also use a stapler if you prefer.
5. Repeat this process for all your envelopes. Once you have completed folding all your envelopes, your cash envelope system is ready to use.
Now that you have your envelopes ready, let’s move on to the next step in the process – organizing and filling your envelopes with the budgeted cash amounts.
Step 3 Write the budgeted amount and category on the front
Now that you have your cash envelopes all set up, it’s time to move on to the next step in the process. Step 3 is all about adding the budgeted amount and category to the front of each envelope.
To do this, you can either handwrite the information or print it out. If you choose to print, then you can use free printables that are available online. Simply search for “cash envelope printables” and you will find a variety of options to choose from. Once you have your printables, you can print them out and cut them to the appropriate size.
Next, fold the envelope along the lines so that the category is on the front and the budgeted amount is on the back. This way, when you open the envelope, you will see the category first and the budgeted amount second.
Take a moment to recap the previous steps. Step 1 was all about gathering the materials you need to make your cash envelopes, and Step 2 was about cutting out the envelope templates. Now, with Step 3, you are ready to write the budgeted amount and category on the front of each envelope.
When writing the budgeted amount, be sure to be specific and clear. For example, instead of writing “groceries,” write “groceries – $200.” This way, you know exactly how much you have allocated for each category.
The purpose of writing the budgeted amount and category on the front of each envelope is to create a system that will help you stay organized and on track with your expenses. By having the information readily available on the front of the envelope, you will be able to easily see how much you have left to spend in each category.
With Step 3 complete, you are now one step closer to a successful DIY cash envelope system. So, let’s move on to Step 4!
Step 4 Stuff the envelopes with your cash
Now that you have your budgeted amounts for each category, it’s time to take out the cash and start stuffing your envelopes. Here’s how to do it:
- Print out the cash envelope printables. You can download and print them for free from various sources.
- Cut out the envelope templates along the outside lines.
- Write the category name on the front of each envelope. For example, “Groceries”, “Entertainment”, “Gas”, etc.
- Take out the amount of cash that you have budgeted for each category.
- Start with the first envelope and fold it along the lines to create the envelope shape.
- Stuff the cash inside the envelope and seal it.
- Repeat this process for all the other envelopes, using the appropriate amount of cash for each category.
By following this system, you can easily keep track of your expenses and know exactly how much you have left in each category. When you need to make a purchase, simply take out the cash from the corresponding envelope. This will help you stay on track with your budget and avoid overspending.
Remember to let us know in the comment section if you have any other successful DIY budgeting tips or if you have any questions. Happy budgeting!
Free Cash Envelopes
When it comes to managing your expenses, one effective method is to use cash envelopes. By assigning a specific amount to each envelope, you can easily track your spending in different categories. If you’re interested in using cash envelopes, there are several options available for free printables that you can use.
Here are the steps to make your own free cash envelopes:
- First, find a printable cash envelope template that suits your needs. There are many websites that offer free printables, so you can choose the design you like. Some templates may already have categories printed on the front, while others offer blank envelopes for you to write your own categories on.
- Once you have selected a template, download and print it on a piece of paper. Make sure to print enough envelopes for each category you need.
- Using scissors or a paper cutter, cut out each envelope template along the designated lines.
- Next, fold each envelope along the fold lines indicated on the template. This will form the main pocket of the envelope.
- Write the category name or expense on the outside of each envelope. This will help you identify the purpose of each envelope.
- If you have budgeted a specific amount for each category, write that amount on the front of the envelope as well.
- Once you have completed all the envelopes, you can start filling them up with cash. Take the amount you have budgeted for each category and put it inside the corresponding envelope.
- You now have your cash envelopes ready to use! The process of using cash envelopes is simple. When you need to spend money in a specific category, take the envelope out, open it up, and use the cash inside.
- As you spend money from the envelopes, make sure to keep track of your expenses. You can either write it down or use a budgeting app to record the transactions.
With these free cash envelope printables, you can easily create a successful budgeting system that helps you stay on track with your finances. By using cash instead of relying on credit cards or online payments, you will be more mindful of your spending and less likely to overspend.
So, if you’re looking for a convenient and effective way to manage your expenses, try making your own cash envelopes with these free printables. Let’s start the process of moving towards a more organized and budget-conscious lifestyle!
So let’s recap the steps you need to take to start using the cash envelope system
1. Download and print free cash envelope printables.
2. Cut out the envelopes along the outer lines.
3. Fold the envelopes along the dotted lines to create the pockets.
4. Write the category of your expenses on the front of each envelope.
5. Budget the amount of cash you will need for each category.
6. Open up the envelopes and stuff them with the budgeted cash.
7. Optional: Use other printable options like tracking sheets or expense logs to help you stay on top of your expenses.
8. Start using the envelopes to pay for your expenses. When you need to make a purchase, take the corresponding envelope with the cash inside and use it to pay.
9. After each successful transaction, write the amount spent and any comments on the outside of the envelope to track your spending.
By following these steps, you will have a DIY cash envelope system that can help you stay on budget and manage your expenses effectively. So why wait? Download the printables, make your envelopes, and start using the cash envelope system today!
Sources
If you’re looking to start a cash envelope system, there are a few key sources you’ll need to get started. Here are the steps:
1. Printables
You’ll need to find printable cash envelope templates to use for your budgeting system. There are many free options available online that you can download and print.
2. Envelopes
Once you have your printables, you’ll need envelopes to cut out and fold into cash envelopes. You can use plain envelopes or get creative with colorful ones to make the process more enjoyable.
3. Write and Label
After you’ve cut and folded your envelopes, it’s time to write the categories on the front. These categories should align with the budgeted expenses you have identified in your budgeting process.
4. Fill with Cash
Now that your envelopes are ready, it’s time to fill them with cash. Take the amount of money you have budgeted for each category and put it in the corresponding envelope.
By using the cash envelope system, you can keep track of your spending and make sure you don’t overspend in any category. When you need to make a purchase, take the cash out of the envelope. If you run out of cash, it’s a sign that you need to cut back on your spending in that category.
The cash envelope system is a popular and successful way to budget your money. Let’s recap the steps:
- Start by printing out the cash envelope printables.
- Cut and fold the envelopes.
- Write the categories on the front of each envelope.
- Fill each envelope with the budgeted cash amount.
With these steps, you’ll have a system in place that will help you stay organized and on track with your budgeting goals. It’s a simple DIY option that can be customized to fit your needs. So go ahead, start the process and let’s get you on your way to a successful budgeting journey!
For other helpful tips and printables, make sure to check out the comment section where you can find additional resources and suggestions from other users who have successfully implemented the cash envelope system.


