

An e-portfolio, or electronic portfolio, is a digital collection of artifacts that showcases a student’s work and achievements over time. It provides a centralized place for students to display their best work, share it with others, and have control over how it is presented.
Creating an e-portfolio can be a valuable step in your academic or professional journey. Whether you are an arts, visual technology, or any other discipline, having an e-portfolio allows you to showcase your work to a wider audience and in a contextual and accessible manner. It also helps you to organize and review your own work, and select the best pieces to display.
If you are a student who wishes to create an e-portfolio, there are several options available to you. For example, many learning management systems, such as Canvas or Quercus, have built-in e-portfolio tools that you can use. These tools allow you to create and customize your e-portfolio, select the sections you want to include, and control who can view it.
Here are some steps you can follow to create your own e-portfolio:
Step 1: Choose a platform
First, you need to select a platform that will host your e-portfolio. As mentioned earlier, learning management systems like Canvas or Quercus often have e-portfolio features built-in. Alternatively, you can use dedicated e-portfolio platforms such as Pathbrite or Mahara. Research the available options and choose the one that best meets your needs.
Step 2: Set up your account
Once you have selected a platform, you will need to set up an account. This usually involves creating a username and password and providing some basic information about yourself. Make sure to use a secure password to protect your e-portfolio.
Step 3: Customize your e-portfolio
After creating your account, you can start customizing your e-portfolio. This includes selecting a layout or theme, choosing which sections to include (such as an about me section, resume, or examples of your work), and setting the privacy settings for each section. You can also change the order of the sections and add any additional information or media that you wish to display.
Step 4: Add your artifacts
The heart of your e-portfolio is the artifacts or examples of your work that you choose to display. Depending on your field of study, these artifacts can be anything from essays, presentations, or artwork, to code snippets or videos. Take your time to select the best examples that demonstrate your skills and achievements.
Step 5: Share and review
Once your e-portfolio is created and populated with your work, you can share it with others. You can provide a link to your e-portfolio on your resume, LinkedIn profile, or personal website. You can also share it with your instructors or potential employers to showcase your abilities. It’s a good idea to regularly review and update your e-portfolio to keep it current and relevant.
Creating an e-portfolio takes time and effort, but it can be a valuable tool in your academic or professional journey. It allows you to showcase your best work, control how it is presented, and share it with others in a meaningful and accessible way.
How do I create an ePortfolio in Quercus
If you are using the Quercus learning management system, you have the ability to create and manage ePortfolios within the platform. An ePortfolio is a digital collection of your work, which can include artifacts, reflections, and evidence of your learning and accomplishments. It provides a way for you to showcase your skills and knowledge to others, such as instructors or potential employers.
To create an ePortfolio in Quercus, follow these steps:
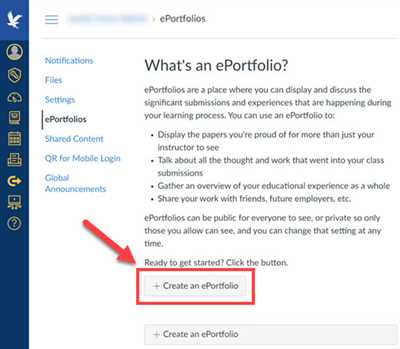
- Log in to your Quercus account and navigate to the “ePortfolios” section.
- Click on the “Create ePortfolio” button.
- Give your ePortfolio a name and a description. This will help others understand the purpose and content of your ePortfolio.
- Choose the settings that you want for your ePortfolio. You can select who can view your ePortfolio and whether or not others can edit or submit artifacts to it.
- Click on the “Create” button to finish creating your ePortfolio.
Once your ePortfolio is created, you can start adding content to it. Quercus provides a visual editor that allows you to easily create and edit the sections of your ePortfolio. You can add text, images, videos, and other media to showcase your work. You can also change the layout and order of your sections to best display your content.
In addition to creating new sections, you can also add existing content from other ePortfolios or course sites. This can be useful if you have already created an ePortfolio in a previous course or if you want to share your work with others outside of your current class. You can select the content you want to add and place it in your ePortfolio as a new section.
Quercus also allows you to control the visibility of your ePortfolio. You can choose to make it public, meaning that anyone can view it, or private, meaning that only people you select can access it. You can also set the visibility of individual sections within your ePortfolio, allowing you to share only certain parts of your work.
Creating an ePortfolio in Quercus is a great way to showcase your work and share your learning journey with others. It can help you demonstrate your skills and knowledge in a visual and contextual manner. Whether you are a student looking to showcase your work to potential employers or an instructor seeking to review and provide feedback on student portfolios, Quercus provides the tools and technology to support ePortfolio creation and sharing.
What is an ePortfolio
An ePortfolio, short for electronic portfolio, is a digital collection of a student’s work that showcases their achievements, skills, and experiences. It is a platform where students can create, organize, and share their work in a format that is easily accessible to others.
ePortfolios provide a space for students to document their learning journey, from the creation of artifacts to the editing and submission process. For example, an art student might create a section in their ePortfolio to display their sketches and paintings. They could also include written reflections on their artistic process and use multimedia elements to enhance their work.
The purpose of an ePortfolio is to allow students to showcase their work in a meaningful and contextual way. It provides a platform for students to share their work with others, such as teachers, peers, or potential employers. ePortfolios can be used to track progress over time, demonstrate skills and achievements, or serve as a showcase for a specific project or assignment.
Creating an ePortfolio involves selecting a platform or technology to host the portfolio, such as a website or a learning management system like Canvas or Quercus. Once a platform is selected, students can start building their ePortfolio by creating sections and organizing their work. They can choose to display their work in different formats, such as documents, images, videos, or audio recordings.
One of the advantages of using an ePortfolio is that it allows students to have control over their own work. They can decide who has access to their portfolio and can change the settings to allow for public or private viewing. This gives students the ability to tailor their ePortfolio to their specific needs and audience.
In summary, an ePortfolio is a digital collection of a student’s work that allows for easy organization, editing, and sharing. It serves as a platform for students to showcase their achievements, skills, and experiences in a meaningful and contextual way. It allows for control over who can view the portfolio and provides a flexible space for students to display their work.
Step 3: Select Your Technology
Once you have decided what purpose your eportfolio will serve, it is time to select the technology that will best help you achieve your goals. There are many different tools and platforms available for creating eportfolios, so you’ll want to review your options before making a decision. Consider the following factors when choosing the technology for your eportfolio:
- What features and functionality do you want your eportfolio to have?
- How much control do you want over the design and layout of your eportfolio?
- Do you want the ability to share your eportfolio with others and allow them to provide feedback?
- Do you want your eportfolio to be viewable outside of your own account or organization?
- Are there any specific artifacts or examples of your work that you would like to include in your eportfolio?
- Are there any specific settings or navigation options that you would like your eportfolio to have?
Once you have a list of your requirements, you can start researching the different technology options available. Some popular choices for creating eportfolios include Canvas, Quercus, and WordPress. Each of these platforms offers different features and benefits, so it’s important to consider how they align with your needs.
For example, if you are an arts student looking to create a visual eportfolio to display your artwork, you may want to choose a platform that allows for easy image and video editing, as well as the ability to create contextual displays for your work. On the other hand, if you are a teacher looking to have your students create eportfolios for class submission, you would likely want a platform that allows for easy organization and access to student work.
It’s also worth noting that some technology options may have a learning curve and require more time to set up and configure. If you are pressed for time or have limited technical skills, you may want to choose a more user-friendly platform.
Remember, the technology you select is just a tool to help you create and manage your eportfolio. It is not the only factor that determines the success of your eportfolio. The content and purpose of your eportfolio is still the most important aspect, so choose a technology that will best support your goals.
How do I create a new ePortfolio as a student
Creating a new ePortfolio as a student involves a few simple steps. First, log into your account and navigate to the settings section. From there, select the option to create a new ePortfolio.
When creating your ePortfolio, you will need to decide how you want to display your work. You can choose a submission-based approach, where you organize your artifacts by the different assignments or projects you have completed. Alternatively, you can select a display-based approach, where you curate your best work to showcase your skills and accomplishments.
Next, you should consider the purpose of your ePortfolio. Is it for a specific class or assignment, or do you wish to use it as a place to showcase your work outside of school? The purpose of your ePortfolio will help you determine the sections and content you should include.
Once you have selected the purpose and format of your ePortfolio, you can begin adding content. For example, if you are an arts student, you may want to include a section for your sketches or visual art pieces. If you are in a lesson-based course, you might include a section for your lesson plans or reflections.
After you have uploaded your work and organized your sections, take some time to review your ePortfolio. Make sure everything is laid out in a logical and coherent manner. You should also check to ensure that all of your artifacts are accessible and displayed as you intend them to be.
When you are satisfied with your ePortfolio, you can choose to share it with others. Depending on the platform you are using, you may have various options for sharing. For example, you could share a link to your ePortfolio or grant specific people access to view it.
Keep in mind that your ePortfolio is a dynamic space, and you can always make changes to it. As you complete new work or gain new skills, you can continue to add to and edit your ePortfolio. This allows you to keep it up to date and reflect your growth and development over time.
Creating a new ePortfolio as a student can be a valuable tool for showcasing your work, sharing your achievements, and showcasing your skills. With the right technology and a little time and effort, you can create a visually appealing ePortfolio that stands out and helps you stand apart from your peers.
If you need help or have any questions about creating or editing your ePortfolio, don’t hesitate to contact your instructor or the technology support team for assistance. They can provide guidance and troubleshooting to ensure that your ePortfolio reflects your best work and meets your goals.
Step 8 Control Access to Your Eportfolio
Once you have created your eportfolio and filled it with your various artifacts and displays, you may wish to control who can view and access it. This is where the contextual portfolios feature in Quercus comes in handy.
In Quercus, you can select which people or groups of people can access your eportfolio. For example, if you are an art student and you have created a visual portfolio of your work, you may only want your art teacher and fellow students to be able to view it. By changing the access settings, you can ensure that your portfolio is only visible to the people you allow.
Here is how you can control access to your eportfolio in Quercus:
- Go to your Quercus account and navigate to your eportfolio.
- Select the “Settings” option in the navigation menu.
- Under the “Access” section, select the “Change” option next to “Who can view my eportfolio”.
- In the pop-up window, you can choose to allow access to specific people or groups of people. You can search for individuals by name or add entire groups.
- Once you have selected who can view your eportfolio, click “Save” to apply the changes.
By controlling access to your eportfolio, you can ensure that only the people you want can view, review, and help you with your work. This feature is especially useful for students who may want to share their eportfolios with select teachers or classmates and receive feedback.
For example, if you have created an eportfolio for an art class assignment, you can allow your teacher and classmates to view it for the purpose of submission and review. Similarly, if you have an eportfolio for a visual arts project outside of your lesson, you can still allow specific people to view and provide feedback on your work.
Remember that the purpose of an eportfolio is to showcase your work and achievements, so you should feel free to control who has access to it. This gives you the flexibility to share your eportfolio with the right people at the right time, whether it’s for a class assignment, a job application, or any other purpose.
Sources
Here are some sources that can help you create your eportfolio:
- Quercus: Quercus is a portfolio platform that allows students to create and display their work. It provides a visual navigation system that allows students to easily review and edit their artifacts. Quercus also allows students to share their eportfolio with others, allowing for collaborative feedback and interaction.
- Canvas: Canvas is a learning management system that many educational institutions use. It offers e-portfolio settings and tools that allow students to create and display their work. Canvas also provides a platform for students to submit their eportfolios for review and grading.
- Outside Technology: If you wish to create a new eportfolio outside of your institution’s platforms, there are many other technologies available. For example, you could use a website builder, a blogging platform, or even a social media account to create and display your eportfolio.
- Arts and Design-specific platforms: If you are an arts or design student, there may be specific platforms or tools that are tailored to your field. For example, a sketchbook app that allows you to create, select, and display your artwork in a digital format.
These sources should give you a starting point for creating your eportfolio. Remember, the purpose of an eportfolio is to showcase your work and allow others to view and review it. So make sure to select a platform or tool that best suits your needs and allows you to control the display and navigation of your eportfolio.


