

If you are looking for a way to create a mobile app, then Flutter is a great choice. Flutter is an open-source UI software development kit created by Google. It allows you to create cross-platform apps that run on iOS, Android, and the web using a single codebase.
One of the main advantages of Flutter is its vibrant community. The community is constantly updating the platform, adding new features and improving performance. This means that you can always find support and resources to help you with your Flutter app development.
Creating a Flutter app is simple and easy. All you need is a basic understanding of programming and a few tools. The three main steps of creating a Flutter app are installing Flutter, setting up an IDE, and running your first app.
To install Flutter, you can go to the official Flutter website and download the latest version. Once you have downloaded Flutter, you need to extract the zip file and add the Flutter bin folder to your system’s PATH variable. This will allow you to access the Flutter command-line tools from anywhere on your computer.
Next, you need to set up an IDE for Flutter development. Flutter has excellent support for Android Studio and Visual Studio Code, but you can also use other IDEs like IntelliJ IDEA or Eclipse. Once you have selected an IDE, you need to install the necessary plugins and extensions for Flutter development.
Now that you have set up your IDE, you can start creating your first Flutter app. Open your IDE and create a new Flutter project. You can either name your project or use the default name. The IDE will generate the necessary folder structure and files for your Flutter app.
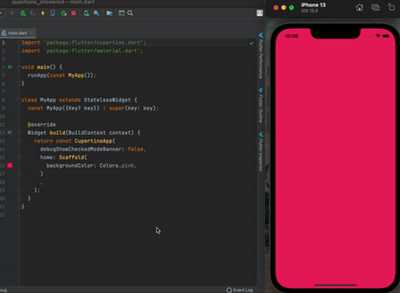
When your project is created, you can start writing the code for your app. Flutter uses the Dart programming language, so make sure you have the Dart SDK installed. The code for your app will be written in the lib/main.dart file.
The main.dart file is the entry point of your Flutter app. It contains the main function, which is the starting point of your app. You can import Flutter and Dart packages, create widgets, and define the UI of your app in this file.
Once you have written the code for your app, you can run it on a simulator or a physical device. Connect your device to your computer and click the run button in your IDE. The app will be compiled and installed on your device automatically. You can also run your app on the web by selecting the Chrome option in the IDE.
In conclusion, creating a Flutter app is easy and straightforward. By following these steps, you can build your first Flutter app in no time. Flutter’s simplicity, versatility, and strong community support make it an ideal choice for mobile app development.
Building a web application with Flutter
Fluter is a cross-platform framework that allows you to build applications for various platforms, including web. In this article, we will go through the process of building a web application using Flutter.
To get started, make sure you have Flutter SDK installed on your computer. You can download the latest version from the official Flutter website. Once you have installed Flutter, you can verify the installation by running the “flutter doctor” command in your terminal or command prompt.
The first step in building a web application with Flutter is creating a new Flutter project. Open your terminal or command prompt and navigate to the folder where you want to create your project. Run the command “flutter create my_app” to create a new Flutter project named “my_app”.
Next, navigate to the project folder using the “cd my_app” command. Open the project in your preferred IDE, such as Visual Studio Code or IntelliJ IDEA Community Edition.
Once the project is open in your IDE, you will see the project structure. The main Flutter application code is written in Dart, which is the programming language used by Flutter. The main entry point of the application is the “main.dart” file located in the “lib” folder.
To start building a web application, you need to add support for web by running the “flutter create . –platforms web” command in your project folder. This will enable web support for your project.
Next, you need to import the “flutter_web_plugins” package in your “main.dart” file. Add the following import statement at the top of the file:
import 'package:flutter_web_plugins/flutter_web_plugins.dart';
After importing the package, you need to register it as a plugin in the “main” function. Add the following code inside the “main” function:
void main() {
configureApp();
runApp(MyApp());
}
void configureApp() {
if (kIsWeb) {
// Initialize web specific plugins here
FlutterWebPlugins().registerDefaultRouteParser();
}
}
Now, you are ready to start building your web application. You can write your web-specific code inside the “lib” folder, just like you would for an Android or iOS app. Flutter provides a set of widgets and libraries that you can use to create your application’s user interface and handle user interactions.
When you are ready to test your web application, you can use a web browser to run it. Run the command “flutter run -d chrome” to launch your application in a Chrome browser. This will start a local development server and open your application in a new browser tab.
To create a production-ready version of your web application, you can use the “flutter build web” command. This will generate a production build of your application in the “build/web” folder.
In summary, building a web application with Flutter involves the following steps:
- Install Flutter and verify the installation
- Create a new Flutter project
- Open the project in your IDE
- Add web support to your project
- Import the “flutter_web_plugins” package and register it as a plugin
- Write your web-specific code in the “lib” folder
- Test your web application using a web browser
- Create a production build of your web application
With these steps, you can start building web applications with Flutter and take advantage of its cross-platform capabilities and rich set of features.
Creating Simple Application in Android Studio
When it comes to creating a simple application in Android Studio, there are a few steps you need to follow. First, you will need to install Flutter and set up your IDE. One option is to use Android Studio, which is a popular IDE for Android development. You can also use IntelliJ IDEA, which also has support for Flutter development.
Once you have your IDE set up, the next step is to create a new Flutter project. In the IDE, you can do this by going to the File menu and selecting “New Flutter Project”. This will create a new project folder with all the necessary files and folders.
The next step is to write your main application code. In the project folder, you will find a file called “main.dart”. This is where you will write the code for your application. The main.dart file serves as the entry point for your application.
For the purpose of this tutorial, we will be creating a simple application with a button. The button will have a click event that will change the text of a label when clicked. This is a basic example, but it will help demonstrate the main concepts of creating a Flutter app.
To get started, you can copy and paste the following code into your main.dart file:
import 'package:flutter/material.dart';void main() => runApp(MyApp());
The code above imports the necessary libraries and sets up the entry point for your application. The void main() function is the starting point for your application. It calls the runApp() function which takes an instance of your app and runs it.
Next, you will need to create a new class called “MyApp” which extends the MaterialApp class. This class will serve as the root widget of your application. In this class, you can define the structure and behavior of your app.
Inside the MyApp class, add the following code:
class MyApp extends StatelessWidget {@overrideWidget build(BuildContext context) {return MaterialApp(title: 'My Flutter App',home: Scaffold(appBar: AppBar(title: Text('My Flutter App'),),body: Center(child: Column(children:[ Text('Click the Button:'),ElevatedButton(child: Text('Click Me!'),onPressed: () {print('Button Clicked!');},),],,),),,),,),;}}
The code above creates a basic structure for your app. It includes a title, an app bar with a title, and a body with a centered column. The column contains a text label and a button. When the button is clicked, it will print a message to the console.
Now that you have your basic app structure, you can run your app to see it in action. To run your app, you can either use the “Run” option in the IDE, or you can use the command line and run flutter run in the project folder.
When you run your app, it will build and run on a connected device or emulator. It will open a Chrome browser window with your app running in it. You can interact with the app and test its functionality.
Congratulations! You have created a simple Flutter application in Android Studio. This was just a basic example, but it demonstrates the importance of the main.dart file and the basics of creating a Flutter app.
Flutter has a vast community of developers and provides many third-party packages and plugins to support app development. You can explore the Flutter website and the Flutter package community to learn more about building your app further.
Running our App in the Chrome Browser
After creating our Flutter app and setting up our development environment, we can run our app in the Chrome browser for testing and debugging purposes. In this section, we will explore how to run our app in the browser using the Flutter IDE.
-
Open the Flutter project you are working on in your preferred IDE (IntelliJ IDEA or Android Studio).
- In your project folder, locate the
lib/main.dartfile. This file contains the main code for our Flutter application. - Open the
main.dartfile and make sure it imports the necessary packages and libraries. -
When the code for your app is written and ready to run, click on the Run button in your IDE.
-
From the options provided, select the option to run the app in the Chrome browser.
-
The IDE will now build the app and launch it in a new Chrome window or tab.
-
You can now test and debug your app in the browser, keeping in mind the differences and limitations of running a Flutter app on the web.
Running our app in the Chrome browser is a simple way to quickly test the functionality and appearance of our app. It allows us to get an idea of how our app will behave on the web and make any necessary adjustments. The Flutter community provides support for building web applications, and there are third-party plugins and libraries available to enhance the capabilities of our app.
The importance of testing our app in the browser cannot be overstated. By running our app in the Chrome browser, we can identify and fix any issues or bugs before deploying it to a wider audience. Additionally, testing our app on the web allows us to reach a broader range of users who may prefer using a browser over a mobile device.
In summary, running our Flutter app in the Chrome browser is a crucial step in the development process. By following the steps outlined here, we can easily test our app on the web and ensure its functionality across different platforms.
Install IDE plugins
When working with Flutter, it is essential to have the necessary IDE plugins installed to ensure a smooth development experience. IDE plugins provide convenient features and tools to help you write code more efficiently and effectively.
There are several IDEs available for Flutter development, but in this article, we will be using IntelliJ IDEA as our main IDE. It offers excellent support for Flutter and Dart, making it a popular choice among developers.
To get started, follow these three simple steps to install the necessary IDE plugins:
Step 1: Install IntelliJ IDEA
First, we need to install IntelliJ IDEA, the IDE in which we will be writing our Flutter application code. You can download the community version of IntelliJ IDEA from the official website. Make sure to select the appropriate version for your operating system.
Step 2: Install the Dart plugin
Once you have IntelliJ IDEA installed, open the IDE and navigate to the plugin settings. In the plugin settings, search for the “Dart” plugin and click on the “Install” button to install it. This plugin provides support for the Dart programming language, which is used for writing Flutter applications.
Step 3: Install the Flutter plugin
In addition to the Dart plugin, we also need to install the Flutter plugin. The Flutter plugin enables us to build and run Flutter apps directly from within IntelliJ IDEA. In the plugin settings, search for the “Flutter” plugin and click on the “Install” button to install it.
Once you have completed these steps, you should have the necessary IDE plugins installed for Flutter development. You can now start creating Flutter apps with the support of IntelliJ IDEA’s powerful features and tools.
By installing these IDE plugins, we can take advantage of the rich ecosystem and community support that Flutter and Dart offer. We can easily import libraries, use code auto-completion, and test our apps directly in the browser using Flutter’s hot reload feature.
In conclusion, installing IDE plugins is an important step in setting up your Flutter development environment. With IntelliJ IDEA and the Dart and Flutter plugins, you will have a solid foundation for building beautiful and functional Flutter apps.


