

If you often start your day in the office with a list of PowerPoint presentations to go through, manually selecting and configuring the slideshow options for each one can become a cumbersome task. Fortunately, Microsoft PowerPoint offers a feature that allows you to easily automate this process, saving you time and effort.
By enabling the “Automatically After” option in the Slide Transition tab, you can set the timings for each slide and create a self-running slideshow. This means that once you start the presentation, it will automatically move from slide to slide without requiring any manual intervention.
To set up the automatic slideshow, follow these steps:
- Select the slide that you want to start the automatic slideshow with.
- Go to the “Transitions” tab in the PowerPoint ribbon.
- In the “Timing” group, check the “After” box and set a specific amount of time for each slide to stay on screen before transitioning to the next one. For example, if you want each slide to show for 5 seconds, you would enter “00:00:05” in the “After” box.
- Select the desired transition effect from the “Transition” gallery, which controls how the slides will appear and disappear.
- Repeat steps 2-4 for each slide in your presentation.
Once you have configured the timings and transitions for all your slides, you can save the presentation and share it with others. When they open the PowerPoint file, the slideshow will automatically start and proceed through the slides at the specified intervals.
This feature is especially useful for creating multiple slideshows that you want to share or present without having to manually control the timing and transitions. For example, if you have a series of animations or a kucha with a lot of slides, setting up an automatic slideshow can save you a lot of time and effort.
Additionally, for presentations that you want to record or share online, the automatic slideshow feature allows you to create a self-running presentation that viewers can watch at their own pace.
By following these simple steps, you can automate your PowerPoint presentations and make them more engaging and convenient for both yourself and your audience.
How to Set Up a Microsoft PowerPoint Slide Show to Repeat Automatically
If you want your Microsoft PowerPoint slide show to play continuously on its own, without having to manually start each slide, you can set up the presentation to repeat automatically. This can be useful in situations where you want the slides to loop continuously, such as in a kiosk or at a trade show booth.
To configure PowerPoint to automatically repeat a slide show, follow these steps:
- Open your presentation in Microsoft PowerPoint.
- Click on the “Slide Show” tab in the ribbon at the top of the window.
- In the “Set Up” group, click on the “Set Up Slide Show” option.
- In the “Set Up Show” window that appears, select the “Loop continuously until ‘Esc'” option.
- Click on the “OK” button to apply the changes.
By selecting the “Loop continuously until ‘Esc'” option, your slide show will automatically start over from the beginning once it reaches the last slide. It will continue to repeat until you press the “Esc” key to exit the slide show.
Additionally, if you have animations or transitions enabled in your presentation, they will also replay automatically each time the slide show loops. This can be a useful way to create self-running presentations with timed animations and transitions.
For example, if you have a slide with a series of bullet points that appear one by one, the animations will start from the beginning each time the slide show loops. This allows you to create a fully automated and repetitive presentation that you can set up and leave running.
By configuring your slide show to repeat automatically, you can have a continuous and engaging presentation that requires no manual interaction from the presenter or viewer. This can be especially useful if you’re using PowerPoint for advertising purposes or showcasing information in a public setting.
So, the next time you want to automate your PowerPoint slide show and have it play on a loop, remember these steps to set up and configure your presentation to repeat automatically.
How to Create a Self-Running PowerPoint Presentation

In Microsoft PowerPoint, you have the option to create self-running presentations that advance automatically. This can be useful for situations where you want to share a slideshow with others but don’t want to manually control the progression of slides. By configuring timings and transitions, you can automate your slideshows to play through without any user intervention.
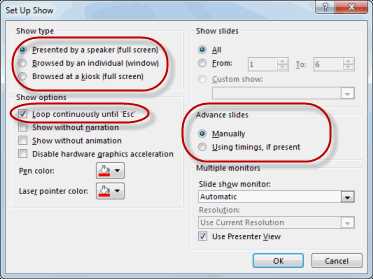
To create a self-running presentation, start by selecting the “Slide Show” tab from the ribbon. In the “Set Up” group, click on the “Set Up Slide Show” button. This will open a window where you can configure various options for your presentation.
Under the “Show type” section, select the “Presented by a speaker (full screen)” option. This will cause your slideshow to take up the entire screen when it plays. You can also choose to have the slideshow appear in a window if desired.
| Step | Instructions |
|---|---|
| 1 | Enable the “Use timings, if present” option. This will ensure that any predefined timings on your slides are used during the self-running presentation. |
| 2 | Select the “Loop continuously until ‘Esc'” option if you want the slideshow to repeat automatically. If you don’t enable this, the slideshow will stop after reaching the last slide. |
| 3 | Choose to either advance the slides manually or use timings. If you select the “Use timings, if present” option, PowerPoint will automatically advance the slides based on the timings you have set. |
| 4 | Click on the “OK” button to save your settings and close the window. |
Now that your PowerPoint presentation is set up for self-running, you can start it by selecting the “Slide Show” tab from the ribbon and clicking on the “From Beginning” button. Your slideshow will now play through automatically, advancing the slides and applying any transition animations that you have set.
If you want to create a self-running presentation with multiple slideshows, you can configure each individual slideshow to play on its own. For example, you can have one slideshow play, then another starts automatically after it finishes.
To configure timings for individual slides, go to the “Transitions” tab in the ribbon. In the “Timing” group, you’ll see options to set the duration for each slide and the transition effect that appears between slides. You can configure each slide to advance automatically after a certain amount of time.
Creating a self-running PowerPoint presentation is a great way to automate your presentations and share them with others. By using the options available in PowerPoint, you can create dynamic slideshows that play through without any user intervention.
Sources:
– https://support.office.com/en-us/article/play-a-sound-ac2d6b0a-37f8-4fd3-8997-a13bdcbe3ca1
How to Automate Animation and Slideshow Transitions in PowerPoint
In Microsoft PowerPoint, you can manually set the timings for each slide in a slideshow. However, this can become time-consuming, especially if you have a large number of slides to configure. To save time and create a more dynamic presentation, you can automate the animation and slideshow transitions in PowerPoint. This way, your slides will advance automatically, allowing you to focus on delivering a seamless presentation.
To automate animation and slideshow transitions in PowerPoint, follow these steps:
- Open your PowerPoint presentation.
- Select the slide you want to start the automated slideshow from.
- Go to the “Transitions” tab on the ribbon.
- In the “Timing” section, check the “After” box.
- Set the time duration (in seconds) for how long you want each slide to appear before advancing to the next one.
- If you want the slides to advance automatically, also check the “On Mouse Click” box.
- Select the transition effect you want to apply between slides from the “Transition to This Slide” list.
- If you want the transition to repeat itself, check the “Repeat” box.
- Repeat steps 2-8 for all the slides you want to include in the automated slideshow.
- When you’re done configuring the timings and transitions, click the “Slide Show” tab on the ribbon.
- In the “Start Slide Show” section, click the “From Beginning” or “From Current Slide” button to start the automated slideshow.
This step-by-step guide will help you automate animation and slideshow transitions in PowerPoint. By configuring the timings and transitions, you can create a self-running presentation that will advance through the slides without any manual intervention. This is especially useful when you want to share your presentations with others or when you’re presenting in a full-screen mode and don’t have access to the PowerPoint window.
Automating these animations and transitions can also be helpful in other scenarios. For example, if you’re recording a slideshow, you can enable the autoplay feature to ensure that the slides advance at the right times. Additionally, if you have multiple presentations and want to create a kucha-style or a continuous flow of slides, you can use the automate slideshows option to seamlessly transition from one presentation to another.
To sum up, automating animation and slideshow transitions in PowerPoint is a convenient way to create engaging and dynamic presentations. By following the steps outlined in this post, you can easily configure the timings and transitions for your slides and start a self-running slideshow. Whether you’re presenting in person or sharing your presentation online, this feature will ensure that your slides advance smoothly and captivate your audience.
Automate Slide Animations

When creating a slideshow in Microsoft PowerPoint, you can configure slide animations to automatically play without manual intervention. By setting up transitions and timings for each slide, you can create a self-running slideshow that plays from start to finish without any user input.
To automate slide animations in PowerPoint, follow these steps:
- Select the slide on which you want to add animations. You can do this by navigating to the slide in the Slide pane on the left-hand side of the window.
- Go to the “Transitions” tab in the ribbon. This tab is located between the “Home” and “Animations” tabs.
- In the “Transition to This Slide” section, select the transition effect you want to use from the list of available options. This effect will be applied when transitioning from the previous slide to the selected slide.
- Configure the “Advance Slide” options to determine how the slide appears and how long it will be displayed before advancing to the next slide. You can choose to manually advance the slide or set a specific time duration for each slide.
- Repeat steps 1 to 4 for all the slides you want to include in your autoplay slideshow.
- After selecting all the slides and configuring the animations and timings, go to the “Slide Show” tab in the ribbon.
- Click on the “Set Up Slide Show” button in the “Start Slide Show” group.
- In the “Set Up Show” window that appears, make sure the “Loop continuously until ‘Esc'” checkbox is enabled. This setting will make the slideshow repeat automatically until you manually stop it.
- If you want to record timings while presenting, select the “Use Timings, if Present” checkbox. This option will allow PowerPoint to automatically record the time spent on each slide during a live presentation.
- Click the “OK” button to close the “Set Up Show” window and save your settings.
- To start the self-running slideshow, click on the “From Beginning” button in the “Start Slide Show” group of the “Slide Show” tab.
By following these steps, you can easily automate slide animations and create dynamic and engaging presentations that play on their own. This is particularly useful for situations where you want to share your presentation with others or need a kucha-style presentation where the slides advance automatically at specified times.
Automate Slide Transitions
In Microsoft PowerPoint, you can create self-running presentations that automatically transition from one slide to another. This is useful if you want to present a slideshow without having to manually advance through the slides each time. With the automatic slideshow feature enabled, you can sit back and let PowerPoint do the work for you.
To automate slide transitions, follow these steps:
- Select the slide from which you want the transition to start. This is the slide that will appear first when the slideshow begins.
- Go to the “Transitions” tab in the PowerPoint ribbon.
- In the “Timing” group, select “Automatically After” and specify a time in seconds. This will set the time delay between slides.
- If you want the slideshow to repeat automatically, select the “Repeat” option.
- In the “Advance Slide” group, you can choose additional options for how the slides advance. For example, you can select “On Mouse Click” to require a click to advance to the next slide.
- If you have animations on the slides, you can also configure their timings by selecting the “Animation Pane” option.
- Once you’ve configured the slide transitions and other options, you can start the slideshow by clicking the “From Beginning” button in the “Start Slide Show” group.
When the slideshow starts, PowerPoint will automatically advance through the slides according to the timings you’ve set. If you selected the “Repeat” option, the slideshow will continue to loop until you manually stop it.
This feature is great for sharing presentations when you’re not there to manually control the slideshow. You can simply set up the timings and animations and let PowerPoint do the rest. It’s also useful for creating kucha slideshows or self-running presentations for training sessions or trade shows.
Now you know how to automate slide transitions and create self-running slideshows in PowerPoint. Enjoy the convenience and professional look that automatic transitions bring to your presentations.
Share This Post
After you have created a self-running slideshow in PowerPoint, you may want to share it with others. PowerPoint allows you to configure your slideshow so that it automatically starts when the presentation is opened. This can be useful, for example, if you want to share a set of slides with some colleagues in your office.
To share a self-running slideshow, follow these steps:
- Select the Slide Show tab in the ribbon.
- In the Set Up group, select the Set Up Slide Show button.
- In the Set Up Show window, under Show type, select Browsed at a kiosk (full screen).
- Check the box next to Loop continuously until ‘Esc’.
- Click OK to close the Set Up Show window.
- Select the Transition tab in the ribbon.
- In the Transition to This Slide group, select the transition you want to use between slides.
- Check the box next to Automatically after, and set a time for how long each slide should be displayed.
- Click Apply to All to apply the transition and time settings to all slides in your slideshow.
- Click the Slide Show tab in the ribbon.
- In the Set Up group, select the Rehearse Timings button.
- In the Record Slide Show window, click Start Recording.
- Manually advance through your slideshow by clicking the Next button.
- After you have gone through all the slides, click the Stop button.
- Click Yes when prompted to save the timings.
After you have completed these steps, your slideshow is ready to be shared. You can share it by sending the PowerPoint file to others, or by saving it in a format that can be viewed by people who do not have PowerPoint, such as PDF or video. When the recipients open the slideshow, it will start automatically and repeat itself until they press the Esc key.
By following these steps, you can create and share self-running slideshows with others. This can be useful for presentations or sharing information with colleagues or clients. You can also use this feature to automate the viewing of slideshows in situations where you want the slides to show themselves without manual intervention.
Multiple Slideshows
Creating multiple slideshows in Microsoft PowerPoint allows you to present different presentations or share a collection of slideshows with others. You can also view and present multiple slideshows at once.
To create multiple slideshows, first start by recording a slideshow as you would normally do. Once you have finished recording, go to the “Slide Show” tab in the ribbon. Here, you will see a “Set Up Slide Show” group. In this group, select the “Use Rehearsed Timings” option. This will enable automatic timings for the slideshow.
If you want to create another slideshow, select the “Record Slide Show” option from the “Slide Show” tab. This will start a new recording and create a new slideshow. You can repeat this process to create as many slideshows as you need.
To view and present multiple slideshows at once, go to the “Slide Show” tab and select the “Set Up Slide Show” option. In the “Set Up Show” window that appears, select the “Browse at a kiosk (full screen)” option under the “Show type” section. This will allow you to present multiple slideshows simultaneously.
When presenting multiple slideshows at once, each slideshow will run independently with its own timings and transitions. To automate the transitions between the slideshows, go to the “Slide Show” tab and select the “Rehearse Timings” option. This will allow you to configure the transition timings for each slideshow.
If you want the slideshows to advance automatically, go to the “Slide Show” tab and select the “Set Up Slide Show” option. In the “Set Up Show” window, select the “Loop continuously until ‘Esc'” option under the “Show options” section. This will cause the slideshows to repeat automatically until you manually stop them.
For example, if you have three slideshows and you set them to autoplay, the first slideshow will start playing, followed by the second slideshow, and then the third slideshow. This sequence will continue until you press the “Esc” key to stop the autoplay.
By using these options, you can create and present multiple slideshows in Microsoft PowerPoint. This can be useful for presentations that require multiple perspectives or for showcasing a variety of content in a single session.
Example
Here is an example of how you can create an automatic slideshow using Microsoft PowerPoint:
- Start by opening PowerPoint and selecting a blank presentation.
- Next, go to the “Transition” tab in the ribbon.
- In the “Timing” group, check the box next to “Advance Slide” and set the desired time for each slide to be displayed.
- You can also configure other settings, such as the transition effect between slides.
- After selecting the desired settings, go to the “Slide Show” tab and click on the “From Beginning” or “From Current Slide” button to start the slideshow.
- You can also enable the “Loop continuously until ‘Esc'” option to repeat the slideshow automatically.
- During the slideshow, the slides will transition and advance according to the timings you have set, creating a self-running presentation.
- If you want to automate the slideshow even further, you can use the “Record Slide Show” feature. This allows you to record timings, narrations, and laser pointer gestures to be played back later.
- You can then save and share the presentation with others, and they will be able to view the slideshow without having to manually advance the slides.
- These are just some of the options and features available in PowerPoint to create and present slideshows.
With a little practice and experimentation, you can create engaging and professional presentations that automatically advance through slides, allowing you to focus on delivering your message rather than manually controlling the slideshow.
Sources
In order to create an automatic slideshow, you have several options to choose from. Here are some sources to help you with the process:
- Selecting up next: When creating a slideshow, you can select the next slide to appear after a certain amount of time has passed. This can be done by enabling the “Automatically after” option from the Transitions tab in Microsoft PowerPoint.
- Using timings: Another way to automate your slideshow is by setting timings for each slide. This can be done by selecting the slide you want to configure and then choosing the desired time from the “After” dropdown menu.
- Repeating animations: You can also set animations to repeat themselves until the next step is triggered. To do this, select the animation you want to repeat, go to the Animation tab, and check the “Repeat” box.
- Creating self-running presentations: If you want your slideshow to start automatically and run continuously, you can create a self-running presentation. To do this, go to the Slide Show tab, click on “Set Up Slide Show,” and choose the “Loop continuously until ‘Esc'” option.
- Using the Slide Show window: In addition to configuring timings and transitions, you can also use the Slide Show window to manually advance through your slides. This window appears when you start the slideshow and allows you to navigate through the slides at your own pace.
By following these sources, you can effectively automate your slideshow and make it more engaging for your audience.


