

A flowchart is a visual representation of a process or workflow. It is a useful tool used in many different fields, such as business management, project management, and even creative endeavors. Flowcharts can help you understand and communicate the steps and activities involved in a process, determine the inputs and outputs, and indicate the conditions and connections between different steps. In this article, we will explore the basics of flowcharting and learn how to create a flowchart using the SimpleMind tool.
To create a flowchart, you will need a flowcharting tool like SimpleMind. SimpleMind is a user-friendly tool that allows you to easily draw and modify flowcharts. It provides a variety of shapes and labels that you can use to represent different types of processes and activities. You can also add additional information, such as decision points, inputs, and outputs, to make your flowchart more detailed and informative.
The first step in creating a flowchart is to determine the main topic or process you want to illustrate. This could be anything from a simple step-by-step guide to a complex business workflow. Once you have chosen a topic, you can start drawing the flowchart. Start by adding the basic components of your process, such as activities and decision points. Use the shapes and labels provided by SimpleMind to represent these components.
Next, you need to connect the different components of your flowchart to indicate the flow of the process. You can use arrows or connecting lines to show the direction of the flow. Make sure to review your flowchart and check for any logical inconsistencies or missing steps. Flowcharts should be clear and easy to follow, so it is important to ensure that all the steps and connections make sense.
- How to Create a Flowchart in Word
- Part 1: Unpacking Flowcharts
- 11What is a Flowchart
- 12 Basic Shapes We Use in a Flowchart
- Step 3 – Modify topic shapes and add conditions
- Download courses and take training wherever you are
- Explore Business-related Topics
- Explore Topics Related to Creativity
- Explore Topics Related to Technologies
- The 6 steps to making a business process flow diagram
- 1 Determine the main components of the process
- 2 Order the activities
- 3 Choose the correct symbols for each activity
- 4 Make the connection between the activities
- 5 Indicate the beginning and end of the process
- 6 Review your business process diagram
- Video:
- Introduction to Flowcharts
How to Create a Flowchart in Word
Creating a flowchart in Word is a simple and efficient way to visualize and communicate information. Whether you are outlining a workflow, explaining a decision-making process, or mapping out a system, flowcharts provide a clear and organized representation of the various steps and components involved. In this article, we will guide you through the process of creating a flowchart in Microsoft Word.
Step 1: Determine the Flowchart’s Purpose
Before starting, it’s important to clearly define the purpose of your flowchart. This will help you identify the key activities, decision points, and inputs/outputs that need to be included. For example, if you are creating a flowchart to illustrate the steps involved in a product development workflow, you may need to indicate different types of activities, decision conditions, and the outputs or deliverables at each step.
Step 2: Choose the Correct Symbols
Flowcharts use various symbols to represent different elements and actions. These symbols include shapes, arrows, and labels. In Word, you can find a wide range of predefined flowchart symbols in the “Shapes” section. However, if you need other symbols that are not available, you can modify the shapes by right-clicking on them and selecting “Edit Points” to customize the shape as needed.
Step 3: Add and Label the Shapes
Now that you have determined the symbols needed, you can start adding and labeling them in Word. To do this, go to the “Insert” tab, click on “Shapes,” and choose the desired shape from the dropdown menu. Once the shape is inserted, you can modify its size and style to match your flowchart. Then, add text labels to each shape to describe the activity or decision it represents.
Step 4: Draw Arrows between Shapes
To connect the shapes and indicate the flow between them, use the arrow shapes available in Word. Position the arrow shape’s starting point on the source shape’s border and the endpoint on the target shape’s border. This will create a clear visual representation of the flow from one component to another.
Step 5: Review and Modify the Flowchart
After completing the initial flowchart, take a step back and review it for clarity and accuracy. Make sure that each step and decision is logically connected and that the flowchart accurately represents the intended process or workflow. If needed, make modifications, such as adding or removing shapes, labels, or arrows, to improve the overall flow and readability of the diagram.
Step 6: Save and Share Your Flowchart
Once your flowchart is complete, save it as a Word document or export it as a PDF or image file for easy sharing. You can also copy and paste the flowchart into other documents, such as reports or presentations, to support your analysis or findings.
Creating flowcharts in Word is a valuable skill that can be used in various contexts, ranging from business workflows to creative projects. By following the steps outlined in this article, you can quickly and effectively create flowcharts in Microsoft Word, making it easier to communicate complex processes and ideas.
For more information on how to create flowcharts and learn other essential skills, you can explore online training courses or join professional communities on platforms like LinkedIn. These resources can provide additional guidance and support to help you become proficient in flowcharting and improve your overall understanding of business and technology topics.
Part 1: Unpacking Flowcharts
Flowcharts are powerful tools for visually representing processes and workflows in a business or any other domain. In this article, we will explain what flowcharts are, their purpose, and how to create them using HTML.
In the world of business management, flowcharts are extensively used to depict the steps involved in a particular process. They provide a visual representation of the flow of activities, inputs, and outputs, as well as the decision points and conditions that determine the correct path to take. Flowcharts can be used for various purposes, such as documenting existing processes, designing new processes, troubleshooting issues, or even for creative endeavors like brainstorming sessions.
When creating a flowchart, you can choose from a variety of shapes and symbols to represent each activity or step in the process. These shapes are connected with arrows to illustrate the flow between different activities. Each shape is labeled to provide a clear understanding of what it represents. By using flowcharts, you can easily identify bottlenecks, inefficiencies, or areas that need improvement in a process.
Before you begin drawing your flowchart, it is essential to determine the main objectives and scope of your diagram. Define the starting point and end goal of the process you want to visualize. This will help you identify the inputs, outputs, and decision points that need to be included.
There are various types of flowcharts, and each has its unique style and purpose. Some common flowchart types include basic flowcharts, process flowcharts, and decision flowcharts. Depending on the complexity of the process or workflow, you can choose the appropriate type.
One of the tools you can use to create flowcharts is HTML, the markup language used for building websites. With HTML, you can easily design and structure your flowchart using tags like
| 1. Art and Design | 7. Business and Entrepreneurship |
| 2. Writing and Literature | 8. Technology and Innovation |
| 3. Music and Performing Arts | 9. Politics and Social Issues |
| 4. Film and Media | 10. Science and Research |
| 5. Photography and Visual Arts | 11. Education and Training |
| 6. Fashion and Design | 12. Health and Wellness |
By understanding these topics, you can better determine the types of flowcharts used in different industries. Flowcharts are a visual representation of a process, allowing you to map out the steps and connections between various activities. They can be used to create workflows, check for correct inputs and outputs, and make decisions based on certain conditions.
When creating a flowchart, keep in mind the main components: the beginning and end of the process, the steps or activities involved, the symbols or shapes used to represent each step, and the connections or arrows that show the flow of the process. Flowcharts can be simple or complex, depending on the complexity of the process you are trying to represent.
There are many tools available to help you draw flowcharts, such as SimpleMind, Flowchart.com, and Lucidchart. These tools offer a user-friendly interface and allow you to easily modify the flowchart as needed. Additionally, you can add conditions or decision points to your flowchart, which means that the process may differ based on certain factors.
Whether you are in business, technology, or any other field, understanding how to create and interpret flowcharts can be a valuable skill. It allows you to visualize and analyze processes, identify areas for improvement, and ensure that tasks are completed in a logical and efficient manner. So, take the time to explore topics related to creativity and familiarize yourself with flowcharting techniques – it will certainly benefit your work!
Explore Topics Related to Technologies
When it comes to creating flowcharts, it’s important to familiarize yourself with the topics related to technologies. This will help you understand the flow and system connections better, allowing you to create more effective and meaningful flowcharts. In this section, we’ll unpack some of the key themes and concepts you need to know in order to work with flowcharts:
- Determine the purpose: Before you begin drawing your flowchart, determine the main objective or topic you want to illustrate. This could be anything from a simple process flow to more complex workflows.
- Choose the right symbols: Flowcharts use different symbols to represent various components and activities. Each symbol has a specific meaning, and it’s important to choose the right ones for your flowchart.
- Create connections: Flowcharts show the flow of activities and decisions, so it’s important to create clear connections between each step. Arrows are commonly used to indicate the direction of the flow.
- Add labels: To make your flowchart easier to understand, add labels to each step or activity. This will help others comprehend the flow without confusion.
- Modify and review: Flowcharts are dynamic tools, so don’t be afraid to modify and review your flowchart as needed. This will ensure accuracy and clarity in representing your process or system.
In addition to learning the basic steps of creating a flowchart, there are also many online courses and training materials available to help you familiarize yourself with the topic. Websites like LinkedIn Learning offer courses on flowcharting and other related topics. You can even find video tutorials on platforms like YouTube or language-specific resources like Bahasa Indonesia or Chinese.
By exploring these topics and utilizing the right tools and symbols, you’ll be able to create effective flowcharts that communicate information clearly and efficiently. Whether it’s for business management, product development, or even creative activities, flowcharts can be a valuable tool in understanding and improving your workflows.
So, take the time to familiarize yourself with the topics related to technologies and dive into the world of flowcharts!
The 6 steps to making a business process flow diagram
Creating a business process flow diagram is a useful technique for visualizing and analyzing the workflow of a business. Flowcharts can help identify inefficiencies, bottlenecks, and areas for improvement. In this article, we will outline the six steps to making a business process flow diagram.
Step 1: Identify the process
The first step in creating a business process flow diagram is to identify the specific process that you want to diagram. This could be anything from a simple task, such as making a cup of coffee, to a complex series of steps involved in product development.
Step 2: Identify the main activities
Once you have identified the process, you need to determine the main activities or steps involved. These activities are the key components of your flowchart and will be represented by shapes in your diagram.
Step 3: Determine the order of activities
Next, you need to determine the order in which the activities occur. This will help you create a logical flow within your diagram. Use arrows to indicate the direction of the workflow.
Step 4: Add decision points
In some processes, there may be decision points where different actions are taken based on certain conditions. These decision points are important to include in your diagram as they can affect the flow of the process.
Step 5: Review and modify
Once you have created your initial flowchart, it’s important to review and modify it as needed. This can involve making adjustments to the shapes, adding labels or symbols, or rearranging the order of activities to make the diagram more clear and accurate.
Step 6: Check for errors and finalize
Before finalizing your business process flow diagram, be sure to check for any errors or inconsistencies. Make sure that the flowchart accurately represents the process and that all connections between activities and decision points are correct. Once you’re satisfied, your diagram is ready to be shared and used for analysis, training, or documentation purposes.
By following these six steps, you can create a clear and comprehensive business process flow diagram that will help you better understand and optimize your business workflows.
1 Determine the main components of the process
In order to create a flowchart, you need to determine the main components of the process that you want to represent. Flowcharts are used in various industries and business domains to visually represent the steps and decision points in a system or process.
Flowcharts use a set of symbols and shapes to represent different activities, inputs, outputs, and decision points. These symbols are connected with arrows to show the flow of the process from the beginning to the end.
Before you start creating a flowchart, you should choose the correct symbols and shapes to represent each component of your process. There are various tools available, both online and offline, that can be used to draw flowcharts. Some popular options include Microsoft Visio, Lucidchart, and SimpleMind.
Start by brainstorming the main topics or steps of your process. You can use a simple mind mapping tool like SimpleMind to visually organize your ideas and determine the main components. This will help you identify the key activities and decision points that need to be included in your flowchart.
Once you have determined the main components, you can begin creating the flowchart using the appropriate symbols and shapes. Each component should be represented by a specific symbol or shape, and the connections between them should be represented by arrows.
For example, you can use a rectangular shape to represent activities, a diamond shape to represent decision points, and a rounded rectangle shape to represent inputs or outputs. The arrows can be used to show the flow of the process from one component to another.
It’s important to label each component of the flowchart correctly and provide clear instructions and descriptions for each step. This will ensure that the flowchart is easy to understand and follow.
Once you have created the flowchart, you should review it and check for any errors or areas that need modification. Flowcharts are a dynamic tool, and they can be modified and updated as needed.
In conclusion, determining the main components of the process is the first step in creating a flowchart. By using the appropriate symbols and shapes, you can visually represent the flow of the process and make it easier to understand and follow.
2 Order the activities
In order to create a flowchart, you need to determine the order in which the activities should be arranged. This will help you understand the flow of the process and ensure that all necessary steps are included. Here are the steps to order the activities:
- Start by listing all the activities that are part of the process.
- Review the activities and determine the connections between them. Decide how each activity leads to the next one.
- Next, create a simple diagram using symbols and shapes to represent the activities. You can use a tool like SimpleMind or even draw the diagram by hand.
- Once you have the initial diagram, label each activity with a brief description.
- Now, add arrows to indicate the flow of the process. Use arrows to show the connections between the activities.
- Check for any missing activities or connections. Make sure that the diagram represents the entire workflow.
- If needed, modify the diagram to include any additional activities or connections that you may have missed.
- Once you have a complete diagram, review each activity and determine the inputs and outputs for each one. This will help you understand the conditions and decision-making involved.
- Finally, order the activities in a logical sequence. This can be done by numbering the activities or using a tool like Microsoft Word to rearrange them.
By following these steps, you can create a flowchart that clearly illustrates the order of activities in a process. It will make it easier for others to understand and follow, whether it’s for business purposes or for training and education.
3 Choose the correct symbols for each activity
When creating a flowchart, it is important to choose the correct symbols to represent each activity. These symbols are used to indicate the different types of steps in a process or workflow. In order to make your flowchart clear and easy to understand, you need to use the right symbols for each activity.
There are several basic symbols that are commonly used in flowchart diagrams:
- Start/End symbol: This symbol is used to indicate the beginning or end of a process or workflow. It is usually represented by a circle or oval shape.
- Process symbol: This symbol is used to represent a specific action or step in the process. It is usually represented by a rectangle shape.
- Decision symbol: This symbol is used to indicate a decision point in the process where the flow can take different paths based on certain conditions. It is usually represented by a diamond shape.
- Input/Output symbol: This symbol is used to represent inputs or outputs in a process. It can be used to indicate data that is being received or produced by the system. It is usually represented by a parallelogram shape.
- Connector symbol: This symbol is used to connect different parts of the flowchart or to indicate the flow between steps. It is usually represented by arrows or lines.
When choosing the correct symbols for each activity, consider the main components of your process or workflow. Determine what steps are needed and how they are connected to one another. Use the appropriate symbols to label each step and indicate the flow between them.
There are also software tools available that can help you create flowcharts, like SimpleMind, Lucidchart, or Microsoft Visio. These tools have pre-built shapes and symbols that you can use to make your flowchart more visually appealing.
In conclusion, choosing the correct symbols for each activity is crucial when creating a flowchart. It helps create a clear and organized representation of a process or workflow. By using the right symbols, you can make your flowchart easier to understand and review. So take the time to choose the correct symbols and make your flowchart a valuable tool for business management or any other topic.
4 Make the connection between the activities
Once you have identified the processes or activities that need to be included in your flowchart, the next step is to make the connections between them. This will help you visualize the workflow and understand the sequence of steps involved in the process.
To make these connections, you can use different types of symbols and arrows to indicate the flow of the process. One simple tool that you can use for making flowcharts is called SimpleMind. It allows you to draw and connect different activities with ease.
Start by labeling each activity or step in your flowchart. This will make it easier to understand the flow of the process. You can use symbols like squares and circles to represent the activities, and arrows to indicate the direction of the flow.
When making connections between activities, you need to determine the correct sequence of steps. This means that each activity should lead to the next one in a logical manner. For example, if you are creating a flowchart for a business process, you might begin with the step of choosing a product, then move on to checking inventory, and so on.
In some cases, there may be conditions or decisions involved in the process. You can use conditional symbols like diamonds to indicate these points. For example, if there is a decision point where the process can go in two different directions, you can use a diamond symbol to represent this.
It’s also important to review your flowchart and make any necessary modifications. This can be done by using a review tool or system to ensure that the flowchart is accurate and correctly represents the workflow.
By making these connections between activities, you can create a flowchart that accurately represents the workflow or process you are working on. This will make it easier for others to understand and follow the process, and can be a valuable tool for training and management purposes.
With the simple process of making connections between activities, you can effectively organize and visualize the different steps involved in your workflow or process. This will help you identify any bottlenecks or inefficiencies, and make improvements as needed.
In conclusion, creating a flowchart is an essential part of business process management. By using the correct symbols and making the right connections between activities, you can create a clear and understandable representation of your workflow. This will ultimately help you streamline your processes, increase efficiency, and achieve better results.
5 Indicate the beginning and end of the process
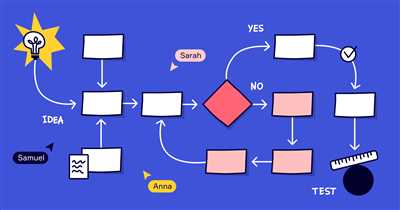
When creating a flowchart, it is important to clearly indicate the beginning and end of the process. This helps to define the scope of the diagram and provides a clear starting point for anyone interpreting the flowchart.
Typically, the beginning of a process is represented by a shape called a “terminator” or “start/end” shape. This shape is often oval or capsule-shaped and is labeled with the word “Start” or a variation of it.
Similarly, the end of a process is represented by a shape called an “end” or “terminator” shape. This shape is also oval or capsule-shaped, but is labeled with the word “End” or a variation of it.
These shapes serve as guideposts for the flowchart, making it easier for the reader to determine where the process begins and ends. It is important to label these shapes correctly to avoid confusion.
Within the flowchart, it is common to use arrows to show the connection between different activities or steps. Arrows typically indicate the direction of flow, showing the sequential order of the process. Arrows can also indicate decision points or conditions that need to be reviewed or met before continuing with the process.
By indicating the beginning and end of the process, flowcharts can provide a clear and organized representation of a workflow or business process. They can be used to review and improve existing processes, or to communicate new processes to team members or stakeholders.
There are many tools available for creating flowcharts, with varying features and complexity. Simple tools like Microsoft Word or even pen and paper can be used for simple flowcharts, while more complex processes may require specialized software like SimpleMind or Lucidchart.
In conclusion, when creating a flowchart, it is important to indicate the beginning and end of the process clearly. This helps to define the scope of the diagram and makes it easier for readers to understand and interpret.
6 Review your business process diagram
Once you have created a flowchart to represent your business process, it’s important to review and analyze it. This step is crucial to ensure that your diagram accurately captures the steps, inputs, and outputs of your system or process.
Start by reviewing each step or activity in your flowchart. Make sure that the sequence of steps is logical and follows the correct order. If needed, modify or reorganize the steps to improve the flow of your process.
Next, review the symbols and shapes used in your flowchart. Each symbol has a specific meaning, so ensure that you have used the correct symbols to indicate activities, decisions, inputs, outputs, and other components of your process.
Check the connectors and arrows between steps. These arrows represent the flow of your process and should accurately show the sequence and direction of the activities. Make sure that all the connections are clear and easy to follow.
Look for any conditions or decision points in your flowchart. These are represented by diamond-shaped symbols and indicate where the process may have different paths or outcomes based on certain criteria. Ensure that these conditions are correctly represented in your diagram.
Review the inputs and outputs of each step or activity. Make sure that all the necessary inputs are included, and that the outputs are clearly defined. This will help you identify any missing or redundant steps in your process.
Finally, step back and take a big picture view of your flowchart. Ensure that your diagram accurately represents the main objectives and goals of your business process. If needed, make any necessary adjustments to align it with your desired outcomes.
By reviewing your business process diagram, you can identify any areas that need improvement or optimization. This will make it easier for you to understand and communicate your process to others, and ensure that your workflow is efficient and effective.
Video:
Introduction to Flowcharts


