

Are you going to throw a party or decorate your room for a holiday? Paper balls can be a great DIY decoration option. They are easy to make, require only a few materials, and can create a festive atmosphere. In this step-by-step guide, we will show you how to make paper balls with just paper and a little bit of folding.
To start, gather the materials you need: paper, scissors, and glue. You can use any type of paper you want, but it’s best to use lightweight paper that is easy to fold. If you’re planning on making several paper balls, it’s also a good idea to have enough paper on hand.
Begin by cutting the paper into squares. The size of the square will determine the size of the ball, so think about how big you want your paper ball to be. A square with sides measuring 2-3 inches is a good starting point. If you want larger paper balls, you can cut bigger squares.
Next, fold the square in half diagonally to create a triangle. Then, fold the triangle in half again to create a smaller triangle. Open up the folds to reveal the creases. You should have two diagonal creases forming an “X” shape on the paper.
Now, fold the paper in half horizontally, bringing the top edge down to the bottom edge. Then, fold the paper in half vertically, bringing the left edge to the right edge. This will create four smaller triangles within the bigger triangle.
Take one of the flaps at the bottom of the paper and fold it up to meet the top point of the triangle. Repeat this step with the other flap to create a smaller triangle. Flip the paper over and repeat the process with the remaining flaps. You should end up with a circular shape made up of many smaller triangles.
Apply a small amount of glue to one of the sides of the triangle and press it down onto the other side. Hold it in place for a few seconds to allow the glue to set. Repeat this step with all the triangles. If you want to hang the paper ball, create a small loop with a string or ribbon and attach it to one of the triangles before gluing them together.
Once all the triangles are glued together, gently pull the sides of the paper ball apart to create a spherical shape. You may need to adjust and shape the ball a bit with your hands to get it to look just right. If you still have some flaps sticking out, glue them down to the other triangles for added support.
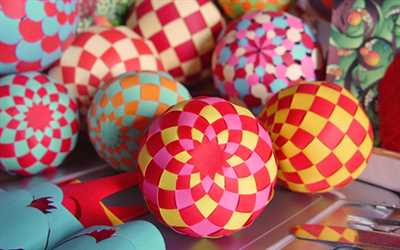
Voila! You’ve made a paper ball! Repeat the process to make as many paper balls as you need for your party or decoration. Hang them from the ceiling or place them on tables as festive ornaments. They will add a fun and playful touch to any celebration or room.
We hope our step-by-step guide has been helpful to you. If you have any more questions or want to share your DIY paper ball creations, we would love to hear from you. Feel free to leave a comment in the Q&A section or join our online community of paper craft enthusiasts. Happy crafting!
DIY PAPER BALL
If you’re wanting to add some fun and decoration to your next party or holiday gathering, making paper balls is a great DIY option. These paper balls can be used as ornaments, garland, or even as a support for other decorations. Plus, they’re easy to make and require only a few simple steps.
To make a paper ball, you’ll need paper, scissors, and glue. You can use any type of paper you want, whether it’s colored or patterned. Just make sure it’s stiff enough to hold its shape.
Step 1: Start by cutting your paper into circles. The size of the circles will determine the size of your paper balls, so think about how big you want them to be. You’ll need at least three circles for each ball you want to make.
Step 2: Fold each circle in half to create a semi-circle. Then, fold the semi-circle in half again to create a smaller triangular shape. Repeat this step for each circle you have.
Step 3: Apply glue to one side of each folded triangle and stick them together. Make sure to align the straight edges of the triangles to create a circular shape. You can use paperclips to hold the flaps together while the glue dries.
Step 4: Once the glue is dry, gently unfold the paper ball to reveal its full shape. You may need to adjust the folds and flaps to get it to look just right. If you want to hang the paper ball, make sure you leave a small opening at the top and attach a string or ribbon.
Make as many paper balls as you need for your event or decoration. You can experiment with different sizes and colors to create a visually interesting display. These DIY paper balls are a simple yet effective way to add a festive touch to any gathering.
Paper Ball Ornaments
If you’re looking for a fun and festive DIY project, paper ball ornaments are a great option. These ornaments are easy to make and can be customized to fit any holiday or party theme. Below, we’ll take you through the step-by-step process of making your own paper ball ornaments.
- Start by gathering all the materials you’ll need. This includes paper, scissors, and string or ribbon for hanging.
- Next, cut the paper into circles. You can use a circular template or trace around a circular object. The size of the circles will determine the size of your finished ornaments.
- Once you have your circles, start folding them in half. Then, fold them in half again to create a smaller triangle shape.
- Continue folding the circles in half until you have a small stack of triangles. The more circles you use, the fuller your paper ball will be.
- Next, take your string or ribbon and tie a knot at one end. This will be used to hang your paper ball ornament.
- Take one of the folded circles and loop it onto the string or ribbon. Then, thread the string through the center of the circle until it reaches the knot.
- Repeat this process with the other folded circles, alternating colors or patterns if desired. As you add more circles, the paper ball will start to take shape.
- Once you have added all the folded circles, pull the string or ribbon tight and tie another knot at the top to secure the circles in place.
- If you’re making ornaments to hang on a tree or garland, you’re all set! If you want to make a larger paper ball, you can continue adding more circles until you achieve the desired size.
- -If you’re wanting to make paper ball ornaments for a community or party event, consider using different colors or patterns to create a festive look.
- -You can also experiment with more complex folding patterns, such as using triangles instead of circles, to create unique paper ball ornaments.
With just a few simple steps, you can make beautiful paper ball ornaments that will add a festive touch to any holiday or party decor. Whether you hang them on a tree, string them together for a garland, or display them as standalone decorations, these ornaments are a great way to get creative and add a personal touch to your holiday celebrations.
Community QA
If you want to make a paper ball, there are a few different methods you can try. Here’s a step-by-step guide on how to make a paper ball:
- Start with a square piece of paper. You can use any size you want, but a 6-inch by 6-inch square is a good place to start if you’re new to paper folding.
- Fold the square diagonally in half to create a triangle shape.
- Take the two opposite corners of the triangle and fold them up to meet at the top point. This will form a smaller triangle with two flaps sticking out.
- Fold these flaps down over the triangle, tucking them underneath to secure them.
- Flip the paper over and repeat steps 3 and 4 on the other side.
- Open up the paper, and you should see two triangles on each side. Fold these triangles in half along the crease to create smaller triangles.
- Take one of the smaller triangles and fold it up towards the top point, then tuck it underneath to secure it. Repeat this step on all of the smaller triangles.
- Continue folding and tucking the triangles until you have a complex circular shape with a support in the center.
- If you want to make multiple paper balls, repeat steps 1-8 as many times as you like.
Now you have your paper balls! These DIY paper ornaments can be great for holiday decorations or party garland. You can also try making them with other shapes, such as circles or squares, by starting with different types of paper. If you’re still wanting more complex paper folding projects, the community Q&A is a great place to think about going. You’ll find many other DIY enthusiasts sharing their tips and tricks on how to make paper crafts.
Step 2 Complex Folding
If you want to make a paper ball with a more complex folding pattern, this step is for you. In this step, we will create 2 more triangles with the paper to add to the folding process. Don’t worry, it may sound complicated, but if you follow along, you’ll have a beautiful paper ball in no time!
First, take the paper and fold it in half diagonally to create a triangle. Then, unfold it and repeat the process by folding the paper diagonally in the opposite direction. Now you should have two triangles on the paper.
If you want to make a paper ball garland or ornaments for a party or holiday, you will need many paper balls. You can use different colors and patterns of paper to make it more festive.
Now, take one of the triangles you created and fold it in half again along the long side. Then, fold the two corners of the triangle inward to meet at the center crease. Repeat this step with the other triangle as well.
After folding the triangles, you will notice little circular flaps on each side. These flaps will help support the ball and give it a round shape.
Next, unfold the triangles and flatten them out. Then, fold each side of the triangle up to the center, creating a diamond shape. Fold the top point of the diamond down, tucking it into the pocket created by the previous folds. Repeat this step with the other triangle as well.
Now, fold the triangles in half again, this time bringing the top point down to meet the bottom point. You should have a smaller triangle now.
Take the two smaller triangles and place them together, with the flaps facing each other. Then, intertwine the flaps together by weaving them through each other. This will create a knot that holds the two triangles together.
After completing this step, you should have a complex folding pattern with three triangles. The paper ball is starting to take shape!
Remember, if you’re still having trouble following along, there are many DIY tutorials and community resources available online that can provide step-by-step instructions with visual support. Don’t be afraid to reach out for help if you need it!
How to Make a Paper Ball Garland
If you’re looking for a fun and DIY project to add some festive flair to your next party or holiday celebration, making a paper ball garland is a great option. This simple craft requires just a few supplies and some basic folding techniques.
To start, gather the following materials:
- Paper (colored or patterned)
- Scissors
- String or ribbon
Once you have your supplies ready, follow these steps:
- Begin by folding the paper in half, creating a long rectangular shape.
- Next, fold the rectangle in half again, but this time in the opposite direction. This will create a smaller rectangle with two flaps on the sides.
- With the paper still folded, take the top corner of the rectangle and fold it down to meet the opposite corner, forming a triangle. Repeat this step on the other side.
- Now, fold the two flaps on the sides of the triangle inwards towards the center. This will create a diamond shape with two pointed ends.
- Repeat steps 2-4 with more paper to create as many paper balls as you want for your garland.
- Once you have enough paper balls, take a piece of string or ribbon and tie a knot at one end.
- Thread the string through the pointed ends of the paper balls, alternating between colors or patterns if desired.
- Continue threading the paper balls onto the string until you have reached the desired length for your garland.
- Tie a knot at the other end of the string to secure the paper balls in place.
Now you have a beautiful paper ball garland to hang up and enjoy! You can use it to decorate your home for a party or create a festive atmosphere during the holiday season. If you want to get even more creative, you can add other ornaments or decorations to the garland.
If you think that making paper balls is too complex for you, don’t worry! There is a great DIY community online that can help answer any questions you may have. You can also find step-by-step tutorials and instructional videos to guide you through the process.
Remember, practice makes perfect, so if your first few paper balls don’t come out exactly how you hoped, keep trying! With time and patience, you’ll be able to create beautiful paper ball garlands that will wow your guests and add a touch of whimsy to any occasion.
With these resources, you’ll have all the information you need to start making your own paper balls. Whether you’re looking to create simple ornaments or complex garlands, they’ll have you covered. Happy folding!


