

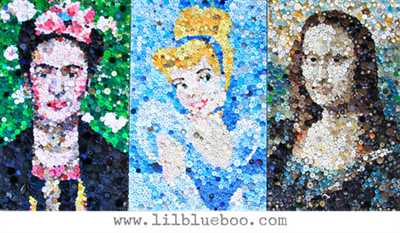
If you’re looking for a creative and practical way to show off your photos or images, then making a collage is a great option. Collages are a modern and well-blended way to present a collection of pictures or textures. They can be a unique and personal piece of art that adds a different touch to any space. Whether you want to create a collage as a gift or to decorate your own home, this step-by-step guide will help you make a stunning final product.
First, gather all the materials you’ll need. This includes a selection of photos or images you want to include in your collage, as well as any stock imagery or textures you’d like to use. Don’t forget to have access to a printer to print out the pictures if they are not digital. You may also want to gather some scissors, glue or tape, and a white poster board or canvas to use as the background.
Next, plan out the layout and composition of your collage. Determine how many layers or parts you want to include, and whether you want to overlay the images or keep them separate. Consider the size and placement of each image, and move them around until you find a design that you like. You can always play around with different arrangements until you’re happy with the final result.
Once you have your design in mind, start by cutting out the different images or textures you want to use. Be careful not to rush this step – take the time to cut out each element precisely. Then, begin to arrange and glue or tape the pieces onto the white background. You can create a well-blended collage by overlapping and layering the images, or go for a more structured look by placing them in precise lines.
Finally, when all the elements are in place, step back and take a look at the final collage. Make any adjustments if needed, and make sure everything is securely attached. If you’re satisfied with the result, save the collage and share it with others or display it in your home. Collages can add a touch of creativity and life to any space, and they’re a great way to showcase your favorite memories or create something unique and artistic. Follow these tips and tricks, and you’ll be creating beautiful collages in no time!
- How to Make a Collage
- Gather Your Materials
- Create Your Collage
- Add Textures and Finishing Touches
- Save, Print, or Display
- Make a collage – 10 practical tips
- 1. Gather your materials
- 2. Plan your composition
- Step 5 – Save, Print, Present
- Save Your Collage
- Print and Present
- Video:
- How to Make a Photo Collage on iPhone (Without Using Third-party Apps)
How to Make a Collage
Collages are a creative and fun way to express yourself and showcase your artistic skills. Whether you’re an experienced artist or just looking to create something unique, making a collage is a practical and enjoyable activity. In this article, we will show you step by step how to make a collage without any help.
Gather Your Materials
The first step in creating a collage is to gather all the necessary materials. You can find a variety of imagery to use in your collage, such as photos, magazine cutouts, or even stock images from the internet. Look for textures, patterns, and images that resonate with the theme or style you’re going for.
If you’re looking for a more modern or minimalistic vibe, you may want to use clean lines and simple layers. On the other hand, if you’re going for a more eclectic or vintage look, you can access thrift stores or flea markets to find unique pieces to include in your collage.
Create Your Collage

Once you have gathered your materials, it’s time to start collaging. Begin by selecting a background for your collage, whether it’s a plain white stock or a textured paper. Then, arrange and layer your chosen images and textures on top of the background, mixing and matching until you achieve the desired composition.
Don’t be afraid to experiment and try different arrangements. You can overlay images, move them around, or even cut them into different parts to create interesting effects. Play with scale and juxtaposition to create depth and visual interest in your collage.
It’s important to ensure that all the elements in your collage are well-blended and integrated. To achieve this, use glue or double-sided tape to secure the pieces together. You can also use scissors or an X-Acto knife to trim any excess or unwanted parts of the images.
Add Textures and Finishing Touches
If you want to add more depth and texture to your collage, consider incorporating different materials and textures. You can use fabric, ribbons, buttons, or any other objects that fit your theme. Layer these elements on top of your images or background to create a multi-dimensional effect.
Once you’re satisfied with your collage, take a step back and assess the final result. Make any necessary adjustments or refinements before deciding it’s finished.
Save, Print, or Display
After making your collage, you have several options for what to do with it. You can choose to save it digitally, print it out and display it in a frame, or even incorporate it into a larger artwork project. It’s entirely up to you how you want to present your collage and share it with others.
Making a collage can be a fun and fulfilling artistic endeavor. By following these tips and steps, you’ll be able to create a unique piece of art that showcases your creativity and adds a personal touch to your life.
Make a collage – 10 practical tips
Collages are a creative way to express yourself and showcase your artistic skills. Whether you’re looking to make a collage for personal use or to present it as a gift, these practical tips will help you create a visually stunning and well-blended piece of art.
1. Gather your materials
Before you start making your collage, collect all the materials you’ll need. This may include photos, printouts, magazines, stock images, textures, and anything else that you find inspiring.
2. Plan your composition
Take a few minutes to plan the layout of your collage. Think about how different images and textures can work together and create a cohesive design. It’s always helpful to sketch out your ideas before you start cutting or gluing.
3. Choose your base
Decide whether you want to create your collage on a white background or on a different colored surface. Both options can create interesting visual effects, so choose the one that suits your vision for the final piece.
4. Cut and move your images
Once you have your materials and composition ready, start cutting out the desired parts and move them around to see what works best. Don’t be afraid to experiment and try different arrangements until you’re satisfied with the result.
5. Use layers and overlays
Add depth and dimension to your collage by layering different images and textures. Play with opacity and blending modes to create interesting visual effects. Overlaying images can add a sense of complexity and intrigue to your artwork.
6. Pay attention to lines and edges
Make sure that the lines and edges of your cutouts are clean and well-blended. Use scissors with precision or use digital editing tools if you’re collaging on a computer. Clean lines can make your collage look more professional and polished.
7. Incorporate text
If you’d like to include text in your collage, carefully choose fonts, colors, and placements that complement the overall design. Text can add context or present a personal message in your artwork.
8. Don’t be afraid to save and access
Continuous saving will ensure that you don’t lose any progress in case of unexpected accidents. Additionally, having easy access to your collage files will allow you to make adjustments or print additional copies in the future.
9. Print or present your collage
Once your collage is complete, decide whether you want to print it out or present it digitally. Printing can give your collage a physical presence, while digital formats allow for easy sharing and showcasing online.
10. Have fun and enjoy the process!
Most importantly, remember to enjoy the process of making a collage. Experiment, try new techniques, and let your creativity flow. Collaging is a wonderful way to express yourself and bring your ideas to life.
Step 5 – Save, Print, Present
Once you have finished creating your collage, it’s time to save, print, and present your final piece. These steps will help you bring your collages to life and show them off to the world.
Save Your Collage
Before anything else, make sure to save your collage. This way, you can always access it in the future, whether you want to make any edits or simply cherish your creation. Saving your collage is as simple as clicking on the “Save” button in your collage-making software or application. Choose a file name and location that you can easily remember.
Print and Present
Now that you have saved your collage, it’s time to decide whether you want to print it and present it physically or share it digitally. If you choose to print, find a good printer and use high-quality paper for the best results. You can also take your collage to a professional print shop to ensure the colors and details come out well-blended.
If you decide to share your collage digitally, you can do so by sharing the file via email, social media, or a file-sharing platform. This way, your friends and family can access it and appreciate your artistic efforts. You can also consider using the collage as a background, screensaver, or profile picture.
Whether you choose to save, print, or share your collage, always consider the presentation. You can add a white border or overlay to give it a modern touch or include a title or text to explain the theme or message behind your creation. Experiment with different stock images, textures, or even lines to add depth and make your collage more dynamic.
To present your collage, you can frame it and hang it on a wall, display it on a shelf or easel, or even give it as a gift. If you’re presenting it digitally, make sure to provide context or a short description that helps viewers understand the intent or story behind the collage.
Remember, the final step is to showcase your collage and let it speak for itself. Don’t be afraid to get creative with how you present it. Collages are unique, and they always seem to capture something special through the combination of different images and layers. You’ve created a piece of art, so show it off with pride!
These practical tips should help you complete your collage-making journey. Now, go ahead and drag and move those images, blend the ends, and create a well-blended collage that’s full of life and imagery. Enjoy the process and let your creativity shine!


