

If you are managing projects in Jira, it is important to understand how to create filters. Filters allow you to specify the criteria for displaying a specific set of issues. Whether you want to show all open issues assigned to you or display issues with a specific fix version, filters are the right tool for the job.
When creating a filter in Jira, you have a variety of options at your disposal. You can use simple search criteria such as project, issue type, or assignee, or you can set up more complex filters using Jira Query Language (JQL). JQL allows you to filter issues based on their attributes, such as status, sprint, or custom fields.
Once you have created your filters, you can use them in a variety of ways. For example, you can use filters to create dashboards that show the most important information related to your project. You can also use filters to manage your work more efficiently by displaying only the issues that need your immediate attention.
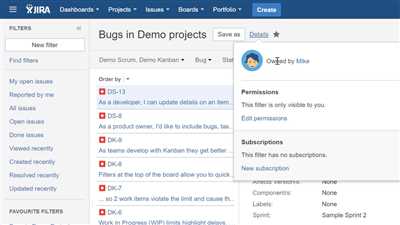
If you want to share your filters with others, Jira has you covered. You can create a filter and make it public, allowing anyone with the appropriate permissions to use it. You can also share filters with specific users or groups, ensuring that only the right people have access to the information they need.
How to create and manage filters in Jira
If you use Jira for your project management, it’s important to know how to create and manage filters. Filters allow you to display a specific set of issues based on certain criteria, making it easier to focus on what matters most to you.
To create a filter, start by opening Jira and navigating to your dashboard. From there, click on the “Filters” menu and select “Manage filters”. This will open a page where you can see all your existing filters and create new ones.
Click on the “Create filter” button to start creating a new filter. You will be prompted to provide a name and description for your filter. Make sure to give it a descriptive name so that you can easily identify it later.
Next, you need to define the criteria for your filter. Jira provides a wide range of options that you can use to filter your issues. For example, you can filter by sprint, fix version, assigned to a specific user, or even by specific Jira fields. Just make sure to specify the criteria that are relevant to your specific needs.
Once you have defined the criteria for your filter, you can save it and it will be added to your list of filters. You can now use this filter to display the relevant issues on your dashboard or in other Jira views.
Managing your filters is also important to ensure that they are up to date and provide the desired results. To manage your filters, go to the “Manage filters” page and you will see a list of all your filters. From there, you can edit or delete filters as needed.
If you want to share your filters with others, you can do so by clicking on the three-dot menu next to the filter name and selecting the “Share” option. This will allow you to share the filter with specific users or groups.
In addition to managing your filters within Jira, you can also export them to other formats such as CSV or Excel. This can be useful if you want to analyze the data or share it with stakeholders who don’t have direct access to Jira.
To conclude, creating and managing filters in Jira is essential for efficient project management. By utilizing filters, you can quickly and easily display the specific issues that are most relevant to you and your team. Make sure to familiarize yourself with the different filter criteria options and regularly review and update your filters to ensure they continue to meet your needs.
When to Use Jira Filters
Jira filters are a powerful tool that can help you manage your projects and tasks efficiently. They allow you to create specific queries and save them for future use. Here are a few examples of when you might want to use Jira filters:
1. To Create a Dashboard: If you want to have a quick overview of the issues assigned to you or your team, you can create a Jira filter and add it to your dashboard. This way, you can easily see all the relevant tasks without having to search for them manually.
2. To Manage Projects: Filters can also be used to manage projects. For example, if you want to display all the open issues in a specific project, you can create a filter that only shows issues with a certain fix version or assigned to a particular team member.
3. To Track Sprints: If you are using the Agile methodology and have multiple sprints in your project, you can create filters to track the progress and status of each sprint. This can help you keep track of the tasks that are in progress, completed, or still to be done.
4. To Share Information: Jira filters can be shared with other team members or stakeholders. For example, if you have a filter that shows all the high-priority issues, you can share it with your team to ensure everyone is aware of the most critical tasks that need immediate attention.
5. To Integrate with Other Tools: Jira filters can be used in conjunction with other tools like Confluence or third-party integrations. This allows you to combine Jira’s powerful filtering capabilities with other features and functionalities to create a comprehensive solution for managing your projects.
Overall, Jira filters are a versatile tool that can be used in various scenarios to help you stay organized and focused. Whether you need to quickly view specific issues, track project progress, or share information with others, filters can provide a flexible and efficient way to achieve your goals.
Explore topics related to technologies

- When working with Jira, you will need to create filters to manage and display the specific information you need.
- Bahasa is a project management language specific to Jira and Confluence.
- Dashboard is a quick way to open a Jira project and see all the issues, filters, and boards assigned to you.
- In Jira, you can create a quick filter to show only the issues that have the same fix version assigned.
- Make sure to use filters to manage and display the most important information without overwhelming your dashboard.
- When using Jira, you can also create a sprint dashboard to show the progress and status of your sprints.
- In Jira, you can use filters to organize your projects and make them easier to manage.
- Confluence is another Atlassian tool that can be used in conjunction with Jira to document and collaborate on projects.
- For example, you can create a Confluence page to document your project’s structure, processes, and best practices.
- Explore various sources and references to stay updated with the latest technologies and trends.
- In Jira, you can open an issue and fix it without leaving your dashboard.
- When using Jira, make sure to assign fix versions to your issues to keep track of their progress and releases.
- Chinese (most commonly Mandarin) is one of the languages supported in Jira for international teams.
By familiarizing yourself with these topics related to technologies, you will be able to effectively use Jira and other Atlassian tools in your project management workflow.
Example Quick Filters
When you need to quickly filter issues in Jira, Quick Filters can be a useful tool. They allow you to create specific filters that can be easily accessed and used without having to open the full filter structure. Quick Filters are displayed on your Jira dashboard and are a great way to manage and show only the issues that are most relevant to you.
Here is an example of how to create Quick Filters:
- First, open Jira and go to your project.
- On the left sidebar, click on the “Filters” menu and select “Your Filters”.
- In the top-right corner, click on the “Create” button and select “Filter” from the dropdown menu.
- Give your filter a name and a description that will help you identify its purpose.
- In the JQL (Jira Query Language) field, you can enter specific search criteria to filter your issues. For example, if you want to show only the issues that are assigned to you, you can use the following JQL query: “assignee = currentUser()”.
- Make sure to set the project, fix version, sprint, or any other relevant filters depending on your specific needs.
- Click on the “Save” button to save your filter.
Once you have created your Quick Filters, you can use them directly from your Jira dashboard. They will be displayed on the left sidebar under the “Filters” section. Just click on the filter you want to use, and Jira will automatically show only the relevant issues based on your filter criteria.
In Confluence, you can also use Quick Filters to display Jira issues in your pages. To do this, simply insert the Jira Issues macro and select your Quick Filter from the list of available filters.
Make sure to familiarize yourself with the Jira Query Language and its syntax to create more complex filters. There are many sources available online that can help you learn and master JQL, including the official Atlassian documentation.
Sources
When using Jira, it is important to know how to create filters to manage your project effectively. Filters are a useful tool in Jira that allows you to display a set of issues based on certain criteria.
For example, if you want to show all the issues that are assigned to you and have a fix version of “Sprint 1”, you can create a filter that includes the following JQL (Jira Query Language) query:
| JQL Query |
|---|
| assignee = currentUser() AND fixversion = “Sprint 1” |
By creating this filter, you can easily access all the issues that are relevant to you without having to search for them manually.
In addition to creating filters, Jira also provides other sources for managing your project. You can use your dashboard to get a quick overview of the most important information about your project, such as open issues, sprint status, and more.
If you need more detailed information or want to collaborate with your team on specific topics, you can use Confluence. Confluence is a collaboration tool that allows you to create and share content with your team, including documents, meeting notes, and project updates.
Jira also supports integration with other tools and technologies. For example, if you work with a team in China and need to communicate in Chinese, you can integrate Jira with a Chinese translation tool to make it easier for your team to understand and interact with Jira.
Overall, Jira provides a wide range of sources and tools to help you effectively manage your project. By using filters, your dashboard, Confluence, and integration with other tools, you can ensure that you have the right information at the right time to make informed decisions and keep your project on track.


