

If you are one of the many users who frequently work with PDF files, you may want to make Adobe your default reader. Here, we will guide you through the process of installing the Adobe Reader app, setting it as the default option on Windows, and answering some frequently asked questions. Follow the step-by-step methods provided in this post to customize your settings and make Adobe your go-to program for all your PDF related needs.
- How to Make Adobe Default PDF Viewer on Windows 1011 – 3 Methods
- Method 1: Using the Settings Menu
- Method 2: Changing Default Programs
- Method 3: Changing Policies in the Registry Editor
- Make Adobe Acrobat Default PDF Reader from Windows Settings
- Install Adobe Acrobat app for all users
- FAQs on How to Make Adobe Default
- Sources
How to Make Adobe Default PDF Viewer on Windows 1011 – 3 Methods

If you are a Windows 10 or 11 user, you may have noticed that Microsoft provides its own default PDF viewer called Microsoft Edge. However, if you prefer to use Adobe Acrobat Reader or Adobe Acrobat Pro as your default PDF viewer, you can make the necessary changes in the settings of your Windows operating system. In this post, we will explore three different methods to help you make Adobe the default PDF viewer on Windows 10 and 11.
Method 1: Using the Settings Menu
The first method involves changing the default PDF viewer through the system settings. Follow the steps below:
- Click on the “Start” button located on the bottom left corner of your screen.
- Choose “Settings” from the menu that appears.
- In the Windows Settings window, click on “Apps.” Then, click on “Default apps” in the left-hand menu.
- Scroll down and click on “Choose default apps by file type.”
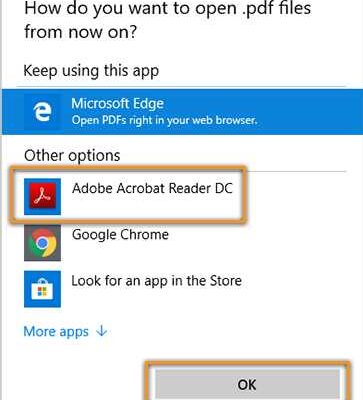
- Locate the “.pdf” file extension and click on the current default app next to it, which is most likely “Microsoft Edge.”
- A pop-up menu will appear. Select “Adobe Acrobat Reader” or “Adobe Acrobat Pro” from the list to set it as the default app for opening PDF files.
- Close the Settings window, and Adobe will now be the default PDF viewer for your system.
Method 2: Changing Default Programs
If the first method doesn’t work for you, you can try changing the default programs directly in the Control Panel. Here’s how:
- Press the “Windows” key + “R” on your keyboard to open the Run dialog box.
- Type “control” and press Enter. This will open the Control Panel.
- In the Control Panel window, click on “Programs.”
- Under the “Default Programs” section, click on “Set your default programs.”
- Scroll through the list of programs and select “Adobe Acrobat Reader” or “Adobe Acrobat Pro.”
- Click on “Set this program as default” to choose Adobe as the default PDF viewer.
- Click on “OK” to save the changes.
Method 3: Changing Policies in the Registry Editor
If the above methods didn’t work, you can try changing some policies in the Registry Editor. Here’s how:
- Press the “Windows” key + “R” on your keyboard to open the Run dialog box.
- Type “regedit” and press Enter. This will open the Registry Editor.
- In the Registry Editor, navigate to the following section:
HKEY_LOCAL_MACHINE\SOFTWARE\Microsoft\Windows\CurrentVersion\Policies\Attachments - If the “Attachments” key doesn’t exist, right-click on the “Policies” key, go to “New,” and select “Key.” Name the new key as “Attachments.”
- With the “Attachments” key selected, right-click on the right-hand side of the window and choose “New,” then “DWORD (32-bit) Value.”
- Name the new value as “SaveZoneInformation” and set its value to “1”.
- Exit the Registry Editor.
After following any of the above methods, Adobe Acrobat Reader or Adobe Acrobat Pro will be set as the default PDF viewer on your Windows 10 or 11 system. Now you can easily open and view PDF files with Adobe’s program. If you need further assistance or have any related FAQs, refer to the official Adobe support page or other reliable sources.
Make Adobe Acrobat Default PDF Reader from Windows Settings
If you are a Windows user and want to make Adobe Acrobat your default PDF reader, then you have several methods to choose from. Adobe Acrobat is a powerful and versatile program that allows you to view, edit, and create PDF files. Here, we will guide you on how to make it your default PDF reader in Windows 10/11.
| Method | Description |
|---|---|
| Method 1: Using the Settings App |
|
| Method 2: Using Control Panel |
|
| Method 3: Using Adobe Acrobat |
|
After following any of the above methods, Adobe Acrobat should be set as the default program for opening PDF files in Windows. If you encounter any issues or have further questions, consult Adobe’s official support resources, FAQs, or community forums for more information.
Install Adobe Acrobat app for all users
If you want to make Adobe Acrobat your default program for opening PDF files on Windows, you can follow the steps below to install the Adobe Acrobat app for all users.
Step 1: Download the Adobe Acrobat app from the official Adobe website. Make sure to choose the version that is compatible with your operating system.
Step 2: After the download is complete, open the installation file by double-clicking on it. A window will appear with the option to install Adobe Acrobat.
Step 3: Follow the on-screen instructions to complete the installation process. This may take several minutes.
Step 4: Once the installation is finished, you can set Adobe Acrobat as the default program for opening PDF files. To do this, right-click on any PDF file and select “Open with” from the menu that appears. Then, choose “Adobe Acrobat” from the list of available programs.
Step 5: If you want to make Adobe Acrobat the default program for opening PDF files in web browsers such as Google Chrome, you may need to make some changes in the settings. Follow the steps below:
- Open Google Chrome and click on the three vertical dots in the top-right corner of the window.
- From the drop-down menu, choose “Settings”.
- In the settings window, scroll down and click on “Advanced” to expand the advanced settings section.
- Under “Privacy and security”, click on “Content settings”.
- In the content settings window, scroll down and click on “PDF documents”.
- Toggle the switch next to “Download PDF files instead of automatically opening them in Chrome” to the off position.
- After making these changes, when you click on a PDF file in Google Chrome, it will automatically open in Adobe Acrobat instead of the default Chrome PDF viewer.
There you have it! By following these steps, you can install Adobe Acrobat app for all users and set it as the default program for opening PDF files on your Windows system.
FAQs on How to Make Adobe Default
Here are some frequently asked questions about how to make Adobe the default program for opening PDF files:
| Question | Answer |
| 1. How can I make Adobe Acrobat my default PDF viewer? | To make Adobe Acrobat the default PDF viewer, you can follow these steps: |
| 2. What are the different methods available for making Adobe the default program? | There are several methods available for making Adobe the default program: |
| 3. Can I make Adobe my default program for editing PDF files as well? | Yes, you can make Adobe your default program for editing PDF files. |
| 4. How do I choose Adobe as the default program for opening PDF files? | To choose Adobe as the default program for opening PDF files, you can follow these steps: |
| 5. Are there any other options for making Adobe the default program? | Yes, there are other options available for making Adobe the default program. |
| 6. Can I make Adobe the default program on Windows 10 as well? | Yes, you can make Adobe the default program on Windows 10. |
| 7. Where can I find the settings to make Adobe the default program? | You can find the settings to make Adobe the default program in the following locations: |
| 8. Do I need admin rights to make Adobe the default program? | Yes, you need admin rights to make Adobe the default program. |
| 9. Is there a step-by-step guide on how to make Adobe the default program? | Yes, there is a step-by-step guide available on how to make Adobe the default program. |
| 10. Can I make Adobe the default program for opening PDF files in Google Chrome? | Yes, you can make Adobe the default program for opening PDF files in Google Chrome. |
For more FAQs and related information, click here.
Sources
When it comes to making Adobe your default program for opening PDF files, there are several methods and sources you can follow. Here, we will discuss some of the available options and related services that can help you with this task.
If you are on a Windows operating system, the following methods can be used:
| Method | Instructions |
|---|---|
| Method 1 | Click on the Start menu, then choose Settings. Under Settings, go to Apps, and then Default apps. From there, you can choose Adobe Acrobat as your default program for PDF files. |
| Method 2 | Press the Windows key + I to open the Settings window. In the Settings window, click on Apps, then Default apps. Under Default apps, click on Choose default apps by file type. Scroll down to find the .pdf extension and select Adobe Acrobat as the default program. |
| Method 3 | If you have Adobe Acrobat installed on your computer, you can right-click on any PDF file, select Properties, and then click on Change next to Opens with. From there, choose Adobe Acrobat as the default program. |
If you are using a Mac, the process is a bit different. To make Adobe your default PDF viewer on a Mac, follow these steps:
- Open any PDF file on your Mac.
- Right-click on the file and select Get Info from the context menu.
- In the Get Info window, click on the triangle next to Open with to expand the section.
- From the available options, choose Adobe Acrobat as the default program.
- Click on the Change All button to apply the changes to all PDF files.
If you are using Google Chrome as your default web browser, you can also set Adobe Acrobat as the default PDF viewer within the browser settings. Here’s how:
- Open Google Chrome and click on the three-dot menu icon in the top-right corner.
- From the drop-down menu, select Settings.
- Scroll down and click on Advanced to expand the advanced settings.
- Under the Privacy and Security section, click on Site Settings.
- Scroll down and click on PDF documents.
- Toggle the switch to enable Download PDF files instead of automatically opening them in Chrome.
- Restart Google Chrome for the changes to take effect.
If you are an admin user in a corporate environment, you may need to check with your IT department for any specific policies or restrictions related to default program settings. They might have specific guidelines or procedures in place.
If you have any further questions or need additional assistance, Adobe provides FAQs and support services on their website. Simply visit the Adobe Reader or Adobe Acrobat support section for more information.


