

Facebook is a popular social media platform that allows you to connect with friends, share photos and posts, and stay updated with the latest news. While it’s a great way to stay in touch, you might find that you want to keep some things private. In this article, we will explore three ways you can make your Facebook profile more private and control what you share with the world.
1. Adjust your privacy settings: To start making your profile more private, click on the small arrow icon in the top right corner of the screen. From there, click on “Settings” and then “Privacy” to open the privacy settings options. Here, you can choose who can see your future posts, who can send you friend requests, and who can see your friends list. You can also adjust the privacy for your photos and videos, status updates, and other specific options.
2. Control who sees your past posts: If you’ve been using Facebook for a while and want to make sure that your past posts are also private, you can change the settings for this too. Go to the settings again and click on “Privacy.” Then, click on “Limit Past Posts” and press the “Limit Old Posts” button. This will change the privacy settings for all of your previous posts, making them visible only to your friends or a specific group of people.
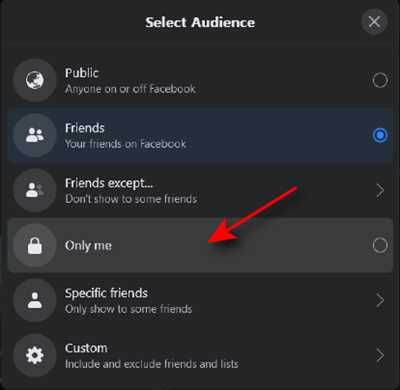
3. Use the audience selector: Facebook has a built-in feature called the audience selector that allows you to choose who sees each individual post. When you make a new post, click on the audience selector icon next to the “Post” button. From there, you can choose to share the post with “Public,” “Friends,” “Only Me,” or a specific group of people. This way, you have complete control over who can see your posts, and you can share specific updates with only those you wish to.
Making your Facebook profile private is a great way to keep your personal information and updates secure. By following these three simple steps, you can ensure that your posts, photos, and inbox messages are seen only by those you trust. So, take a moment to adjust your privacy settings, control who sees your past posts, and make use of the audience selector feature to keep your Facebook world a private and secure place!
How to make photos private on Facebook
If you want to keep your photos private on Facebook, there are a few steps you can take to ensure your privacy. Here are three options you can choose from:
- Filtering your audience: When making a post or uploading a photo, you can choose who can see it. To do this, click on the audience icon in the bottom right corner of the post or photo. From there, you can select “Friends,” “Only me,” or a specific list you’ve created.
- Using the privacy settings: You can also adjust the privacy settings for your entire account. To do this, go to the privacy settings page and choose the level of privacy you wish to set. This will apply to all future posts and photos unless you change the setting again.
- Being more drastic: If you really want to make sure your photos are private, you can choose to only share them through a private message or inbox. This way, only the recipient will be able to see them.
It’s important to note that even if you make your photos private, someone you’re friends with could still take a screenshot or download the photo to share it with others. So, be cautious about what you post on Facebook and who you choose to share it with.
Facebook provides a range of privacy options, so you can customize your settings to suit your needs. Whether you’re sharing photos from your holidays or just want to keep your life more private in the online world, the choice is in your hands.
To wrap it up, here are the basic steps to making your photos private on Facebook:
- Click on the audience icon in the bottom right corner of the post or photo you want to make private.
- Select the desired privacy setting, such as “Friends,” “Only me,” or a specific list.
- If you want to make all future posts and photos private, adjust the privacy settings in your account settings.
- If you really want to ensure privacy, share the photo only through a private message or inbox.
By following these steps, you can take control of your privacy and decide who sees your photos on Facebook.
You might also like
If you’re concerned about your privacy on Facebook, you might also like to know about these three ways to make your profile more private.
1. Start by clicking on the small icon in the top right corner of your Facebook homepage. Then press “Settings”, and a drop-down menu will come up. Click on “Privacy” in the menu.
2. On the left side of the Privacy setting page, you’ll see a list of options. You can choose to either make your posts public, only visible to your friends, or only visible to you. If you wish to keep your posts private, select the second option.
3. You can also adjust the privacy settings for your photos and albums. Click on the “Albums” tab on your profile, and then click on the specific album you’d like to change the privacy for. From there, you can choose between three options: public, friends, or only me. This way, you can control who can see your photos.
In addition to these steps, there are a few other ways you can make your Facebook profile more private. You can drastically limit the amount of information that is visible to the public by filtering what certain people can see on your profile. You can also wrap your Facebook inbox in a bubble of privacy by setting it so that only your friends can message you.
If you want to make sure your profile is really private, you might also like to know about the “Calculator” feature on Facebook. This feature allows you to see how your profile looks to others. Simply go to your profile page and click the three dots next to “Edit Profile”, then select “View As”. This will show you the same view your profile has when someone who isn’t your friend or isn’t logged in views it.
So, if you’re making your Facebook private, remember to click on the privacy icon in the top right corner, adjust the settings for your posts and photos, filter what certain people can see, and use the “Calculator” feature to see how your profile looks to others. With these options, you can ensure that you only share what you really wish to share on this social media platform.
How do I make my Facebook profile private
Keeping your Facebook profile private is important to protect your personal information and control who can see your posts. There are three main ways to adjust the privacy settings on your Facebook profile:
-
Step 1 – Click on the icon in the top-right corner of the Facebook homepage. This will open a drop-down menu with various options.
-
Step 2 – From the drop-down menu, click on “Settings & Privacy” and then select “Privacy Checkup”.
-
Step 3 – In the Privacy Checkup, you can go through the different sections and adjust your privacy settings based on your preferences. You can choose who can see your future posts, review your current privacy settings, manage who can contact you, and control how your personal information is used.
If you wish to make your Facebook profile even more private, there are a few more steps you could take. For example, you could limit who can see your friends list, restrict the audience for specific posts or photos, and control the privacy of your inbox messages.
It’s important to note that making your Facebook profile completely private means that only your friends will be able to see your posts and information. If you want to keep some parts of your profile open to the world, you can choose to make certain posts public while keeping the rest of your profile private.
Start by clicking on the privacy setting icon, which looks like a lock or calculator, located in the top-right corner of your Facebook homepage. From there, you can choose the privacy options that best suit your needs.
Remember that sharing personal information on Facebook is always a personal choice, and it’s important to be aware of the potential risks of sharing too much with the world. Pressing the privacy settings is a crucial step in controlling who can see your information and posts, and it gives you the power to decide what to share and with whom.
Step 1: Click Your Profile Icon
To make your Facebook profile more private, you need to start by navigating to your profile page. This can be done easily by clicking on your profile icon, which is usually located in the top right corner of your Facebook homepage. It’s the icon that looks like a silhouette of a person.
To Wrap Up
To wrap up, there are three ways you can make your Facebook profile more private. First, you can click on the privacy icon in the top right corner of your homepage and then select “Settings”. From there, you can choose who can see your future posts by selecting either “Public”, “Friends”, or a specific group of people. You can also control who can see your past posts by clicking on the same privacy icon and selecting “Activity Log”.
Another way to keep your Facebook profile private is by filtering who can see your photos and videos. When you upload a photo or video, you can select the audience for that specific post, either by choosing “Friends” or a specific group of people. You can also go back to your previously uploaded photos and videos and change the audience settings.
Finally, if you really wish to make your Facebook profile private, you could take a more drastic step and change your privacy setting to “Only me”. This means that only you will be able to see your posts, photos, and profile information. However, be aware that if you do this, your profile will become almost invisible to the outside world. Only your friends will be able to see your posts and interact with you. If you want to connect with others on Facebook, you will need to send them a friend request or accept their friend requests.
In conclusion, making your Facebook profile private is an important step to protect your privacy. By using the options and settings mentioned above, you can control who sees your posts, photos, and profile information. Remember to regularly review and update your privacy settings to ensure your desired level of privacy. Happy sharing!


