Have you ever wondered how to create an interactive slideshow? Slideshows are a great way to present information in a visual and engaging manner. Whether you’re giving lessons, showcasing a project, or simply want to add a bit of flair to your presentation, learning how to create a slideshow is a valuable skill.
There are many programs you can use to create a slideshow, but one of the most commonly used is Microsoft PowerPoint. PowerPoint offers a wide range of features and tools that make it easy to create professional-looking slideshows. From open bite-sized timings to adding music and recording your voice, PowerPoint has everything you need to create an interactive and engaging slideshow.
When creating a slideshow, it’s important to keep the end goal in mind. What message do you want to convey? What information do you want to share? Each slide should be clear and concise, with a focus on the main points. Consider using visuals, such as photos or graphics, to enhance your presentation and keep your audience engaged.
To create an interactive slideshow, you can add animations and transitions between each slide. This will make your presentation more dynamic and engaging. You can also add hyperlinks or buttons to navigate between slides or external sources. Additionally, consider adding quizzes or interactive activities to make your slideshow even more interactive.
Create a photo slideshow in PowerPoint

Microsoft PowerPoint is a powerful tool that allows you to create interactive and engaging presentations. One popular way to use PowerPoint is to create a photo slideshow. Whether you are creating a presentation for a school project, a business meeting, or just for fun, PowerPoint provides the necessary tools to make your slideshow engaging and visually appealing.
To create a photo slideshow in PowerPoint, follow these simple steps:
- Open PowerPoint: Start by opening Microsoft PowerPoint on your computer. If you don’t have PowerPoint installed, you can download it from the Microsoft website.
- Create a new presentation: Click on the “New” button to create a new presentation. Select a blank slide layout to start with.
- Add photos to your slideshow: Click on the “Insert” tab and then select “Pictures” to add photos to your presentation. Choose the photos you want to include and click “Insert” to add them to each slide.
- Arrange the photos: Resize and position each photo on the slide to create the desired layout. You can also add captions or descriptions to each slide if desired.
- Add transitions and timings: Click on the “Transitions” tab to add transitions between each slide. Select a transition effect and adjust the timings for each slide.
- Add music or recording: If you want to add music or a recording to your slideshow, click on the “Insert” tab and then select “Audio” or “Record Audio”. Choose the audio file or record your own voiceover.
- Make your slideshow interactive: To make your slideshow interactive, you can add hyperlinks, animations, or interactive elements to engage your audience.
- End with a closing slide: Create a closing slide to provide a conclusion to your presentation. You can summarize the main points or include a call to action.
Once you have finished creating your photo slideshow in PowerPoint, you can save it as a presentation file or export it as a video. PowerPoint offers various options for sharing and presenting your slideshow, whether it’s in a classroom, a boardroom, or online.
By following these steps, you can create a professional and visually appealing photo slideshow in PowerPoint. With a little bit of creativity and skill, you can turn a simple presentation into an engaging visual experience.
End Slide Show
Knowing how to end a slide show is an important skill to have when creating interactive presentations. Whether you are using programs like Microsoft PowerPoint or recording bite-sized lessons with photo slideshows, understanding how to end the slide show is essential.
When it comes to ending a slide show, there are a few different options you can choose from depending on your preferences and the purpose of your presentation.
- Switch to the last slide: One way to end the slide show is to simply switch to the last slide. This can be easily done by pressing the “End” key on your keyboard, or by clicking on the last slide in your presentation.
- Add a “Thank You” slide: Another option is to add a “Thank You” slide at the end of your presentation. This slide can include a thank you message, your contact information, or any other closing remarks you may have.
- Use timings: If you have set timings for each slide in your presentation, you can let the slide show run its course until the last slide is reached. The timings will automatically advance the slides, allowing you to end the slide show without any manual intervention.
- Play music: To add a bit of flair to your slide show’s ending, you can consider adding music. You can select a suitable music file and set it to play on the last slide. This can create a more engaging and memorable end to your presentation.
Regardless of which method you choose, it’s important to practice ending a slide show to ensure a smooth transition and a polished presentation. Remember to consider the purpose, audience, and tone of your presentation when deciding how to end your slide show.
Switch Programs
When creating a slideshow with Microsoft PowerPoint, you have the ability to switch between programs to enhance your presentation. This can be useful for adding interactive elements, recording lessons, or incorporating music and photos from other sources.
To switch programs during your PowerPoint presentation, follow these steps:
- Open the PowerPoint presentation you wish to switch programs in.
- From the “Slide Show” tab, click on the “Set Up Slide Show” option.
- In the “Set Up Show” window, under the “Show type” section, select “Browsed by an individual (window)”.
- Click the “OK” button to save the changes.
- Now, when you run the slideshow, it will open in a separate window, allowing you to switch between programs without interrupting the presentation.
Switching programs can be helpful when you want to add bite-sized lessons, record video or audio clips, incorporate live web content, or include photos or music from other sources. By switching programs, you can seamlessly include content from different software tools or online platforms, boosting your presentation skills and making your slideshow more engaging for your audience.
Remember to always practice these transitions beforehand to ensure a smooth flow throughout your presentation. With the ability to easily switch programs, you can create a truly dynamic and interactive slideshow experience.
How to Add Timings to Each Slide in the Slideshow
If you are creating a presentation or an interactive slide show with Microsoft PowerPoint, you may want to add timings to each slide. Timings allow you to control how long each slide is displayed before switching to the next one. This can be especially useful when you want to sync your presentation with music or create bite-sized lessons.
To add timings to your slides, follow these steps:
- Open your PowerPoint presentation or create a new one.
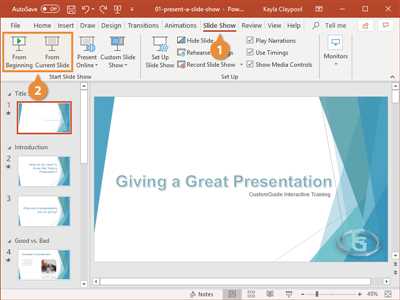
- Go to the “Slideshow” tab at the top of the screen.
- Click on the “Recording” button in the “Set Up” group.
- A new Recording toolbar will appear at the top of the screen.
- Click on the “Start Recording from Beginning” button to begin recording timings.
- Advance through your presentation by clicking or pressing the arrow keys when you want to move to the next slide.
- The time spent on each slide will be recorded automatically.
When you reach the end of your slideshow, click on the “End Show” button in the Recording toolbar to stop the recording.
You can also manually set timings for each slide by going to the “Transitions” tab and adjusting the duration in the “Timing” group.
Adding timings to your slideshow can make it more dynamic and engaging for your audience. It allows you to control the pace of the presentation and switch between slides at the right moment. Whether you are creating a presentation for work, school, or personal use, adding timings can be a valuable skill to have.
Sources
In creating a slide show, there are various sources to consider. One of the most popular programs for creating slideshows is Microsoft PowerPoint. This software allows you to create interactive and visually appealing presentations.
To start a slideshow in PowerPoint, open the program and click on “New Presentation”. You can then add slides to your presentation by clicking on “Add Slide” or by using the keyboard shortcut “Ctrl + M”.
When creating your slides, you can switch between different slide layouts to best suit your content. You can choose from a wide range of options such as photo slides, text slides, and graphic slides.
To make your slideshow more dynamic, you can add transitions between each slide. This can be done by selecting the “Transitions” tab and choosing from the various transition options available.
Another important aspect of a slideshow is the timing. You can set the timings for each slide to automatically transition to the next one after a certain amount of time. This can be done by selecting the “Transitions” tab and adjusting the timings in the “Advance Slide” section.
In addition to slides, you can also add music to your slideshow. This can help create a more engaging and immersive experience for your audience. You can do this by selecting the “Insert” tab and choosing the “Audio” option. You can then select the desired music file to add to your presentation.
When creating a slideshow, it is important to keep in mind the skill level of your audience. If you are creating a presentation for a more technical audience, you may want to include more detailed information. On the other hand, if your audience is less experienced, you may want to keep your slides more bite-sized and focus on delivering key points.
In conclusion, there are many sources available for creating a slideshow. Microsoft PowerPoint is a popular choice for creating interactive and visually appealing presentations. By following these tips and utilizing the various features and options available, you can create engaging and impactful slideshows for your lessons, presentations, or any other purpose.


