

If you’re in need of creating a survey, Google Forms is the perfect tool for you. With just a few clicks, you can easily create and send surveys to anyone. Whether you’re conducting market research, gathering feedback, or simply creating a form for your personal needs, Google Forms has got you covered.
One of the best things about Google Forms is its user-friendly interface. Creating a survey is as easy as filling out a form. All you need to do is open a new tab in your browser, head to Google Forms, and click on the “+” sign to create a new form. This step-by-step guide will show you how to create a Google survey in no time.
Once you’re on the Google Forms page, you’ll see a blank canvas waiting for you to start creating your survey. By default, it will have only one column, but you can add more columns if needed. You’re free to customize the form in any way you want, from changing the color scheme to adding your own branding elements.
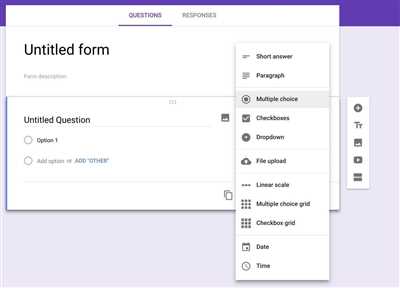
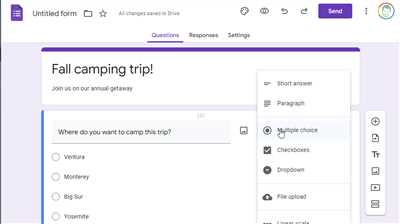
Next, you can start adding questions to your form. Google Forms offers various question types, such as multiple choice, checkboxes, dropdown menus, and more. You can also add text fields for open-ended questions or email addresses if you want to receive responses via email. This flexibility allows you to create a survey that suits your specific needs.
Once you’ve finished creating your survey form, you can customize the options for respondents. For example, you can choose whether or not to allow them to edit their responses after submitting the form. You can also limit the number of responses or set a specific end date for the survey. Google Forms provides you with many options to tailor your survey to your liking.
After you’ve created your survey, Google Forms will automatically generate a link for you to share with your audience. You can distribute this link via email, social media, or any other channel you prefer. As responses start pouring in, Google Forms will organize all the data for you in Google Sheets. You can then use this data to create charts and analyze the results of your survey.
With Google Forms, creating and conducting surveys has never been easier. Whether you’re a business owner looking for market research or a student at Rutgers University needing feedback for a project, Google Forms is the go-to tool. Give it a try and see for yourself how convenient and efficient it is to create a survey using Google Forms.
- How to Make a Form in Google Forms Public
- How to Create a Google Form
- Branding options to customize your Google survey
- Customize your survey form
- Add your logo or image
- Customize the survey link
- Customize the email invitation
- Create custom themes and templates
- Questions and Responses Tab
- Creating a Survey in Google Documents
- Video:
- Google Forms Tutorial
How to Make a Form in Google Forms Public
If you want to create a survey or collect responses from people, Google Forms is a great tool to use. You can easily make a form and share it with your audience. By default, the form you create in Google Forms is private, meaning only people with the link can access it. However, if you want to make your form public and allow anyone to respond, follow these step-by-step instructions:
Step 1: Create a Google Form
The first step in making your form public is to create it. Simply go to Google Forms in your browser and click on the “Blank” option to start creating a new form. Add your questions, select the types of responses you want and customize the form to meet your needs. Click on the “Send” button when you’re done.
Step 2: Make the Form Public
Once you have created your form, you need to make it public. In the “Send” tab, click on the “Copy link” button below the form URL. This will copy the link to your form onto your clipboard.
Step 3: Share the Form
Now that you have the link to your form, you can easily share it with anyone. You can send it via email, post it on a website or share it on social media. You can also embed the form into your website or blog by using the embed code provided in the “Send” tab.
Step 4: Collect Responses
Once your form is public, anyone who has the link can access and respond to it. You will receive all the responses in a Google Sheets document. Google Forms will automatically organize the responses into a table with each response in a new row and each question in a new column.
Step 5: Analyze the Results
After collecting responses, you can analyze the results using the built-in features in Google Forms. You can view response summaries, create charts and use formulas to calculate and display data. This will help you understand the feedback and draw insights from the survey.
Remember, making your form public allows anyone to respond, so keep that in mind when creating and sharing your form. Also, you can customize the branding of your form to match your needs.
This guide should help you in creating and making your Google Forms survey public. Although the steps are simple and straightforward, customizing the form and analyzing the results can be as limited or extensive as you want. So, make the best use of Google Forms to fit your requirements and get valuable feedback.
How to Create a Google Form
Creating a Google Form is a simple way to collect information and gather feedback from a group of people. Google Forms provides a user-friendly interface for creating customizable surveys, questionnaires, and feedback forms. In this step-by-step guide, we will show you how to create a Google Form using the Google Forms tool in your Google account.
Step 1: Access Google Forms
To create a Google Form, you need to have a Google account. If you don’t have one, you can sign up for free at google.com. Once you have a Google account, you can access Google Forms by going to https://docs.google.com/forms in your web browser.
Step 2: Create a New Form
Once you are in the Google Forms interface, click on the “Blank” option to create a new form from scratch. You can also choose from predefined templates if they meet your needs.
Step 3: Customize Your Form
Google Forms provides many options to customize your form to fit your branding or personal preferences. You can customize the form’s title, description, and theme using the options available in the toolbar. You can also add different types of questions, such as multiple-choice, short answer, or rating scales, by clicking on the “+ Add question” button.
Step 4: Organize Your Questions
Once you have created your questions, you can organize them by dragging and dropping them to different positions. You can also add sections and page breaks to your form to make it more organized and user-friendly.
Step 5: Receive Responses
By default, Google Forms will automatically collect responses for your form. If you want to limit the responses to specific people, you can choose to send your form via email and only allow people with the link to respond. You can also create a public form where anyone with the link can respond.
Step 6: View and Analyze Results
Once people start responding to your form, you can view and analyze the results in real-time. Google Forms automatically collects responses in a Google Sheets document. You can access the responses by clicking on the “Responses” tab in your form. From there, you can view individual responses, create charts and formulas, and make any necessary adjustments to your form based on the collected data.
Creating a Google Form should now be a breeze with this step-by-step guide. Customize your form to meet your specific needs, whether it’s for surveys, feedback collection, or organizing information. Make the best use of the options and features available in Google Forms to create a form that suits your requirements.
Please note that this guide provides a basic overview of creating a Google Form and there are many advanced options and features that are not covered in this article. For more detailed instructions and tips, please refer to the official Google Forms documentation or other online resources.
Branding options to customize your Google survey
When creating a Google survey, it’s important to customize it to fit your specific branding needs. Google offers a variety of options that can help you create a survey that reflects your organization’s identity. Below, we will discuss some of the branding options available to you:
Customize your survey form
Google provides various tools to customize the appearance of your survey form. You can choose from different themes, fonts, and colors to match your brand. By using the options under the “Theme” tab, you can easily create a survey that aligns with your organization’s style and visual identity.
Add your logo or image
Another way to brand your Google survey is by adding your organization’s logo or any other relevant image. This can be done by clicking on the “Insert Image” button and selecting the appropriate image file. By incorporating your logo or an image that represents your brand, you can give your survey a professional and personalized touch.
Customize the survey link
When you share your survey with participants, Google allows you to customize the survey link. This is helpful for branding purposes as you can include your organization’s name or any relevant keywords in the survey URL. This will make it easier for participants to recognize the survey as coming from your organization.
Customize the email invitation
If you choose to distribute your survey via email, Google also provides options to customize the email invitation. You can include your organization’s logo, change the font style, and add a personalized message to reflect your brand. This helps create a cohesive and consistent experience for participants when they receive the survey invitation.
Create custom themes and templates
For organizations with specific branding needs, Google offers the ability to create custom themes and templates. By using the Google Docs platform, you can design a survey form that perfectly aligns with your brand. This allows you to have full control over the design elements and layout of your survey.
In addition to the options mentioned above, Google also provides various options to customize your survey results. You can use formulas, create charts, and organize the responses in a way that best suits your needs. Google Sheets, where the survey responses are collected, offers many tools to analyze and visualize data.
Please note that although the branding options are not as extensive as in other form-building platforms, Google Forms is a user-friendly and versatile tool that anyone can use, especially for public surveys. So, if you’re looking for a quick and hassle-free way to create branded surveys, Google Forms is a great choice.
Questions and Responses Tab
When creating a survey with Google Forms, it’s important to have a way to view and analyze the responses you receive. This is where the Questions and Responses tab comes in. This tab, located at the top of the Google Forms interface, provides a comprehensive view of all the questions you’ve created and the responses you’ve received.
Using the Questions and Responses tab, you can:
- See a list of all the questions you’ve created for your survey
- View the responses that participants have submitted
- Organize your questions and responses in a table format
- Create charts and graphs to analyze your survey results
- Customize the appearance of your survey with branding options
To access the Questions and Responses tab, simply click on the tab at the top of the Google Forms interface. From there, you can select the survey you want to view and analyze.
Once you’re on the Questions and Responses tab, you’ll see a table with columns representing each question in your survey. The rows below the questions represent the individual responses you’ve received. You can click on any cell in the table to edit the responses or make changes to the questions.
Additionally, you have the option to filter and sort your responses to make it easier to analyze the data. You can also use formulas to perform calculations and create custom charts based on the responses.
If you’re looking for a step-by-step guide on how to use the Questions and Responses tab, Rutgers University has created a helpful tutorial titled “Using Google Forms: Questions and Responses Tab.” It provides detailed instructions on how to organize and analyze your survey data, as well as tips on how to make the most of the tab’s features.
Please note that the Questions and Responses tab is only available when using Google Forms in a web browser, not in the Google Sheets app. However, you can easily transfer your survey data from Google Forms to Google Sheets if you prefer to work with it there.
Creating a Survey in Google Documents
If you’re looking to create a survey, Google Documents offers a simple and user-friendly solution. With step-by-step instructions and a variety of customization options, you can easily create a survey that meets your needs. Whether you want to receive feedback from customers or gather data for research purposes, Google Documents has you covered.
To get started, open a new Google Documents form in your browser. From there, you can begin creating your survey by adding questions and selecting the types of responses you want to receive. Google offers a variety of question types, including multiple choice, checkboxes, scale ratings, and more.
Once you’ve created your survey questions, you can also customize the appearance of your form. Google Forms allows you to add your own branding, such as a logo or custom colors, to give your survey a personalized touch. This is especially useful if you’re sending the survey to clients or using it in a professional setting.
After you’ve finished creating your survey, you can choose how to distribute it. Google Forms provides you with the option to send the survey link via email or make it public, allowing anyone to access and complete the survey. Additionally, you can embed the survey on a website or share it through social media.
As responses start coming in, Google Forms automatically organizes the data for you. You can view the results in a table format or create charts and graphs to analyze the data. If you need to perform calculations or use formulas with the survey responses, you can export the data to Google Sheets to further analyze and manipulate the data.
Although Google Forms is a powerful tool, it does have some limitations. For example, there is a limit to how many times a person can submit the survey, and the number of questions you can include may also be limited. However, for most basic survey needs, Google Forms is an excellent choice.
To create your survey in Google Documents:
- Go to Google Forms
- Click on “Blank” or choose a pre-made template
- Add questions by clicking on the “+” button in the toolbar
- Select the type of question and input your question text
- Customize the appearance of your form using the options available
- Choose how to distribute your survey (email, public, etc.)
- Review the settings and make any desired adjustments
- Click on “Send” to share your survey with others
- Monitor responses by checking the results tab in your form
Creating a survey in Google Documents is a simple and efficient way to gather information and feedback from your audience. Whether you’re a student at Rutgers University or a business professional, Google Forms can meet your survey needs. So why wait? Start creating your survey today!


