

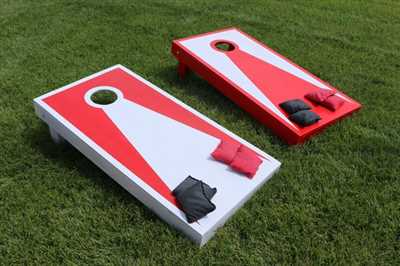
If you’re looking to add some DIY fun to your next backyard party or family gathering, building your own cornhole board is a great option. This classic game is popular with kids and adults alike, and with a few basic woodworking skills and some basic tools, you can build your very own cornhole board.
To start, you’ll need some materials. The most important component is the wood. You’ll need two 2x4x48-inch boards for the frame, two 2x4x21-inch boards for the legs, and a 2x4x48-inch board split in half for the sides. You’ll also need a 2x4x21-inch board for the back, two 2x4x21-inch boards split in half for the angled legs, and two 2x4x21-inch boards for the crossbars.
Once you have your materials, gather your tools. You’ll need a jigsaw for cutting the holes, a drill for adding the pilot holes, and a carriage bolt for properly securing the legs to the frame. You’ll also need some screws, washers, and tape for the construction process.
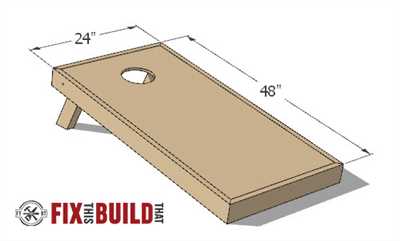
Begin by cutting the holes in the tops of the boards. The regulation size for cornhole boards is 6 inches in diameter and centered 9 inches from the top. Use a jigsaw to carefully cut the holes, making sure to keep your lines straight and clean. Add pilot holes around the holes to prevent splitting.
Next, build the frame by attaching the two 48-inch boards to the two 21-inch boards using screws. Make sure the corners are flush and the frame is square. Add the legs by spacing them evenly along the frame and attaching them with screws. For added stability, you can also attach the back and crossbars.
Finally, sand down any rough edges and apply a coat of paint or stain to protect the wood and customize your cornhole board. Allow it to dry properly before adding any additional decorations or accessories, such as a score strip or carrying handles.
Now, you’re ready to play! Grab some cornhole bags, gather your friends and family, and enjoy hours of fun playing this classic game that you built yourself.
- DIY Cornhole: How to Build Your Own Regulation Set
- Skill Level Moderate
- Tools Required
- The Materials You Will Need to Build your Own DIY Cornhole Boards
- Preparing the Wood for Construction
- Building the Frame
- Adding the Holes for the Bags to Play
- Adding the Legs
- Completing Your DIY Cornhole Boards
- How To Make Your Own Custom Cornhole Board
- Step 10: Optional Extras
- Sources
- Videos:
- How to Make Cornhole Boards
DIY Cornhole: How to Build Your Own Regulation Set
If you’re looking for a fun outdoor game that can be enjoyed by all ages and skill levels, cornhole is the perfect choice. Building your own regulation cornhole set is a great way to save money and customize your game boards to your own style.
Materials You’ll Need:
- Two 2x4x48 inch boards for the frame
- Four 2x4x21 inch boards for the legs
- Two 2x4x21 inch boards for the crossbars
- Two pieces of plywood measuring 24×48 inches each
- Wood screws and carriage bolts
- Nails and staple gun
- Sanding tools
- Drill
- Tape measure
- Painting supplies
Step 1: Preparing the Wood
Start by cutting the plywood to the regulation size of 24×48 inches. Sand the edges to ensure they are smooth and prevent any splintering.
Step 2: Building the Frame
Start by attaching the 2x4x48 inch boards to the longer sides of the plywood. Use wood screws or nails to secure them in place. Then, attach the 2x4x21 inch boards as legs to the shorter sides of the plywood.
Step 3: Adding Crossbars
Attach the 2x4x21 inch boards as crossbars between the legs on each end of the frame. This will provide additional support and stability to the cornhole boards.
Step 4: Drilling the Holes
Measure and mark the center of the plywood, then use a 6-inch hole saw to drill a hole. This will be the cornhole opening. Measure 9 inches from the top of the plywood and mark another hole for the bean bags to go through. This will be the wing hole.
Step 5: Painting and Finishing
Paint the cornhole boards with your desired colors and designs. You can also add any extra designs or logos using stencils. Allow the paint to dry completely before moving on to the next step.
Step 6: Attaching the Plywood
Place the painted plywood on top of the frame and attach it using nails or screws. Make sure it is evenly spaced and secure on all sides.
Step 7: Completing the Cornhole Set
Finally, add any extras you may need such as a carrying handle or a scorekeeping system. Make sure all screws, nails, and staples are securely in place and check the cornhole boards for stability.
With these simple steps, you can build your very own regulation cornhole set. It’s a fun woodworking project that can be completed in just a few hours and will provide hours of enjoyment at your next party or backyard gathering.
Please note that some of the links above are affiliate links, and at no additional cost to you, we earn a commission if you make a purchase. We only recommend products that we have used and loved ourselves.
Skill Level Moderate
If you are looking to build a cornhole board yourself, you will need some moderate building skills. Don’t worry, they’re not too difficult to earn, and the end result is well worth it. With a few hours of work, you can have your own custom cornhole board that you and your friends can enjoy for many games to come.
Before you start building, make sure you have the tools and materials required for this project. Here is a list of what you will need:
| – | Two 2×4 boards, each 8 feet long |
| – | One sheet of 1/2 inch plywood, measuring 4×2 feet |
| – | Eight 3-inch carriage bolts with washers and nuts |
| – | 48 wood screws, 2 inches long |
| – | Hammer or nail gun |
| – | Jigsaw |
| – | Tape measure |
| – | Pilot bit for drilling |
| – | Sanding block or electric sander |
| – | Paint or stain |
| – | Paintbrushes or rollers |
Once you have everything you need, you can start by preparing the wood. Cut the plywood into two 2×4 feet boards. Then, cut the 2×4 boards into four 48-inch pieces for the frame and four 12-inch pieces for the legs. Sand the edges of all the boards to prevent splintering.
To build the frame, lay two of the 48-inch boards parallel to each other, spaced 21 inches apart. Place the other two boards perpendicularly at each end, flush with the edges. Screw them together using wood screws, making sure to pre-drill pilot holes to prevent splitting.
Next, attach the legs to the frame. Measure and mark 11 inches from the top of each leg. Align the marked point with the bottom corner of the frame and screw the legs in place.
After completing the frame, place one of the plywood boards on top, making sure it is centered. Screw it to the frame, spacing the screws evenly along the edges.
Now it’s time to paint or stain your cornhole board. Choose any design or colors you like, but make sure to use durable outdoor paint or stain that can withstand the elements. Allow the paint or stain to dry completely before proceeding.
Finally, you will need to complete the construction of the cornhole board by adding the hole. The hole should be 6 inches in diameter and centered 9 inches from the top of the board and 12 inches from each side. Use a jigsaw to cut out the hole, starting with a pilot hole and then cutting along the marked lines.
Congratulations! You have built your own cornhole board. Now it’s time to get some bags and start playing. Remember, cornhole is a game that everyone can enjoy, no matter their skill level. So gather your friends, set up the boards, and have a great time at your next cornhole party!
These are the basic instructions for building a cornhole board. If you want to add any extras, like scoreboards or cup holders, there are many DIY resources available online that can show you how to do it. Just remember to have fun and enjoy the process!
Tools Required
When it comes to woodworking and building your own cornhole board, there are a few essential tools that you’ll need to have on hand. These tools will make the process much easier and ensure that your board is built properly and will last for many games to come.
Here is a list of the tools you will need:
- Wood: You will need 2x4x48 inch boards for the frame and 2x4x21 inch boards for the sides, as well as plywood for the playing surface.
- Tape Measure: This will help you measure and cut the wood to the correct sizes.
- Drill: You will need a drill with the proper drill bit to drill pilot holes for the nails or screws.
- Nails or Screws: These will be used to join the wood pieces together.
- Hammer or Screwdriver: You will need a hammer or screwdriver to drive the nails or screws into the wood.
- Saw: A saw will be needed to cut the wood to the correct lengths.
- Sandpaper: Sandpaper will help you smooth out any rough edges or splinters on the wood.
- Paint and Brushes: While optional, painting your cornhole board can add a personal touch and protect the wood from the elements.
It’s important to note that some steps in building a cornhole board may require specific tools or skills, such as using a pneumatic nail gun or making precise cuts. However, for the most part, these tools should be sufficient for a simple DIY project.
Before starting the construction process, it’s a good idea to make sure you have all the necessary tools and materials on hand. This will help you avoid any delays or interruptions once you get started.
Additionally, if you are looking to earn affiliate income from your cornhole board project, you can include Amazon affiliate links to the tools and materials you used in your article. This can be a great way to earn some extra income while sharing your DIY skills with others.
The Materials You Will Need to Build your Own DIY Cornhole Boards
Building your own cornhole boards is a simple and fun DIY project that can provide hours of entertainment for everyone at your next party or gathering. To build your own cornhole boards, you will need a few basic materials and tools. Here is a list of the materials you will need:
1. Wood
You will need a frame for the cornhole boards. To make the frame, you will need two 2x4x48 inch pieces for the long sides and two 2x4x21 inch pieces for the short sides. These dimensions are based on standard regulation cornhole board measurements.
2. Screws and Washers
You will need screws and washers to secure the frame together. Carriage bolts can be used to attach the legs to the frame.
3. Sanding and Painting Supplies
It is important to sand the edges of the boards to smooth them out and ensure that there are no rough spots. Sanding is also required to prepare the boards for painting or staining, if desired.
4. Cornhole Bags
You will need cornhole bags to play the game. It is recommended to have eight bags, four of one color and four of another color.
5. Extras
If you want to add some custom touches to your cornhole boards, you may need additional materials such as paint or stain, decals, or other decorative elements. These are optional and not required to build the basic boards.
Once you have gathered all of the necessary materials, you are ready to begin building your cornhole boards. Follow the steps provided in a full tutorial or guide to ensure that you measure and cut the wood correctly, attach the frame and legs securely, and complete any sanding or painting necessary. Building your own cornhole boards is a moderate woodworking project that requires some skill and tools, but with the right materials and instructions, anyone can successfully build their own set.
Preparing the Wood for Construction
Before you start building your own cornhole board, it’s important to properly prepare the wood to ensure a durable and long-lasting game set. This step is crucial, regardless of your DIY skills, because the quality of the materials and how they’re prepared will greatly affect the final result.
First, gather all the necessary materials and tools. You will need a skill saw or a jigsaw, a drill with a pilot bit, a pneumatic nail/staple gun, measuring tape, sandpaper, and screws.
Once you have everything you need, it’s time to start preparing the wood. Take the 2×4 plywood sheets and cut them into four equal pieces, each measuring 2×4 feet. These pieces will serve as the main playing surface for your cornhole board.
Next, round off the edges of the plywood using sandpaper. This will not only give the board a finished look but also make it safer to play on. Make sure to sand down any rough spots or splinters.
To assemble the frame of the cornhole board, you will need four 2×4 pieces of wood. Cut two pieces to be 4 feet long and the other two to be 21 inches long. Then, attach the pieces together using screws and a drill. Use a level to make sure the frame is straight and even.
Now, it’s time to attach the playing surface to the frame. Place the framed plywood sheet over the frame, ensuring that it is flush with the edges. Secure it using screws, adding extra support at the corners to keep the board sturdy.
At this point, you can also add optional extras such as a bolt and washers to adjust the board’s angle or weight. These additions are not required, but they can enhance your cornhole game experience if you prefer a certain play style.
Before completing the construction, take some time to go over the entire board and make sure everything is properly secured and aligned. This will prevent any potential accidents or injuries during gameplay.
Once you’ve finished constructing the board, you can move on to painting it. Use tape to create the 6-inch holes in the center of each board, ensuring they’re properly centered and 12 inches apart. Paint the entire surface of the board, including the holes, in your desired color scheme.
Remember to let the paint dry completely before you start playing cornhole. This step is important to ensure the paint doesn’t stick to the bags and affect gameplay.
Now that you know the steps and have all the necessary materials and tools, you can start building your own cornhole board. With a little patience and some basic woodworking skills, you’ll have a fun and durable game set that everyone will enjoy!
Building the Frame
When it comes to building your own cornhole board, a crucial step is constructing the frame. This is the foundation upon which the board will be built, and it needs to be sturdy and correctly built in order to ensure proper gameplay.
The materials required for building the frame are simple and affordable. You’ll need four 2x4x48-inch boards for the sides, four 2x4x21-inch boards for the legs, and four 2x4x21-inch boards for the back of the frame. Additionally, you’ll need screws, nails, and washers to secure the boards together properly.
The first step in building the frame is to cut the 2×4 boards to the required lengths. You can do this using a jigsaw or a miter saw. Make sure to measure accurately and cut the boards as precisely as possible.
Once the boards are cut, you can start assembling the frame. Place two of the 48-inch boards on the ground parallel to each other. These will serve as the top and bottom of the frame. Attach the legs by positioning the 21-inch boards vertically at each corner, ensuring they’re evenly spaced.
Next, attach the back of the frame by placing the remaining two 21-inch boards horizontally between the legs at the top and bottom. Use screws and washers to secure all the boards together, making sure everything is flush and secure.
It’s important to use proper woodworking techniques when building the frame, especially when drilling holes for screws or nails. Pre-drilling pilot holes will help prevent splitting and keep everything aligned correctly.
After completing the frame, give it a thorough check to ensure everything is built correctly. The frame should be solid, with no wobbling or loose parts. If necessary, add extra screws or reinforce weak spots.
It’s worth noting that while building the frame is a necessary step, it’s not the end of the DIY cornhole board construction process. After the frame is built, there are still many steps involved, like adding the board’s top surface, painting it, and building the bags. However, the frame is the most crucial part, as it’s what gives the board its structure and stability.
Building your own cornhole board can be a fun and rewarding project. Not only will you have a custom-made game to enjoy at parties and gatherings, but you’ll also earn the satisfaction of knowing you built it yourself. So gather your materials, grab your tools, and get ready to spend a few hours building a cornhole board that’s sure to provide hours of entertainment for everyone!
Adding the Holes for the Bags to Play
Once you have built the frame and prepared the plywood for your cornhole board, the next step is to add the holes for the bags to play. This is a crucial part of the construction, as the placement and size of the holes can greatly affect the gameplay.
The regulation size for cornhole holes is 6 inches in diameter. However, if you’re building a board for kids or just for casual games, you have the option to make the holes smaller or larger. It’s up to you to decide what size holes you want for your cornhole board.
To start, mark the center of each board’s long side. Then measure 9 inches down from the top edge of the board and mark the center point. This is where the center of your hole will be.
Next, you’ll need a jigsaw to cut out the holes. Drill a pilot hole into the inside of the circle you will be cutting out and insert your jigsaw blade into the hole. Cut along the marked line to create the hole. Repeat this process for the second board.
| Materials | Tools |
|---|---|
| – 2x4x48 inch boards (4) | – Jigsaw |
| – 2x4x21 inch boards (2) | – Drill |
| – 1/2 inch plywood | – Carriage bolts and washers |
| – Wood screws | – Nail/staple gun |
| – Sanding materials | – Level |
| – Paint | – Tape measure |
After cutting out the holes, make sure to sand the edges to create a smooth surface. This will prevent any snags or tears when the bags are tossed into the holes. Sanding is a very important step to ensure the durability of your cornhole board.
Now, align the two boards for construction with the hole sides facing each other. Make sure the holes are evenly spaced and that the boards are flush with each other. Attach the boards together using wood screws or nails/staples. Repeat this step for the other two sides of the frame.
As an optional step, you can add legs to your cornhole board. This will elevate the board off the ground and make it easier to play. Attach the 2x4x21 inch boards to the base of the frame using screws.
Finally, you can paint and decorate your cornhole board to your liking. This is where you can get creative and make it personalized. You can even earn affiliate commissions by painting logos or designs from your favorite sports teams!
Adding the holes for the bags to play is a critical step in building a cornhole board. Whether you’re a DIY enthusiast or just looking for a fun project, these steps will guide you through the process. It’s a great activity for all ages, and you can enjoy hours of outdoor games with family and friends.
Adding the Legs
One of the most important steps in building a cornhole board is adding the legs. The legs are what support the board and allow it to stand upright during gameplay. Without sturdy and properly attached legs, the board won’t be usable.
Here’s a step-by-step guide on how to add the legs to your DIY cornhole board:
- Start by preparing the materials and tools you’ll need. This includes two 2×4-inch boards, eight carriage bolts, eight washers, eight wing nuts, a drill with a pilot hole bit, a jigsaw, and a tape measure.
- Measure and mark the correct placement for the legs on each cornhole board. The legs should be positioned 12 inches back from the top edge of the board, centered between the sides.
- Use a jigsaw to cut out the leg holes. These holes should be 6 inches wide and 1 inch tall. Make sure to cut the holes evenly and follow the marked measurements.
- Once the leg holes are cut, attach the legs to the cornhole boards. Place the legs inside the leg holes and secure them with the carriage bolts, washers, and wing nuts. Make sure the legs are properly aligned and tightened to ensure stability.
- Test the stability of the cornhole board by standing it up and applying some weight to it. If the board feels sturdy and doesn’t wobble, you’ve successfully added the legs.
Adding the legs is a crucial step in the construction of a cornhole board. By following these steps and using the correct tools and materials, you can ensure that your board is durable and ready for hours of play. Don’t skip this step, as it’s vital for the proper functioning of the game.
Remember, if you’re not confident in your woodworking skills or don’t have the required tools, you can always purchase a pre-built cornhole board set from Amazon or other retailers. These sets often come with regulation-sized boards and bags, making it easy to play and earn bragging rights at your next backyard party.
While building your own custom cornhole board can be a fun DIY project, it’s important to prioritize safety and proper construction. Always follow the recommended guidelines and consult reliable sources for instructions and tips.
Completing Your DIY Cornhole Boards
Once you have built the frame and prepared the plywood boards for your cornhole game, there are a few final steps to complete before you can start playing.
1. Sanding and Edges: Use sandpaper to smooth out any rough edges on the plywood boards. You want the surface to be flat and the edges to be rounded to prevent injuries. Sanding will also help the paint adhere properly to the wood.
2. Painting: Decide on the color or design you want for your cornhole boards. Use paint to cover the plywood surfaces evenly. Remember to use proper painting techniques, like applying multiple thin coats and allowing each coat to dry before adding another.
3. Adding the Legs: If you want your cornhole boards to have legs, attach them to the frame using carriage bolts. Position the legs at the proper angle to provide stability during play. Make sure the legs are securely attached so they don’t wobble or fall off during gameplay.
4. Hole Construction: Use a jigsaw to cut a 6-inch diameter hole on each board. Measure and mark the correct position for the hole before cutting. Take your time to ensure accuracy, as the holes need to be centered and without any splintering.
5. Cornhole Bags: You will need cornhole bags to play the game. You can make them yourself using materials like duck cloth and corn kernels, or you can purchase them online. Cornhole bags are usually filled to a specific weight and have rounded corners to make them easier to throw.
6. Extras: If you want to add any extras to your cornhole boards, like scoreboards or cup holders, now is the time to do so. Remember that these additions are optional and may increase the overall cost and construction time.
Once you have completed these steps, your DIY cornhole boards will be ready for a cornhole party. Invite your friends and family over for some friendly competition!
How To Make Your Own Custom Cornhole Board
Materials:
- Plywood
- 2x4x21 inch wood boards
- Nail/staple gun with 2-inch nails/staples
- Screws
- Wood glue
- Pilot hole bit
- Wing nuts and washers
- Tape measure
- Painting supplies
Step 1: Cutting the Boards
Start by cutting the plywood into two 2×4 feet pieces, which will serve as the top and bottom of the cornhole board. Then, cut four 2x4x21 inch wood boards for the top frame and four more for the legs.
Step 2: Framed Edges
Take the four 2x4x21 inch boards and attach them around the edges of one of the plywood pieces using a nail or staple gun. Make sure they are properly spaced and flush with the edges. This will create a framed edge for your cornhole board, preventing the bags from sliding off during play.
Step 3: Adding Legs
Attach the four remaining 2x4x21 inch boards to the underside of the plywood without the framed edges. These will serve as the legs of the cornhole board. Make sure they are securely attached with screws and flush with the bottom of the board.
Step 4: Paint and Design
Now it’s time to let your creativity shine! Use paint and any other materials you like to customize the top of the cornhole board with your own design. You can use tape to create crisp lines or let your brushstrokes speak for themselves. This is a great opportunity to show off your favorite team colors or create a unique pattern.
Step 5: Regulation Cornhole Size
If you plan on playing in official cornhole games, it’s important to make sure your board meets regulation size requirements. The top of the board should measure 2×4 feet, and the hole should be 6 inches in diameter. You can easily find cornhole board templates and instructions online, or purchase a regulation cornhole board set from retailers like Amazon.
Step 6: Finishing Touches
Sanding is an important step in any building or DIY project. Use sandpaper to smooth out any rough edges or imperfections on your cornhole board. This will ensure that the surface is smooth and professional-looking, making it easier to slide the bags across.
Step 7: Attach the Legs
Attach wing nuts and washers to the legs of the cornhole board, allowing them to be folded for easy storage and transportation. This is especially useful if you plan on taking your custom cornhole board to parties or events.
Step 8: Enjoy Your Custom Cornhole Board
Once your custom cornhole board is built, painted, and properly finished, it’s time to enjoy it! Gather your friends and family for a fun game of cornhole at your next outdoor party or event. Not only will you have a great time playing, but you’ll also feel a sense of pride knowing that you built it yourself!
Remember, building a custom cornhole board requires basic woodworking skills and tools. If you don’t feel comfortable with the construction or don’t have the required tools, consider asking a friend or hiring a moderate-level handyman to assist you. Building your own cornhole board can be a rewarding experience for everyone involved!
Step 10: Optional Extras
Once you have completed the construction of the cornhole board according to the previous steps, you may want to consider adding some optional extras to enhance the playing experience.
One option is to add a scoring system to keep track of the points during the game. You can do this by creating two evenly spaced holes on the back of the board and labeling them as the scoring holes. You can use nails or washers as markers to keep score.
Another optional extra is to paint or decorate the surface of the board to give it a more personalized look. You can use stencils, tape, or your own artistic skills to create designs or logos. Keep in mind that a durable and weather-resistant paint is recommended to ensure the longevity of the board.
If you want to make the board easier to transport, you can add foldable legs. This will allow you to easily fold the legs up for storage or transport, making the cornhole board more portable and convenient for outdoor parties or events.
Remember to properly sand and round the edges of the board to ensure player safety, especially if you have kids playing the game. You can also add corner protectors or cushions to further enhance safety.
Some other optional extras you can consider include adding handles for easy carrying, adding cup holders for beverages, or attaching a scoreboard to the side of the board.
Keep in mind that these extras are not required for a properly functioning cornhole board, but they can add convenience and enjoyment to the game. Depending on your skill level and the tools you have, some of these extras may require more time and effort to complete.
| Optional Extra | Materials Needed | Where to Purchase |
|---|---|---|
| Foldable Legs | 2x4x21 inches of wood, screws, drill | Amazon, hardware stores |
| Scoring System | Nails/Washers | Hardware stores |
| Painting/Decoration | Weather-resistant paint, brushes, stencils | Art supply stores, hardware stores |
| Cup Holders | Carriage bolts, washers, nuts, drill | Hardware stores |
| Handles | Carriage bolts, washers, nuts, drill | Hardware stores |
| Scoreboard | Plywood, screws, nails/staple gun | Hardware stores |
| Corner Protectors | Rubber or plastic corner protectors | Hardware stores |
Adding these optional extras can further customize your cornhole board to meet your specific needs and preferences. Whether you choose to keep it simple or go all out, the most important thing is to enjoy the game and have fun!
Sources
Before you start building your own cornhole board, you will need to gather the materials and tools necessary for the construction. Here is a list of the required materials and where you can find them:
– 2 pieces of plywood (4’x2′ each) – You can purchase these at a local home improvement store or online at Amazon.com.
– 4 pieces of 2x4x48 lumber – These can also be found at a home improvement store.
– Wood screws – You will need these to secure the boards and legs together. Make sure to choose screws that are suitable for the thickness of your wood.
– Wood glue (optional) – Adding wood glue to the joints will ensure a more durable construction.
– Jigsaw or circular saw – These tools will be necessary for cutting the plywood and lumber to the correct size and shape.
– Drill with pilot bit – You will use a drill to create the holes for the bags to go through and for attaching the legs to the boards.
– Sandpaper – Properly sanding the edges and surfaces of the boards is important to prevent any splinters or roughness.
– Tape measure and level – These tools will help you to measure and ensure that your boards are level before and during construction.
– Paint or stain (optional) – If you want to add some color or protection to your boards, you can paint or stain them according to your preference.
– Cornhole bags – You will need eight bags (four of one color and four of another) to play the game. These can be purchased online or at a sporting goods store.
– Extras – You may also need some washers, nails, and wing nuts for attaching the legs or any other additional features you may want to add to your boards.
Once you have gathered all the required materials and tools, you can then proceed with the step-by-step construction process. The next section will outline all the necessary steps to build a regulation cornhole board.


