

Signatures are a crucial component of many documents, both online and offline. They help certify the authenticity and integrity of the information contained within. In this article, we will explore the process of generating a signature file using various commands and software tools.
There are several methods to create a signature file. One option is to use GnuPG, a free and open-source software, which allows users to sign documents and verify their authenticity. GnuPG, or gnupg, is available for various platforms, including x86_64 and mobile devices.
To begin, you must have a private key. If you don’t have one already, you can create it using the GnuPG software. Once you have your private key, you can sign documents using the “–sign” command. This command allows you to digitally sign a document and generate a clearsigned version in a secure format, such as .txt or .pdf.
Before signing a document, you need to unlock your private key with a passphrase. This adds an additional layer of security, ensuring that only authorized individuals can sign documents using your key. Once your key is unlocked, you can use the “gnupg –sign” command followed by the path to the document you want to sign.
After executing the signing command, a signature file will be created. This file contains information about the signer, the signing time, and the digital signature itself. You can choose to save this signature file separately or append it to the original document. Having a separate signature file can be useful if you need to provide proof of authenticity without altering the original document.
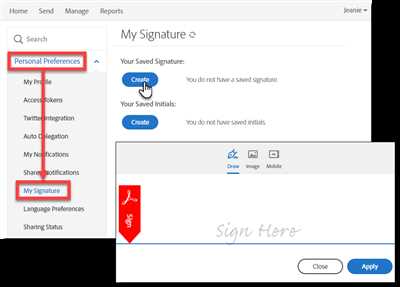
If you are working with PDF forms, you can also use software like Adobe Acrobat or DigiSigner to add your signature electronically. These programs allow you to draw your signature using a mouse or stylus, or even upload an image of your signature. Once added, the signature becomes an integral part of the document, and any changes made to the document will invalidate the signature.
In addition to signing documents, GnuPG offers other options to enhance security. For example, you can encrypt documents using the recipient’s public key or verify the authenticity of signed documents using the “–verify” command. These features make GnuPG a versatile tool for ensuring the integrity and confidentiality of your digital information.
Whether you need to sign a contract, finalize a business deal, or submit a passport application online, knowing how to generate a signature file is essential. By following the steps outlined in this article, you can make sure that your digital signatures are secure, reliable, and legally binding.
Watch How to Use Online Signature Maker
If you need a quick and secure way to sign your digital files, then an online signature maker is an excellent option to consider. With this tool, you can add your signature to various documents such as PDFs, forms, word files, and more, all without the need for any software downloads. The process is simple and can be completed in just a few easy steps.
Here’s a step-by-step guide on how to use an online signature maker:
- Open the Online Signature Maker: Start by visiting the website that offers the online signature maker tool. Make sure you choose a reputable and secure website to ensure the privacy and security of your information.
- Upload Your Document: Once you’re on the signature maker page, you’ll need to upload the document you want to sign. This could be a PDF, a form, a word file, or any other supported file format.
- Create Your Signature: Using your mouse or touchpad, draw your signature on the designated area. You can also choose from pre-drawn signature options if you prefer.
- Save and Download: Once you’re satisfied with your signature, save the changes, and download the signed document.
- Verify the Signature: If you want to verify the authenticity of the signature, you can use software such as Gpg4win on Windows or GnuPG on Mac and Linux. These tools allow you to check if the signature matches the original document and recover any data that might have been changed.
Using an online signature maker not only saves you time and effort, but it also ensures the security and integrity of your signed documents. Feel free to explore different online signature maker tools to find one that suits your needs best.
Private Secure
When it comes to generating signature files, privacy and security are paramount. You want to ensure that your documents and data remain confidential and that any signatures applied to them are valid and cannot be tampered with.
One way to achieve this is by using the GnuPG package, which allows you to create and manage your own set of keys. These keys can be used for digitally signing and verifying files, ensuring their authenticity and integrity.
To generate a signature file, you first need to have the original file that you want to sign. This can be any type of file, including TXT, XLS, DOCX, or PDFs. Once you have the file, you can use GnuPG to sign it. The following steps outline the process:
- Open a Terminal or Command Prompt window and navigate to the directory where the file is located.
- Type
gpg --sign [file_name]and press Enter. Replace[file_name]with the name of your file. - GnuPG will ask you for your passphrase. This is a password that you have previously chosen when creating your keys on keys.openpgp.org.
- After you enter your passphrase, GnuPG will create a clear-signed version of the file (with the extension
.asc) and save it in the same location as the original file.
Now, you have a signed version of your file that can be used to verify its authenticity. To verify the signature, you can use GnuPG again by following these steps:
- Open a Terminal or Command Prompt window and navigate to the directory where the original file and the signature file (
.asc) are located. - Type
gpgv [signature_file] [file_name]and press Enter. Replace[signature_file]with the name of your signature file and[file_name]with the name of your original file. - GnuPG will check the signature on the file and provide you with feedback on whether it is valid or not. If the signature is valid, you can trust that the file has not been tampered with since it was signed.
By following these steps, you can ensure the privacy and security of your documents and data. The use of electronically signed files allows for easy and efficient verification, saving you time and effort.
Make signatures and fill out forms

If you need to fill out forms and sign documents electronically, you can save time and ensure your privacy by using signature files. These files are created using encryption techniques that require a passphrase to unlock, making them secure and only allowing access to you and other authorized users.
To create a signature file, you can use various software and online tools, such as DigiSigner or TorKeyRing. These tools allow you to choose the type of signature you want to create and the format in which it will be saved.
Once you have downloaded the software or accessed the online tool, follow the instructions provided to create your signature. You can use your mouse or other input device to draw your signature or type it using the available options. Make sure that your signature matches the original one you would sign on paper.
After creating your signature, you can use it to sign PDFs, TXT files, XLS documents, and other formats. To sign a document, open it using the software or online tool and follow the commands or options provided to insert your signature in the appropriate place.
It’s also good practice to verify signatures before signing any document. Verifying a signature ensures that it comes from a trusted source and hasn’t been tampered with. You can do this by checking the signature against the original one or using software like GPGv.
Remember that once you sign a document, you cannot recover or change your signature. Hence, it’s important to double-check your signature file and make sure it is correct before using it to sign any documents.
By using signature files, you can save time and make sure your documents are securely signed. These files are widely used by individuals, businesses, and developers to sign contracts, agreements, and other important documents. Feel free to choose the method and software that best suits your needs and enjoy the benefits of e-signatures.
Make signature in PDF Word IMG TXT XLS
When it comes to generating signature files, there are various formats you can choose from. Whether you want to sign PDF, Word, IMG, TXT, or XLS files, there are methods and tools available to help you accomplish this task.
For PDF files, one option is to use a downloaded software or online service that allows you to sign the document electronically. These tools often provide a user-friendly interface where you can add your signature by drawing it with your finger or using a stylus. Once you’re done signing, the software will save the document with your signature in it.
In the case of Word, IMG, TXT, and XLS files, you can use different approaches to add your signature. For example, in Word documents, you can insert an image of your signature or use the built-in signature feature that allows you to draw your signature using the mouse or touch screen.
When it comes to TXT files, you can create a clearsigned file by using commands like –sign or –output in the command line. This will create a signature file that ensures the integrity of the data. Similarly, for IMG files, you can use software like DigiSigner or eSignature to create a digital signature that can be used to verify the authenticity of the image.
For XLS files, you can use software like GnuPG or OpenPGP to sign the document. This software allows you to generate a secure signature that can be used to verify the integrity of the document. It also allows you to encrypt the file with your private key, ensuring that only authorized users with the corresponding public key can access the document.
No matter which format you choose to sign, it’s important to follow the proper steps to ensure that your signature is valid. Make sure to check that your signature matches the one on your passport or other official identification. Additionally, always sign documents on a secure connection to protect your personal information.
In conclusion, generating a signature file for PDF, Word, IMG, TXT, or XLS files can be done using various methods and tools. Whether you need to sign documents using software, draw your signature on a touch screen device, or use command line options, there are options available to meet your needs.
Signature maker options
When it comes to creating a signature file, there are several options that you can choose from. Whether you want to unlock the full potential of your signature or use a simple and straightforward approach, these options offer flexibility and convenience.
One of the most popular signature maker options is to use software such as GPG (GNU Privacy Guard) or OpenPGP to create your signature. These tools allow you to create a digital signature that can be used to sign documents electronically. With GPG or OpenPGP, you can use your private key to create a unique signature that no one else can duplicate.
If you prefer a more hands-on approach, you can create a signature file using commands in the command line interface. By using commands like “gpgv” or “gpg –sign”, you can generate a signature file in the desired format (such as TXT or PDF) from the original document.
Another option is to use signature maker tools available online. These tools often have a user-friendly interface and allow you to simply fill in your data and select the type of signature you want. Some signature maker options even provide additional features such as drawing your signature using your mouse or uploading an image of your handwritten signature.
For those who value privacy and security, using a signature maker that supports the OpenPGP standard is a good choice. OpenPGP is a widely-used encryption protocol that ensures the confidentiality and integrity of your signature. By using OpenPGP, you can create signatures that match the version used by well-known software packages, such as GPG or PGP.
Additionally, if you are using a 32-bit or x86_64 version of a software package, you may need to use signature maker options that are compatible with your system. Some tools, such as GnuPG (the command-line tool of GPG) or GPG4Win, have specific versions for different architectures.
Whether you want to create a digital signature for official documents or simply make your emails and files more personalized, signature maker options allow you to choose the one that best suits your needs. Don’t hesitate to explore these options and find the signature maker that empowers you to make your mark in the digital world.
Create your eSignature to sign documents online PDF Docx and more
Signing important documents is a crucial part of many daily tasks. Whether you need to sign a form, fill out an application, or approve a clearsigned document, having a reliable eSignature solution is essential. With the advancement in technology, you can now create your eSignature to sign various types of documents, including PDF, docx, and more.
One popular tool that developers often use to generate signature files is GnuPG, also known as GPG. GnuPG is an open-source software package that allows users to encrypt and sign their data securely. It uses a combination of public and private keys for encryption and decryption.
Creating your eSignature using GnuPG is simple. First, you need to install GnuPG on your device, which is available for both x86_64 and arm devices. Once installed, you can generate your public and private keys, which will be used to sign your documents.
To create your eSignature, you can use the following command:
gpg –output signature.txt –sign document.txt
In this command, signature.txt is the file in which your eSignature will be saved, and document.txt is the file you want to sign. You can replace these file names with your own filenames.
After creating your eSignature, you can now use it to sign different types of documents, including PDF and docx files. You can either draw your eSignature using your mouse or upload an image of your signature. The choice is yours.
When signing PDF documents, you have the option to choose where to place your eSignature. You can also add additional information, such as the date and your name, to the signature field. This ensures that your eSignature is valid and clearly identifies you as the signer.
For docx documents, you can easily add your eSignature using popular word processing software. Just click on the designated signature field, choose the option to insert your signature, and select your eSignature file. It’s that easy!
When signing documents online, privacy and security should be your top priority. Make sure to use trusted eSignature platforms that offer end-to-end encryption and secure storage for your signature files. Always check the following:
– The platform allows you to save your eSignature securely and doesn’t store your signature data on their servers.
– The platform verifies the integrity of your signature by matching it with your original document.
– The platform provides options to download clearsigned documents and verify them using GnuPG’s gpgv tool.
Having your own eSignature can save you time and effort, as you no longer have to print, sign, and scan documents. Plus, electronically signed documents can’t be easily altered, so you can be confident that your signature is authentic and the document remains unchanged.
So, unlock the power of eSignatures and start signing your documents with ease and convenience. Say goodbye to paper trails and embrace the digital age!
Verifying the signature
Verifying the signature of a digitally signed file is an essential step to ensure its validity and integrity. In order to verify the signature, you will need to have the appropriate software installed on your device.
If you are using a 32-bit version of software, you must choose the 32-bit version of the signature verification tool. Similarly, if you are using a x86_64 version of software, you must choose the x86_64 version of the verification tool.
To verify a signature, you will need the signature file itself and the file that was signed. The signature file is typically in a .asc, .sig, or .pgp format.
To begin the verification process, open the software and navigate to the verification page or section. Choose the option to verify signatures and select the file that you want to verify.
The software will then use algorithms to compare the digital signature with the contents of the file. If the signature matches, it means that the file has not been modified since the signature was created. On the other hand, if the signature doesn’t match, it indicates that the file may have been tampered with.
Verifying a signature may also require you to enter a passphrase that was used to encrypt the private key during the signing process. If you do not have the passphrase, you will not be able to verify the signature.
Once the verification process is complete, the software will display the results. If the signature is valid, you can trust the authenticity and integrity of the file. However, if the signature is invalid or the verification fails, it is possible that the file has been tampered with or the signature was created using unauthorized or compromised keys.
In conclusion, verifying the signature of a file is an important step in ensuring its authenticity and integrity. By using the appropriate software and following the necessary steps, you can confidently verify electronically signed files and protect against potential data breaches or unauthorized modifications.
Sources
When it comes to generating signature files, there are several tools and software available that can be used to create clearsigned documents. Some popular options include:
- Docx: This is a file format used by Microsoft Word to save documents. It allows you to add digital signatures to your Word documents.
- XLS: Similar to Docx, XLS is the file format used by Microsoft Excel for spreadsheets. It also allows for the addition of digital signatures.
- IMG: Image files, such as JPEG or PNG, can also be signed using digital signatures. This is useful for adding signatures to images or scanned documents.
In addition to these file formats, there are various software options that can be used to generate signature files:
- Digisigner: Digisigner is a software package that allows users to electronically sign and upload valid signed documents. It provides options for creating signatures in different file formats.
- GNUPG: GNUPG is an open-source software that can be used to generate secure signatures. It allows users to choose the type of signature they want to create, as well as the format of the signature file.
- Mobile signature apps: Mobile apps are also available that allow users to create signatures using their mobile devices. These apps offer full functionality and don’t require the use of a computer.
Once the signature file is generated, it can be used to sign documents. The process usually involves opening the document in a software application or online service, choosing the signature file, and adding the digital signature to the document.
In summary, there are various sources and tools that can be used to generate signature files. Whether you need to sign a document in a specific format or want to use a mobile app, there are options available to suit your needs.


