

Are you a developer looking to distribute your app to a wide range of devices? Look no further! With our easy-to-use tool, you can generate APKs for your Android app and reach millions of users.
Before you can allow your app to be installed on devices, there are a few steps you need to follow. First, make sure you build your app using the Android SDK. This will ensure that your app is compatible with different Android versions and devices.
Even if you have no prior experience in building APKs, our tool makes it a breeze. With just a few clicks, you can configure the package name, permissions, and user controls. You can also add extra features such as images, sensor-based controls, and background tasks.
Once you have finished editing your app, you can then generate the APK file. This file contains all the necessary files and code for your app to run on any Android device.
With our tool, you can build APKs for different screen sizes, orientations, and device types. We even provide pre-designed templates for you to choose from, so you don’t have to start from scratch.
After generating the APK, you can easily install it on multiple devices for testing or for distribution. Simply follow the easy-to-use instructions we provide.
So why wait? Start using our APK generator today and take your app to new levels of success!
How to generate an apk file from Android Application programmatically
To build an Android application and generate an APK file programmatically, you need to follow a few steps. Here is a guide on how to do it:
- Start by setting up your Android project, including configuring the necessary permissions and settings in the AndroidManifest.xml file. This file allows you to specify the package name, version code, version name, and other important information about your application.
- Design your application screens using XML layout files. In these files, you can define the UI controls, styling, and other display elements of your application. You can include different layouts for different screen sizes and orientations.
- Write the Java source code for your application, which contains the logic and functionality of your app. This code should be placed in the appropriate .java files based on the structure of your projects.
- Configure your application to determine its starting activity and any additional activities, services, and broadcast receivers it may use. This is done through the AndroidManifest.xml file.
- Include any required external libraries or dependencies in your project. These libraries can be added to your Gradle build file or included in the libs folder of your project.
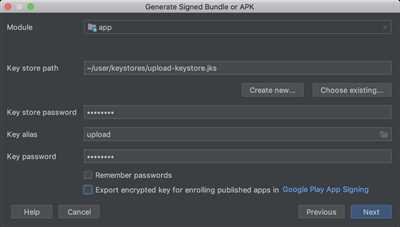
- Make sure your application is properly signed with a valid keystore file. This is necessary for your application to be installed on user devices or published on app stores.
- Compile your project, which will generate the class files for your application. This can be done using your preferred IDE or by running commands in the terminal.
- Build your application by creating an APK file. This can typically be done by selecting the “Build” or “Generate APK” option in your IDE. The resulting APK file will contain all the necessary files and resources for your application to run.
- You can then distribute the generated APK file to other devices or upload it to app stores for users to install and use your application.
- It is important to note that generating APK files might require additional steps depending on your use case or the specific requirements of your application or company.
By following these steps, you can successfully generate an APK file from your Android application programmatically. Remember to regularly update your application and test it on different devices to ensure compatibility and functionality.
Configure the build

Once you have generated your apk, the next step is to configure the build. The configuration process involves setting up various aspects of your application, such as the orientations, organization, and icons.
By default, the screen orientation is set to portrait. However, depending on the needs of your users and your company’s requirements, you may need to configure the orientation to be sensor-based. This allows the app to determine the orientation of the device programmatically, based on the sensor readings.
To configure the build, you will need to create a manifest file. This file contains all the necessary information about your application, including the package name, which is determined by the company or organization you are publishing the app for.
It is also possible to configure the build based on the screen size and resolution of the device. For example, if you want to create a version of your app that is optimized for larger screens, you can configure the build to use a different layout and styling.
Furthermore, you can include multiple sets of icons and splash screen images in different resolutions and orientations. This allows your app to be visible and look great on a wide range of devices.
To configure the build for different levels of Android SDK, you can include multiple versions of the manifest file. This ensures that your app can be installed and run on devices with different SDK levels.
Another important aspect of configuring the build is to allow the installation of multiple apk files on the same device. This is useful for testing purposes, where you may need to have different versions of your app installed simultaneously.
In conclusion, configuring the build is an essential step in the process of generating an apk. It ensures that your app is optimized for different screen orientations, devices, and user preferences. By following the guidelines provided by Google, you can publish a high-quality app that meets the needs and expectations of your users.
Publishing format
The publishing format for Android applications is the APK (Android Package) file format. This format is used by the Google Play store to distribute and install apps on Android devices. It is also possible to generate an APK file for testing purposes or for distribution through other channels.
APK files are archives that contain all the necessary files and resources for the app. The visible part of the app, known as the user interface (UI), is created using XML and resource files. This includes layouts, images, icons, and other assets that determine how the app looks and behaves on different screen sizes and orientations.
When you generate an APK, you can configure various settings and options to tailor the app to your specific needs. For example, you can define the minimum Android SDK version that the app supports, set permissions for accessing device features and data, specify the organization and package name, and create different versions for different devices or user levels.
The APK format allows for easy installation of apps on Android devices. Users can simply download the APK file and install it on their device to start using the app. The installation process can be done in two ways: by directly downloading the APK file and installing it, or by installing it from the Google Play store.
Before publishing an app, it is important to test it thoroughly. This includes testing on different devices, screen sizes, and orientations to ensure that the app functions correctly. The APK format allows you to install the app on multiple devices for testing purposes.
When creating the APK file, you can also include a splash screen, which is the initial screen that users see when they open the app. This screen can display the app’s logo or other images and provides a seamless transition to the app’s main interface.
It is important to note that when publishing an app, you must comply with Google’s guidelines and policies. This includes respecting trademarks, permissions, and other requirements. The APK format allows you to specify these details and make sure that your app meets the necessary criteria.
In summary, the APK format is the standard publishing format for Android applications. It provides a convenient and flexible way to distribute and install apps on Android devices. By utilizing the APK format, you can create and publish high-quality apps that are compatible with a wide range of devices and user preferences.
Editing Manifest Files
Before you generate an APK for your Android application, you may need to edit the manifest files. The manifest file is an XML file named AndroidManifest.xml. It contains important information about your application, such as its package name, version, and permissions.
For example, depending on the orientation of your app, you may need to specify the screen orientation in the manifest file. There are two possible values: portrait and landscape. The portrait orientation is used for apps that are locked to portrait mode, while the landscape orientation is used for apps that are locked to landscape mode.
Another important aspect of the manifest file is the activity tag. It defines each screen of your app and controls its behavior. For example, you can specify the starting screen of your app, the background color, and the icons used for each screen.
Before you create an APK for testing or publishing, it’s important to make sure that your manifest file is properly configured. This includes setting the correct package name, version number, and other options that are specific to your app.
When editing the manifest file, it’s important to know that the Android SDK allows you to specify different resources, such as layout files or values, based on the device’s characteristics. This can be useful, for example, to create different layouts for larger devices or to determine the screen orientation based on the device’s sensor values.
In addition, you can use various attributes to style your app’s components. These attributes determine the appearance and behavior of your app’s UI elements, such as buttons, text fields, or images.
There are normally four files that make up the manifest file: the AndroidManifest.xml file, the build.gradle file, the proguard-rules.pro file, and the google-services.json file. Each file serves a different purpose and contains important information for your app.
For example, the AndroidManifest.xml file contains the basic information about your app, such as its package name, version number, and permissions. The build.gradle file contains settings related to the build process, such as the SDK version and the minimum Android version required by your app.
When generating an APK, you should also consider the runtime permissions required by your app. Depending on your app’s functionality, you may need to request permissions for certain actions, such as accessing the device’s camera or reading external storage.
It’s also worth mentioning that Android is a trademark of Google LLC. The source code of Android is available under the Apache License, and some parts of it are contributed by other open-source projects.
In conclusion, editing the manifest files is an important step in the process of generating an APK for your Android app. It allows you to specify various settings, such as the package name, version number, screen orientation, and permissions. By properly configuring the manifest files, you can ensure that your app functions correctly on different devices and meets the requirements of the Google Play Store or your organization’s publishing guidelines.
Creator: How to generate APK, a free tool for building Android apps, allows you to quickly generate APKs based on your project’s configuration. With How to generate APK, you can easily customize the manifest files and test your app on different devices before publishing it.
Package Names
When it comes to generating an APK file for your Android application, one crucial aspect to consider is the package name. The package name serves as a unique identifier for your app and is used by the Android operating system to distinguish it from other applications installed on the device.
The package name is typically displayed in the format “com.example.myapp” and is included in the manifest file of your Android project. This is the file that provides essential information about your app, such as permissions, activities, and services.
To create a package name, you can follow the reverse domain name notation. This means starting with your domain name in reverse order, followed by the respective projects and sub-projects. For example, if your website is “example.com” and you have a project called “myapp,” the resulting package name would be “com.example.myapp”.
When generating the APK, it’s important to make sure that your package name is unique. This is because the Google Play Store uses the package name to identify your application and its updates. Having a unique package name ensures that your app remains separate from other applications and avoids conflicts.
It’s also worth mentioning that the package name is not visible to the user unless they use a specific app or tool to view it. It primarily serves as an internal identifier for the Android system and developers.
To generate an APK with a specific package name, you can configure it in the build.gradle file of your Android project. The package name can be found under the “defaultConfig” section, where you can set it to the desired value.
Depending on your project’s requirements, you may need to include additional configuration settings for the APK generation. These can include options for the minimum Android SDK version, target SDK version, version code, version name, and more.
In addition to the package name, you should also consider the orientation settings for your application. By default, Android applications can be displayed in both portrait and landscape orientations. However, if your app is designed for a specific orientation, such as landscape-only, you can configure this in the manifest file.
Furthermore, when building your APK, you have the option to include splash screens, icons, and image sets. These assets can enhance the visual appeal of your app and provide a consistent branding experience. By customizing these elements, you can make your app look more professional and appealing to users.
Before publishing your APK, it’s essential to test it on different devices with varying screen sizes and resolutions. This ensures that your app displays correctly on each device and provides an optimal user experience.
Additionally, if your application uses sensor-based controls or requires specific hardware features, you should consider setting the appropriate permissions and configurations. This allows your app to access the needed resources and provides a seamless experience for users.
Finally, once you have generated the APK file with the desired package name and configurations, you can install it on multiple devices for testing or distribute it to users. The installation process involves transferring the APK file to the device and running the installer.
In summary, understanding package names and their significance is crucial when generating an APK file. It serves as a unique identifier for your app, ensures separation from other applications, and allows for proper installation and publishing. By configuring the package name and other settings correctly, you can create a professional and functional Android application.
Styling
When it comes to styling an Android application, there are several factors to consider. The source code, SDK version, and the height and width of displays on different devices all play a role in determining how the app will look.
The manifest file is normally used to declare the configuration and permissions for the app. It includes information about the app’s name, icon, orientation, and more. The package name is an important identifier for the app and should be unique.
There are different sets of resources that can be used to style an app. These resources, such as images, layouts, and values, are stored in respective directories within the app’s package and are used to determine how the app will look on different devices.
One of the key sources for determining the device’s display characteristics is the sensor. The sensor can be used to determine the device’s orientation, which in turn can be used to adjust the layout of the app.
When designing an app, it is important to consider the minimum and maximum screen sizes, as well as the different densities of the display. This ensures that the app looks good on devices with varying screen sizes and resolutions.
In addition to determining the layout of the app, styling can also include the use of colors, backgrounds, and other visual elements. These can be defined using XML resources or programmatically at runtime.
Depending on the organization’s preference, there may be specific guidelines for styling an app. These guidelines can include the use of trademarks, specific color schemes, or other branding elements.
When publishing an app, it is important to consider the target audience and the devices they are likely to use. This information can help determine the style and design choices for the app.
Furthermore, it is important to provide a visually appealing and user-friendly experience. This can be achieved by using intuitive controls, making use of free space, and following best practices for layout and navigation.
In conclusion, styling an Android app involves a combination of factors such as the device’s properties, user preferences, and design guidelines. By carefully considering these factors, developers can create visually appealing and user-friendly apps that meet the needs of their users.
| Permissions | Levels | Files |
|---|---|---|
| The permissions required by the app can influence its style and behavior. Developers need to carefully consider the permissions they request and explain why they are necessary to their users. | Android provides different levels of permission for accessing certain features or data on the device. Depending on the level of permission granted, the app may have different capabilities and restrictions. | Files, such as images or configuration files, can also impact the styling of an app. Developers should ensure that all necessary files are included in the app package and accessible by the app at runtime. |
Starting from Android 9 (API level 28), there are additional restrictions on accessing certain files and directories. Developers should be aware of these restrictions and adapt their app’s styling accordingly.
Google provides various resources and guidelines for developers to learn more about app styling and best practices. These resources can help developers create visually appealing and user-friendly apps.
The direction in which the app’s layout is presented can also impact its styling. Depending on the language and reading direction of the target audience, developers may need to adjust the layout to ensure a seamless user experience.
Rotate controls can be used to allow users to change the orientation of the app’s layout. This can be useful in situations where the default orientation does not provide the best viewing experience.
Screen Orientation
When developing an application, one important aspect to consider is the screen orientation. The screen orientation determines the layout and formatting of the application’s user interface based on the device’s current screen orientation.
For example, let’s say you are creating an APK using a format creator. Before building the APK, you need to decide how the application should handle screen orientation. Should it rotate when the device is rotated, or should it be locked to a specific orientation? This decision depends on the nature of your application and the user experience you want to provide.
In Android, the screen orientation is controlled using permissions and settings. Before your application can rotate the screen, you must declare the necessary permissions in the AndroidManifest.xml file. These permissions allow your application to access the necessary resources and functionalities needed for screen rotation.
Once the necessary permissions are declared, you can start styling and testing your application for different screen orientations. The Android SDK provides four main orientation options: portrait, landscape, reverse portrait, and reverse landscape. Each orientation represents a different direction in which the screen can be rotated.
By default, Android builds an APK that supports all four orientations. However, if you want to build a specific APK that only supports a certain orientation or a combination of orientations, you can configure this in the AndroidManifest.xml file.
Now, let’s say you want your application to be based on the sensor, so it automatically rotates the screen based on the device’s orientation. You can achieve this by specifying the “sensor” value in the AndroidManifest.xml file. This allows the system to determine the appropriate orientation based on the device’s position.
If you want to lock the screen to a specific orientation, you can use the “locked” value in the AndroidManifest.xml file. This will prevent the screen from rotating and keep it fixed in the specified orientation.
Another important consideration is the runtime screen orientation. Even if your application supports screen rotation, you need to handle the changes in layout and styling that occur when the screen is rotated. This can be done by specifying different layouts or by dynamically adjusting the layout based on the current orientation.
For example, you may want to change the color or size of certain elements when the screen rotates from portrait to landscape. In such cases, you can use the respective layout files or programmatically adjust the styling during runtime.
It’s also worth mentioning that not all applications need to support all screen orientations. Some applications may be designed specifically for portrait or landscape orientations, while others may work best in a single fixed orientation.
When publishing your APKs, make sure to name them appropriately based on their supported orientations. This will help users understand which APK to download based on their device’s screen orientation. For example, you can name the APKs as “MyApp_Portrait.apk” and “MyApp_Landscape.apk” to differentiate between the two versions.
In summary, understanding and managing screen orientation is an important aspect of Android application development. By configuring the appropriate settings and layouts, you can create user-friendly applications that work seamlessly in different screen orientations.
Icons
Icons play an important role in the user experience of any application. They serve as visual representations of actions, objects, or ideas and help users quickly identify and navigate through different features and functionalities.
When creating an Android application, it is essential to include appropriate icons that are visually appealing and effectively convey the purpose or functionality of the application. Android provides a set of guidelines and specifications for icons that developers should follow to ensure consistency and compatibility across devices.
Android allows developers to use both system-provided icons and custom icons. System-provided icons are free to use and can be accessed using their predefined names. These icons are visible to the user and are often used for actions such as saving, deleting, or sharing. Custom icons, on the other hand, are specifically designed for a particular application and should align with the overall design and branding of the app.
To include icons in an Android application, developers need to create the required image files in the appropriate format and size. The table below shows the different levels of icons and the corresponding sizes in pixels:
- xxxhdpi: 192 x 192
- xxhdpi: 144 x 144
- xhdpi: 96 x 96
- hdpi: 72 x 72
- mdpi: 48 x 48
The manifest file of the app should define the icon for each activity or component using the android:icon attribute. It is possible to have different icons for different screen orientations by creating separate image files and specifying them in the appropriate attributes.
Android devices with different screen sizes and densities may require different icon sizes for optimal presentation. The runtime system automatically selects the appropriate icon based on the device’s screen density, allowing the application to look its best on all supported devices.
In addition to the application icon, Android also uses other icons such as the splash screen icon, which is displayed when the app is launched, and the notification icons, which are displayed in the status bar. Developers should provide these icons in the appropriate sizes and formats to ensure a consistent and visually pleasing user experience.
The Android operating system and its various components, such as the Google Play Store, have their own set of trademarks and guidelines for the use of icons. Developers should ensure that their icons comply with these guidelines and do not infringe on any copyrights or trademarks.
In conclusion, icons are an integral part of any Android application, as they enhance the user experience and make the app visually appealing. By following the guidelines and specifications provided by Android, developers can create icons that are both functional and visually consistent across different devices and screen sizes.
Splash Screens
A splash screen is a static image or graphical element that appears while an app is loading. It serves as an initial screen that displays branding, logos, and other visually appealing content to engage users during the app startup process.
Building a splash screen for your Android app is an essential step in creating a professional-looking and user-friendly experience. The splash screen can set the tone for your app’s design, and it should align with your organization’s branding and style guidelines.
There are different ways to implement splash screens in your Android app, depending on your specific needs and the desired app user experience. Here are some common approaches:
- Using a static image: You can use a high-quality image as a splash screen. It can be a logo, a promotional graphic, or any other visually appealing content. The image should be medium-sized and appropriate for various screen orientations.
- Using multiple sets of splash screen images: Android allows you to specify different versions of splash screen images based on device orientation. For example, you can have separate images for portrait and landscape orientations. By doing so, your app will display the appropriate splash screen depending on the user’s device orientation.
- Using programmatically generated splash screens: Instead of using static images, you can programmatically generate splash screens using code. This approach gives you more flexibility to customize your splash screen based on various factors like the current time, device orientation, or the user’s location.
When you generate APKs for your Android app, make sure to include all the necessary splash screen images for different screen orientations. This ensures that your app’s splash screen is displayed correctly on all devices, providing a seamless and visually appealing launch experience for your users.
By configuring various splash screen options and settings, you can control how your app displays the splash screen during the app startup process. You can set a minimum display time for the splash screen, define the splash screen’s visibility, configure sensor-based splash screens, and even allow users to skip the splash screen entirely.
When publishing your app on the Google Play Store, ensure that your app’s manifest file includes the necessary permissions for displaying the splash screen. Additionally, consider optimizing your splash screen for quick loading and set it up to allow efficient navigation to the app’s main interface.
In conclusion, splash screens play an important role in creating a polished and engaging user experience for your Android app. They are the starting point of user interaction and can make a quick, positive impression on users. By carefully designing and implementing your app’s splash screen, you can effectively communicate your app’s purpose and branding, setting the stage for a great user experience.
Setting Permissions
One of the important steps in generating an APK file is setting permissions. Permissions are a medium through which an Android application can interact with the various features and resources of a device. The level of permissions granted to an application can range from the highest to the most minimal.
When developing an application, it is necessary to determine what permissions your project needs. Different builds and testing scenarios may require different levels of permissions. The respective SDK for each build offers a preference to define permissions in the manifest file. By default, an application has no permissions specified in its manifest.
To set permissions, you need to create a file called “AndroidManifest.xml” in the “src” folder of your project. This file contains information about your application and specifies the required permissions. The manifest file uses XML format to define the structure of your application.
There are various permissions that an Android application can request, such as access to the internet, the device’s camera, location services, or even the ability to read and write files. To request a permission, you need to add a permission element within the manifest file. For example, if your application needs to access the internet, you would add the following line:
This line informs the Android system that your application requires the INTERNET permission.
In addition to permissions, you can also define other settings in the manifest file. For example, you can specify the orientation preferences for your activities. By default, activities in an Android application are set to have a portrait orientation. However, you can change this to allow different orientations, such as landscape or even sensor-based orientation.
To set the orientation preference for an activity, you can use the following line:
This line specifies that the MainActivity should have a landscape orientation when starting on the screen.
The Android manifest file is also used to define other settings like the starting screen, larger screen layout support, icons to be displayed, and even the version of your application.
It is important to note that permissions and other settings defined in the manifest file determine how the application behaves at runtime and what features it can use. In some cases, certain permissions or settings may require additional permissions to be granted programmatically.
By setting permissions and other settings correctly in the Android manifest file, you can ensure that your application functions smoothly and securely. This is especially important when publishing your application to the Google Play Store or other sources, as users will need to review the requested permissions before installing.
While Android Studio normally sets permissions and other settings automatically, it is possible to edit the manifest file manually if needed. This gives you greater control over the organization and structure of your application.
In conclusion, the Android manifest file is a crucial component in setting permissions and defining various settings for your Android application. By properly setting permissions and configuring the manifest file, you can ensure that your application interacts with the device and its resources in a secure and efficient manner.
How to install an APKS file
After you have generated the APK file for your Android application, you may come across a situation where you need to install an APK Set file (APKS). The APKS file format allows you to create a single bundle containing multiple APK files, each optimized for a different device configuration or language, making it possible to deliver a more tailored installation for your users.
To install an APKS file on your device, you will first need to make sure that the device is unlocked and has permission to install files from unknown sources. Follow these steps:
- On your Android device, go to the Settings app.
- Navigate to Security or Privacy (the name may vary depending on your device’s manufacturer).
- Enable the Unknown sources option. This will allow you to install applications from sources other than the Google Play Store.
Once you have enabled the installation of apps from unknown sources, you can proceed with the installation of the APKS file. Here’s how:
- Find the APKS file on your device and tap on it to open it.
- A screen will appear asking for your confirmation to install the application. Tap on Install to proceed.
- The installation process will begin, and you’ll see a progress bar indicating the installation status.
- Once the installation is complete, you’ll see a confirmation message stating that the app has been installed.
It’s worth noting that the installation process may vary depending on your device’s manufacturer and software version. However, the steps outlined above should generally apply to most Android devices.
In conclusion, with the APKS file format, you have the flexibility to create a single bundle containing multiple APK files to cater to different device configurations and languages. By enabling the installation of apps from unknown sources, you can install APKS files on your Android device quickly and easily.


