

If you are looking to take your art to the next level, resin art is something you should definitely try. With resin, you can create stunning pieces that capture the imagination and leave everyone in awe. Resin is a versatile material that allows you to play with pigments and create something truly unique.
So, where do you begin when it comes to resin art? Getting the right materials is key. You will need resin, pigments, inks, and other tools to get started. It’s important to have a wide range of colors and options available, as they will be the building blocks for your creations.
Before you start, make sure you have a clean and well-prepared workspace where you can get creative. Resin can be messy, so having a proper setup is essential. Additionally, resin art requires a well-ventilated area, as the process can release fumes that may not be safe to inhale.
If you are a beginner looking to dip your toes into this exciting journey, Kate from Colorberry is here to guide you. She has been creating resin art for years and has a wealth of tips and tricks to share. Her Instagram account is a great source of inspiration, and she often posts step-by-step tutorials on how to create beautiful resin art pieces.
One important tip to keep in mind is to mix your resin thoroughly before pouring it onto your canvas or substrate. This will ensure that the resin sets properly and prevents any unwanted bubbles from forming. You can use jugs or cups to mix the resin, and adding a touch of glitter can add even more shine to your final piece.
When it comes to the actual pouring process, be prepared to work quickly. Resin tends to have a limited working time, so you need to pour it onto the surface and spread it evenly before it starts to set. Using a torch or heat gun can help remove any air bubbles that may come to the surface as the resin cures.
Patience is key when working with resin. It takes time for the resin to fully cure and become hard. Depending on the amount of resin used and the temperature and humidity of your workspace, this can take anywhere from 12 to 24 hours. Be sure to follow the instructions on your specific resin product for the best results.
Creating resin art is a fun and rewarding hobby that allows you to express yourself in unique ways. Each piece is a journey of creativity and experimentation, and the possibilities are endless. So, if you’ve been interested in trying resin art, now is the perfect time to dive in and let your imagination run wild.
- How To A Beginner’s Guide to Resin Art – With The Resin Reserve
- What is Resin Art?
- Equipment and Materials
- Getting Started
- What is resin
- Things to keep in mind when doing resin art:
- Creating Your First Resin Painting
- Preparing Your Workspace
- Getting the Right Equipment
- Learning the Basics
- Avoiding Common Mistakes
- How to create Cells in Resin Art pieces with MEYSPRING Pigments
- Video:
- AMAZING DIY IDEAS FROM EPOXY RESIN / 20 COLORFUL EPOXY RESIN
How To A Beginner’s Guide to Resin Art – With The Resin Reserve
If you’re looking to get started with resin art, you’ve come to the right place! Resin art is a unique form of art that allows you to create stunning pieces on a canvas or in whatever form you choose. It has gained popularity in recent years, thanks to platforms like Pinterest and Instagram, where artists show off their beautiful resin creations.
What is Resin Art?
Resin art involves using epoxy resin, which is a two-part mixture that, when combined, creates a crystal-clear, high-gloss finish. The resin can be mixed with pigments in every color, allowing you to create vibrant and colorful artwork. Resin art is loved for its versatility and ability to mimic the look of water and other liquids.
Equipment and Materials
Before you start your resin art journey, you’ll need to gather some essential equipment and materials. Here’s a list of what you’ll need:
- A well-ventilated workspace
- A canvas or whatever surface you want to work on
- Epoxy resin and a hardener
- Pigments in your desired colors
- Moulds, if you want to create specific shapes
- A heat gun or torch to remove air bubbles
- A mask and gloves to protect yourself
- Plastic sheets to cover your work area
Getting Started
Once you have all your equipment ready, it’s time to start creating resin art! Here’s a step-by-step guide to get you started:
- Prepare your workspace by covering it with plastic sheets and ensuring proper ventilation.
- Mix the epoxy resin and hardener according to the manufacturer’s instructions. Be sure to follow the recommended ratio and mix thoroughly.
- If you want to add color to your resin, now is the time to mix in your pigments. Use as much or as little as you want to achieve your desired color.
- Pour the resin onto your canvas or surface. You can pour in one color or create beautiful swirls and patterns by pouring multiple colors and using a tool to mix them together.
- Once you’re happy with the design, use a heat gun or torch to remove any air bubbles that may have formed. Move the heat source in a gentle, sweeping motion to avoid scorching the resin.
- Allow the resin to cure for the recommended time, which can vary between brands. This process can take several days, so be patient.
- After the resin has fully cured, you can remove it from the moulds or work surface. Be careful not to damage your artwork during this step.
- If you want to give your resin art a smooth finish, you can sand it down using a fine-grit sandpaper. This will remove any imperfections and create a polished look.
- Lastly, show off your beautiful resin art! Display it in your home or give it as a gift. The possibilities are endless.
Resin art is a unique and creative way to express yourself. With a little practice and experimentation, you can create stunning pieces that reflect your own personal style. So, don’t be afraid to try new techniques and have fun with resin art!
What is resin
Resin is a high-quality material that is often used in creating art. If you love crafts and exploring new DIY hobbies, then resin art might be right up your alley. Resin is a liquid polymer that can be easily mixed and poured onto various surfaces to create beautiful and one-of-a-kind pieces.
One of the most common types of resin used in art is epoxy resin, which is loved by many artists and hobbyists. Epoxy resin is a two-part mixture consisting of a resin and a hardener. When these two components are mixed together, a chemical reaction occurs, and the liquid resin hardens into a solid, glossy surface.
The process of working with resin can be both fun and challenging. Before you begin, make sure you have all the necessary equipment and supplies. This includes a well-ventilated workspace, gloves, heat gun or torch, measuring cups, stirring sticks, and silicone moulds or canvas for pouring the resin onto.
Resin art allows you to experiment with colors and textures. You can add various pigments, inks, glitter, or even small stones to create different effects. Instagram is a great source of inspiration for resin art, as there is a wide range of artists who showcase their beautiful pieces.
When working with resin, it’s important to follow the instructions provided by the manufacturer. Resin needs to be mixed thoroughly and allowed to cure for a specific amount of time. Keep in mind that resin can be toxic if not used properly, so it’s essential to wear protective gear and work in a well-ventilated area.
Once the resin is mixed and ready, you can pour it onto your chosen surface. Whether it’s canvas or silicone moulds, make sure to think about the color palette and the design you want to achieve. You can create abstract patterns, geode-like shapes, or experiment with different techniques.
After pouring the resin, you might want to move it around or use a heat gun to create unique patterns and effects. Be careful not to touch the resin directly with the heat gun, as it can cause bubbles or uneven drying. Take your time and enjoy the process.
Once your resin art is fully cured, you can remove it from the moulds or canvas. Sanding the edges can help create a smooth finish. Some artists even add additional layers of resin or glaze to enhance the final look of their pieces.
Resin art can be a bit messy, especially if you’re working with glitters or pigments. It’s a good idea to cover your working area with plastic or use tape to protect the surrounding surfaces. If any resin spills or drips onto unintended areas, you can remove it with a scraper or sand it down.
Resin art is a versatile and exciting medium that allows artists to let their creativity flow. Whether you’re a beginner or an experienced artist, resin art offers endless possibilities for creating unique and stunning artworks.
Things to keep in mind when doing resin art:
- Follow the instructions and safety guidelines provided by the manufacturer.
- Work in a well-ventilated area to avoid inhaling toxic fumes.
- Prepare all your materials and equipment beforehand to ensure a smooth workflow.
- Experiment with different color combinations and techniques to find what you love.
- Have patience and take your time when working with resin.
- Protect your working surface and surrounding areas from spills and drips.
- Keep in mind that resin takes time to cure, so be prepared to wait before handling your finished piece.
- Don’t be afraid to think outside the box and try new things with resin art.
Resin art is a wonderful way to express yourself and create stunning pieces of art. Whether you’re a professional artist or just starting out, resin art offers a wide range of possibilities for you to explore and enjoy.
Creating Your First Resin Painting
Resin art is a fascinating and rewarding hobby that allows you to create beautiful and unique pieces of artwork. If you’re a beginner, you may be unsure of how to start your resin painting journey. In this article, we’ll provide you with some handy tips and instructions to help you get started.
Preparing Your Workspace
Before you begin creating your resin painting, it’s important to ensure that you have a proper and well-organized workspace. Make sure to have a clean and flat surface, which is often covered with a plastic sheet or protection. This will prevent your work area from getting messy and allow you to work without any distractions. We also recommend having some handy items like cups, gloves, and masking tape available for easy application and clean-up.
Getting the Right Equipment
When it comes to resin art, having the right equipment is essential. You’ll need a wide variety of tools, including a resin and hardener mixture, pigments for mixing colors, and a spirit level to ensure that your painting stays even. It’s also important to have proper safety equipment, such as gloves and a mask, to protect yourself from any harmful fumes. Additionally, having a mold or frame for your painting can help you create a smooth and finished look.
Learning the Basics
Before diving into resin art, it’s important to take the time to learn the basics. There are many tutorials and videos available online that can teach you different techniques and provide you with inspiration. It’s also a good idea to experiment and practice on smaller pieces before moving on to larger projects. This will help you familiarize yourself with the materials and techniques and allow you to gain confidence in your skills.
When beginning your resin painting, start by following the instructions provided with your resin and hardener mixture. Measure and mix the components thoroughly and add any desired pigments to create the colors you’d like. Work in small areas at a time, ensuring that each area is covered evenly. Use a brush or other tools to spread the resin and create different effects. Take your time and enjoy the process of creating your artwork.
Avoiding Common Mistakes
As a beginner, it’s natural to make some mistakes along the way. One common mistake is not properly preparing the surface before applying the resin. Make sure to clean and dry the surface thoroughly to ensure good adhesion. Another mistake is not following the instructions carefully, especially when it comes to the resin and hardener ratio and curing time. It’s also important to avoid overworking the resin, as this can lead to a less smooth and glossy finish.
Lastly, don’t be afraid to ask for help or seek guidance from more experienced resin artists. There are many online communities and forums where you can connect with others who share your interest. They can provide valuable tips and advice based on their own experiences.
Resin art is an exciting and versatile form of creative expression. Whether you’re interested in creating unique pieces for yourself or giving them as gifts, learning how to create resin paintings can be a rewarding and enjoyable journey. So, take your time, learn from others, and have fun exploring this fascinating hobby!
How to create Cells in Resin Art pieces with MEYSPRING Pigments
Resin art is an especially popular form of art, with its unique and vibrant effects. If you like working with colors and creating beautiful pieces, you’ll definitely enjoy experimenting with resin art. One of the most fascinating techniques you can try is creating cells in your resin art, giving your pieces an interesting and dynamic look.
Creating cells in resin art is possible thanks to the Meyspring pigments. These pigments have the special spirit to interact with the epoxy resin and create cells when mixed properly. However, it’s important to have patience, as creating cells in resin art can be a bit tricky, especially for beginners. But don’t worry, we’re here to guide you through the process!
Firstly, we recommend using high-quality pigments and epoxy resin. This will ensure that you have the best possible results and vibrant colors in your artwork. To start, you’ll need a substrate to work on. It could be a canvas or any other surface that can hold resin without sinking. Make sure to provide a level surface to work on.
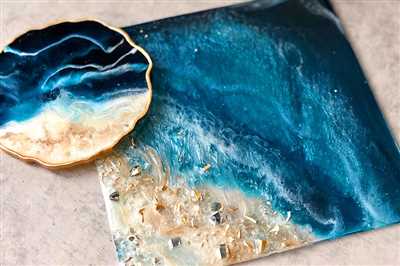
Begin by preparing your pigments. You can choose any colors you like, but for this tutorial, we’ll use shades of blue and orange to create a beautiful ocean-inspired look. Mix your pigments with epoxy resin according to the instructions provided. Stir the mixture well, making sure there are no lumps or clumps remaining.
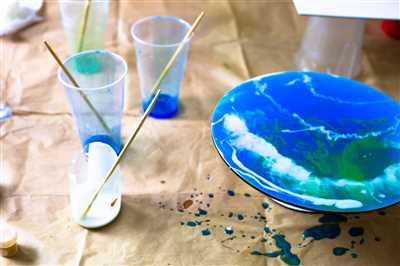
Now comes the exciting part! Pour a small amount of the mixed resin onto your substrate. You can either pour it directly or create drips along the edges. Whatever method you choose, make sure to spread the resin evenly across the surface. This will provide a good base for creating cells.
Once the base layer is done, you can start adding your pigments. Pour small amounts of each color onto the resin and let them interact with each other. You can swirl them around with a stir stick or simply let them mix naturally. This is where the magic happens – the cells will begin to form on their own!
Keep in mind that the process of creating cells can take some time and practice. Some artists may achieve beautiful cells right away, while others may need to experiment and try different techniques. It’s all part of the learning process! If you have any questions or need guidance, don’t hesitate to reach out to experienced resin artists – they’ll be more than happy to help.
Once you’re satisfied with the cells and the overall look of your artwork, you’ll need to let it dry. Follow the instructions on the epoxy resin packaging for the drying time. After it’s completely dry, you can remove any tape or protective covering you used during the process, and your resin art piece is ready to be displayed!
Creating cells in resin art is a fascinating technique that allows you to delve into the world of colors and experiment with different designs. Whether you’re a beginner or an experienced artist, this technique is sure to bring a unique and dynamic touch to your artwork. So gather your pigments, mix them well, and let your creativity flow!
If you’re interested in learning more about resin art and want to see what other artists have created using MEYSPRING pigments, be sure to check out our website and social media channels. You’ll find plenty of inspiration and helpful tips to guide you on your resin art journey!


