

When it comes to professional emails, having a well-designed and informative email signature can make all the difference. Not only does it provide recipients with the necessary contact information, but it also gives your emails a more polished and professional look.
So, how do you create an email signature that stands out? It’s actually easier than you might think. With the help of various online sources and email management settings, you can have a personalized email signature in just a few minutes.
First, you need to start with a template. There are many free email signature templates available online, so you can select one that suits your style and needs. Once you have chosen a template, you can simply copy and paste it into your email signature settings.
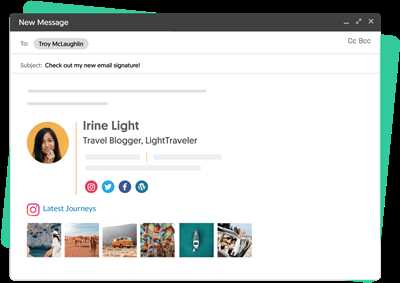
Now comes the fun part – editing your signature. You can add your name, title, contact information, and even a photo or logo for that extra touch of professionalism. Don’t forget to include your social media links, so that recipients can easily connect with you on other platforms as well.
If you’re using Google Workspace (previously known as G Suite), the process of creating and managing email signatures is even easier. Google Workspace provides a signature editor that allows you to design and customize your signature right from your Gmail settings. You can choose from a gallery of templates, or create your own unique design.
With a professional email signature in place, you can save time and make a better impression with your clients and other recipients. So why wait? Start creating your signature now and enhance your email communication!
- Create a professional signature in Gmail
- Where do you wanna start
- Start with the template
- How do I add my new email signature to Gmail
- Email Signature Management for Google Workspace
- It’s time to design your email signature
- What should you do next
- Sources
- Videos:
- 3 Ways to Make an Amazing Signature in Gmail (Email Tips)
Create a professional signature in Gmail
If you want to create a professional signature for your email, Gmail offers a simple and efficient way to do it. You don’t have to be a designer or have any coding knowledge; it’s as easy as a few clicks. Here’s how you can start:
- Open your Gmail inbox and click on the gear icon in the top right corner to access your settings.
- In the dropdown menu, select “See all settings”.
- Next, navigate to the “General” tab and scroll down to the “Signature” section.
- In the signature editor, you can start creating your signature by adding text, images, or links.
- If you already have a signature design in mind, you can create it using other editing tools or software and then paste it into the signature editor.
- If you want to add a photo or logo to your signature, you can simply click on the “Insert photo” button and select an image from your computer or from the Google Photos or Google Drive gallery.
- Gmail also offers a gallery of free signature templates that you can choose from.
- Once you have designed your signature, you can choose whether it appears on new emails, replies, or both.
- When you’re done, click “Save changes” at the bottom of the page.
Now, every time you compose a new email, Gmail will automatically add your professional signature to it. This signature is a great way to showcase your brand, business, or personal identity, and it makes your emails look more polished and professional.
With Gmail’s signature management, you can easily create and edit multiple signatures for different clients or situations. Taking a few minutes to set up a professional email signature can give your recipients a better impression and make your business stand out from the crowd.
So why wait? Start creating your professional signature in Gmail today!
Where do you wanna start
When it comes to creating an email signature, the first thing you need to decide is where you want to start. You have a few options:
| Start from scratch | If you’re feeling creative and want to add your own personal touch, you can start by designing your signature using HTML. It’s a bit more work, but it allows for more customization. |
| Use pre-made templates | If you don’t want to spend too much time on creating your signature, you can use pre-made templates. Many email clients, such as Gmail and Microsoft Outlook, offer a gallery of free templates that you can select from. Simply choose a template that suits your needs and customize it with your own information. |
| Copy from an email | If you already have an email signature that you’re happy with, you can simply copy it from one of your previous emails and paste it into the signature settings of your email client. Just make sure to edit any outdated information and customize it to suit your current needs. |
| Use a signature management tool | If you’re looking for a more efficient way to manage your email signatures, you can use a signature management tool. These tools allow you to design, create, and manage signatures for multiple email accounts in one place. They often come with additional features, such as signature templates, social media icons, and logo management. |
So, where should you start? It ultimately depends on your preferences and the time you’re willing to invest. If you’re looking for a quick and easy solution, using pre-made templates or copying from an email might be better for you. However, if you want more control over the design and customization of your signature, starting from scratch or using a signature management tool would be a better option.
Start with the template
If you’re wondering how to create an email signature, the first step is to start with a template. One of the easiest ways to do this is by using Google templates. Google provides free templates that you can use to create professional email signatures in just a few minutes.
To start, open your Gmail settings and click on the “Create Signature” option. This will take you to the signature management page, where you can start creating your email signature. If you already have a signature that you want to edit, you can simply select it from the list.
Once you’re in the signature editor, you’ll see options for adding your photo, logo, or other media to your signature. If you have a photo or logo that you want to use, simply click on the “Add Photo” or “Add Logo” button. You can either upload an image from your computer or choose one from the Google Workspace gallery.
Next, you’ll want to add your contact information. This includes your name, job title, company name, phone number, and email address. You can also add links to your social media profiles, such as LinkedIn, Twitter, or Facebook. Simply type in the information you want to include and format it using the editing tools.
If you want to add a professional touch to your email signature, you can use the formatting options to change the font, size, and color of your text. You can also add a separator line or change the alignment of your signature.
Once you’re happy with your email signature design, click on the “Save” button to save your changes. Now, every time you compose a new email, your email signature will be automatically added to the bottom of the message.
Creating a professional email signature doesn’t have to be complicated. By starting with a template and following these instructions, you can easily create a professional email signature that makes a better impression on your clients and other recipients. So, what are you waiting for? Start creating your new email signature today!
How do I add my new email signature to Gmail
Adding a professional email signature to your Gmail emails is a quick and easy process. Follow these simple instructions to start sending emails with your new signature:
- Open your Gmail account and click on the gear icon in the top right corner of the page. This will open the settings menu.
- From the settings menu, select the “See all settings” option.
- In the settings workspace, navigate to the “General” tab.
- Scroll down until you find the “Signature” section. Here you can create and edit your email signature.
- If you already have a signature created, paste it in the text box. Otherwise, click on the “Create new” button to start designing your signature.
- In the signature editor, you can add text, images, and even a logo to make your signature look more professional. Use the available editing tools to customize the design according to your preferences.
- If you want to add a photo, click on the “Insert photo” icon in the editor toolbar. You can either upload an image from your computer or select one from the Google Photos or Google Drive gallery.
- Once you have finished editing your signature, click on the “Save changes” button at the bottom of the page.
- Now, every time you compose a new email or reply to a message, your signature will automatically appear at the bottom of the email.
With these easy steps, you can add a professional email signature to your Gmail account in just a few minutes. Take the time to create a signature that represents you and your business in the best possible way. Happy emailing!
Email Signature Management for Google Workspace
If you’re using Google Workspace for your email, it’s important to have a professional and well-designed email signature. With Google Workspace, you have the tools and options to easily create and manage your email signature, making it easier than ever to ensure a consistent and professional brand image across all your client interactions.
Creating a new email signature in Google Workspace is simple. First, go to the Gmail settings in your Google Workspace account. From there, scroll down to the “Signature” section. Here, you can type in and customize your signature using the text editor provided. You can add media such as a logo or photo to your signature by clicking on the appropriate image icon and following the instructions to upload or select an image file.
But if you’re looking for a better and more professional design, Google Workspace also provides pre-designed templates for you to choose from. Simply click on the “Templates” tab in the signature settings and select the template that best fits your needs. You can then edit the template to add your own information and design elements.
Google Workspace also offers a feature called “Google Docs” which allows you to create and edit your email signature in a word processing format. This can be useful if you prefer to work in a familiar interface or if you have multiple people collaborating on the same signature. Once you’re done editing, simply copy and paste the signature from the Google Docs document into the signature settings in Gmail.
With Google Workspace, you also have the option to manage multiple signatures for different purposes or client interactions. For example, you can have a signature for internal emails and another for external client emails. To do this, go to the signature settings in Gmail and click on the “Create New” button next to the signature preview. You can then name and customize the new signature accordingly.
Another useful feature offered by Google Workspace is the ability to add a photo gallery to your email signature. This can be a great way to showcase your portfolio or products. Simply click on the “Insert Photo Gallery” button in the signature settings and follow the instructions to upload and organize your images. You can then select the gallery you want to add to your signature.
Google Workspace also makes it easy to add social media icons to your email signature. In the signature settings, click on the “Social media” tab and enter the links to your social media profiles. Google Workspace will automatically generate the icons and add them to your signature. This is a great way to promote your social media presence and encourage recipients to connect with you on other platforms.
Once you’ve created and customized your email signature, it’s time to start using it. When composing a new email, you will see a drop-down menu next to the signature area. This allows you to select which signature you want to use for that particular email. You can also set a default signature for all outgoing emails in the signature settings. This ensures that your signature is automatically added to every email you send, saving you time and ensuring consistency.
In conclusion, Google Workspace provides a comprehensive suite of tools and options for creating and managing email signatures. From templates to media management, you have the flexibility to design a signature that reflects your brand and professionalism. Whether you’re a small business owner or a corporate executive, Google Workspace has everything you need to create and manage professional email signatures with ease.
It’s time to design your email signature
If you want to create a professional and stylish email signature, it’s time to start designing one. Adding a signature to your emails not only makes them look better but also adds a personal touch to your communication with clients and other recipients.
First, you should decide if you want to create a new signature from scratch or use a template. If you don’t have much time or don’t wanna spend too much time on it, then using a template is a great option. Templates are available for free in various sources, including Google templates gallery.
Next, you will need to select a template that suits your style and needs. Look for a template that allows adding a photo, logo, or other personal information. Make sure it’s a design that represents you or your workspace in a professional manner.
Once you have selected a template, simply copy and paste the template into your email signature settings. If you are using Gmail, go to the settings and then to the signatures tab. There you can paste the HTML code of your signature and save it.
If you don’t know how to access the signatures settings in your email client, you can search for instructions online or check the help section of your email service provider.
After you have copied and pasted the template, it’s time to edit it and add your own information. Replace the placeholders with your name, contact details, and any other information that you want to include in your signature.
Make sure to add your photo or logo if the template allows it. A photo or logo adds a personal touch and makes your signature stand out. If the template doesn’t support adding a photo or logo, consider using a different template or contact the template creator for assistance.
Once you have finished editing your signature, save the changes and test it by sending an email to yourself or some recipients. Make sure everything looks good and that the links and formatting are correct.
Remember, your email signature reflects your professionalism and attention to detail, so take your time to design it properly. With a well-designed email signature, you can leave a lasting impression on your clients and make your emails look more polished and professional.
What should you do next
Now that you have learned how to create an email signature, what should you do next?
First, go to Google and search for email signature templates. There are many free resources available that can help you find the perfect design for your signature.
Next, think about your clients and the recipients of your emails. Select a signature that reflects your brand and appeals to your target audience.
Once you have found a template you like, simply download it and start editing. Most templates come with instructions on how to customize them to fit your needs.
If you want to create a signature from scratch, you can do so by adding your own logo, photo, and other media. Just make sure it’s professional and represents your brand effectively.
When you’re ready, open your email settings and find the option to add a signature. In Gmail, for example, you can find this under the “Settings” menu.
Copy and paste your new signature into the designated area. Make sure to double-check for any errors before saving. You don’t want to send out emails with a poorly formatted signature!
Finally, take some time to test your new signature. Send test emails to yourself and see how it looks on different devices and email clients. Make any necessary adjustments to ensure it looks perfect for your recipients.
Remember that email signature management is an ongoing process. You may need to update or modify your signature as your business or personal needs change. Don’t be afraid to experiment and try out new designs to find what works best for you!
So, what are you waiting for? Get started on creating your new email signature and showcase your professionalism and unique style in every email you send!
Sources
When it comes to creating your email signature, you have several sources to choose from. Let’s start with the most common ones:
– Word: If you already have a professional signature created in Word, you can simply copy and paste it into your email settings.
– Gmail: If you use Gmail as your email client, you can go to the settings and add a signature. You can either create a new one or use a pre-made template from the gallery.
– Google Workspace: If you’re using Google Workspace, you can follow the instructions provided by Google to create and manage your email signatures.
– Templates: If you don’t have a signature yet and want to start from scratch, you can find free templates online that you can customize to fit your needs.
– Logo: If you have a company logo or a personal photo that you want to add to your signature, you can upload it to your email settings and place it accordingly.
– Other media: Besides adding a logo, you can also include links to your social media profiles or any other relevant information in your signature.
By using these sources, you can create a professional and visually appealing email signature in just a few minutes.
Remember to select the design that fits you and your brand the best. What makes a signature better is the time and effort you put into creating it!


