

If you’re a book lover like me, you probably have stacks of books lying around in your home. Sometimes, it can be hard to remember which book is which, especially if you have a large collection. That’s where book stickers come in handy!
Book stickers are a fun and creative way to organize your books. They can be used to mark the front cover, the spine, or even the inside of the book. With just a few simple steps, you can create your own book stickers using materials that you probably already have at home.
The first thing you’ll need is some paper or cardstock to use as the base for your stickers. You can use any type of paper you have on hand, but I recommend using a thick paper or cardstock so that your stickers will be more durable. Cut the paper into small rectangles or squares, depending on the size of the stickers you want to make.
Next, you’ll need some adhesive to stick your stickers onto the books. You can use glue or a glue stick for this step, but I’ve found that a glue stick works best. Apply a small amount of glue to the back of your paper squares and press them onto the covers or spines of your books. Make sure to apply some pressure to ensure that the stickers are firmly attached.
Now it’s time to get creative! You can use markers, pens, or colored pencils to decorate your stickers. Write the title of the book, the author’s name, or any other information you want to include. You can also add drawings, doodles, or patterns to make your stickers more unique and personalized.
Once you’re happy with the design of your stickers, let them dry for a few minutes. This will ensure that the adhesive has time to set and that your stickers won’t come off easily. After they’re dry, your book stickers are ready to use!
Book stickers are not only great for organizing your own collection, but they also make adorable little gifts for your friends and family. You can package them in small envelopes or clear packaging to make them look more professional. And with so many uses for book stickers, you’ll find that you’re reaching for them more often than you think.
So don’t wait any longer – grab your paper, glue, and markers, and start making your own book stickers today! They’re quick, easy, and a fun DIY project that will add a personal touch to your book collection.
Sticker Printing
Sticker printing is a great way to personalize and decorate your books, journals, planners, and other paper products. Whether you want to add a touch of whimsy to your daily planner or create adorable book stickers for your kids, sticker printing can be a fun and creative project to undertake.
One of the most common uses for stickers is in booklets or book covers. These stickers, often called bookplates, can be printed with the name of the book owner or contain cute decorations that match the book’s theme. They can easily be applied to the front cover or inside the book to mark it as your own.
Sticker printing can be done using different materials, but one of the easiest and most popular methods is using gum powder. Gum powder is made from cellulose and is easily mixed with water to create a quick-drying glue. It can be printed on with regular printing equipment and is perfect for DIY sticker projects.
| Materials needed for sticker printing: |
|---|
| 1. Gum powder |
| 2. Water |
| 3. Small printing equipment |
| 4. Sticker paper |
To make your own stickers, simply mix two tablespoons of gum powder with one teaspoon of water. Stir well until the mixture forms a smooth paste. Then, using a small printing equipment or even just a hole puncher, print or punch out your desired sticker designs on sticker paper. Allow the stickers to dry for a few minutes before using them.
Sticker printing can be a fun and personalized way to add a little something extra to your books and other paper products. Whether you’re creating custom bookplates or adorable stickers for Christmas cards, sticker printing allows you to express your creativity and make your items truly unique.
Many online printing companies offer personalized sticker printing services, where you can easily upload your own designs and have them printed and shipped to your door. This is a great option if you’re looking for high-quality stickers or if you want to create large quantities for a special project or event.
So whether you’re looking to add a touch of personality to your daily journal or create a collection of cute trading stickers, sticker printing is a fun and creative activity that anyone can enjoy. With a little bit of creativity and the right materials, you can easily make your own stickers and bring your ideas to life.
DIY Sticker Book
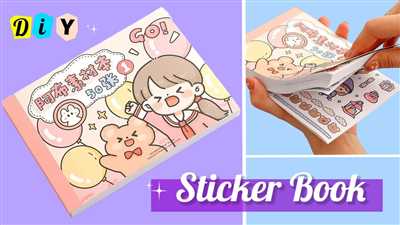
If you’re a fan of stickers and want a fun and easy DIY project, then making your own sticker booklets is the perfect choice. Whether you have a collection of adorable stickers or want to create personalized ones, this step-by-step guide will show you how to make your own DIY sticker book.
First, gather all the materials you’ll need. You’ll need a small binder or journal, paper, a hole puncher, scissors, glue or adhesive, and any stickers or decorations you want to use. If you want to print your own stickers, you’ll also need a printer and sticker paper.
Start by cutting the paper into smaller sheets that fit in your binder or journal. These will be the pages for your sticker book. Punch holes along one side of each sheet, making sure they line up with the holes in your binder.
If you’re printing your own stickers, design them on your computer and print them onto sticker paper. Cut out each sticker individually, being careful not to touch the adhesive side.
Once you have all your stickers ready, it’s time to assemble your sticker book. Apply a small amount of glue or adhesive to the back of each sticker and press it onto a page in your book. Repeat this step for each sticker, organizing them however you like.
If you have any special memories or dates associated with certain stickers, you can use the paper to write them down. For example, if you have stickers from a family vacation to the beach, write down the date and location of the trip next to the stickers. This will make your sticker book even more personal and meaningful.
You can also use the paper to create pockets or envelopes to hold loose stickers or trading cards. Simply fold a piece of paper in half, apply glue along the edges, and press them together to seal the pocket. Then, attach the pocket to a page in your book using glue or adhesive.
Once you’ve finished arranging all your stickers and paper, your DIY sticker book is complete. You can easily flip through the pages to admire your collection, use them to decorate your planner or journal, or even give them as gifts.
These sticker booklets are not only a great way to organize and display your stickers, but they’re also a fun and creative project to do with friends or family. You can spend quality time together, reminiscing about your most loved stickers and creating new ones.
So, why not start your own DIY sticker book today? Gather your materials, choose your favorite stickers, and get ready to have a great time creating a personalized book that will last for years to come.
Step 2: Glue No2 Cellulose Gum
In this step, we will be using No2 Cellulose Gum as our glue to bind the booklets together and create book stickers. It is a great product to use for this project because it has a quick-drying formula and easily sticks to paper.
To start, gather all the materials you would need, such as No2 Cellulose Gum, a small bowl, water, a tablespoon, and the printed booklets or photos you want to turn into stickers.
First, mix two tablespoons of No2 Cellulose Gum powder with half a tablespoon of water in the small bowl. Stir the mixture well until it becomes a thick glue or adhesive. Adjust the amount of water if needed – you want the glue to be thick enough to hold the booklets together, but still easy to apply.
Next, take one of the booklets or photos and apply a small amount of the glue mixture along the spine or edge. Press the other booklet or photo onto the glued area and hold it together for a few seconds to ensure a strong bond. Repeat this step for all the booklets or photos you want to bind together.
Once all the booklets or photos are glued together, you can punch a hole or two at the top of the stickers using a hole puncher. This will allow you to later attach the stickers to other items such as journals, planners, or trading cards.
Now, let the glue dry for a few minutes or until it is no longer sticky to the touch. The drying time will depend on the glue you are using, so be sure to check the packaging for specific instructions.
Once the glue is dry, your book stickers are ready to use! You can place them on the front cover of your journal or planner, use them as decorations on your Christmas cards, or even personalize your own DIY projects.
These book stickers are not only adorable but also functional. You can easily write on them to label dates, names, or other important information. They are perfect for adding a personal touch to your books or organizing your belongings.
When handling book stickers, be careful not to get them wet or expose them to alcohol, as this may ruin the adhesive. Always store them in a dry place, away from any liquids or moisture.
With No2 Cellulose Gum, you can create your own customized book stickers in just a few simple steps. They’re perfect for anyone who loves crafts and wants to add a unique touch to their projects. So why not give it a try and start making your own book stickers today?
Bind the Book Together
Once you have all your booklets printed and ready, it’s time to bind them together to create your personalized book sticker journal. Here’s a step-by-step guide on how to do it:
- First, gather all the materials and equipment you’ll need for this DIY project. You’ll need a binder, a hole puncher, some adhesive, such as glue or gum, and some decorative elements like stickers or paper decorations.
- Determine how many booklets you’d like to include in your book sticker journal. Depending on how thick you want your journal to be, you can choose to bind just a few or many booklets together. Keep in mind that a smaller booklet will make the journal easier to handle and carry around.
- Using a hole puncher, punch two holes near the left edge of each booklet. Make sure the holes are aligned so that when the booklets are bound together, they will line up properly.
- Take the cover of the book sticker journal and apply glue or gum to one side. Place this side on top of the first booklet, aligning the punched holes. Press them together and make sure they stick firmly.
- Repeat the previous step for the rest of the booklets, stacking them one on top of the other and aligning the holes. Apply adhesive to each new booklet before attaching it to the previous one.
- Once all the booklets are bound together, you can add any additional decorations or personal touches to the front cover. This could be stickers, photos, or even dates to make it a perfect journal or keepsake.
- Let the glued pages dry for a few days to ensure they’re securely bound together.
- And there you have it! Your adorable book sticker journal is now ready to use. You can keep track of important dates, write down thoughts and ideas, or even use it as a planner. The possibilities are endless!
Whether you’re making these book sticker journals for yourself or as a DIY gift, they’re a great way to showcase your creativity and have a personalized product. They’re also a wonderful project to do with friends or family during Christmas or any other special time. No matter how many booklets you choose to bind together or what decorations you add, these book sticker journals will always be a cherished possession that will last for years to come.


