

If you love using Line Messenger and want your own customized stickers, then this guide is for you. Line is a popular messaging app that allows users to send messages, make calls, and share images with their friends. One of the unique features of Line is the ability to send and use stickers in your conversations. Stickers are a fun way to express emotions and add a personal touch to your messages.
Creating your own Line stickers can be a fun and creative process. There are several ways to go about making your own stickers. You can either design them from scratch using a drawing or design software, or use pre-made images and edit them to your liking. If you prefer using your own drawings or designs, you can start by preparing your images. Line stickers should be in PNG format with a maximum size of 370×320 pixels. It’s important to remember that Line stickers have certain technical limits, so make sure to check Line’s guidelines for more information on file size, format, and other requirements.
When designing your Line stickers, you should keep in mind that they should have a clear and simple design for maximum visibility. Line stickers are usually small and displayed in a horizontal layout, so it’s important to make them easily recognizable. You can add captions or text to your stickers to give them more personality and context. Line stickers support both English and Japanese characters, so you can use any language you like. It’s also a good practice to use thick and clear lines to make your sticker stand out.
Once you have your images ready, you can use the Line Creators Studio, Line’s official sticker maker, to create and customize your stickers. The Line Creators Studio is a free software that allows you to easily create your own stickers and captions. It provides various tools and features that enable you to customize your stickers, such as cropping, editing, and adding captions. You can also preview your stickers before they are sent to make sure they look good. The Line Creators Studio also provides guidelines and tips on how to create the best stickers and increase your chances of being featured in Line’s sticker market.
After creating your stickers, you can upload them to the Line Creators Market, where other Line users can download and use them. Line Creators Market is Line’s official platform for sticker creators to share and sell their stickers. If your stickers are popular and receive high ratings, you may even earn revenue from them. Line Creators Market is a great place to showcase your creativity and connect with other sticker creators from around the world.
In conclusion, creating Line stickers is a fun and creative way to personalize your Line Messenger experience. Whether you are a professional designer or just someone who enjoys drawing, you can use Line’s sticker maker to bring your ideas to life. With Line’s easy-to-use tools and the support of the Line Creators Market, you can create and share your own stickers within minutes. So why not give it a try and start designing your own Line stickers today?
- LINE Creators Stickers – How-To Guide – Who Said You Needed to Be Good at Drawing
- Part 1 What is LINE Sticker Creator or LINE Sticker Maker
- Things to Remember When Making Custom Stickers
- Preparing Your Custom Sticker Images
- 1. Designing Your Stickers
- 2. Editing and Customizing Your Images
- 3. Preview and Check Your Stickers
- 4. Synced with Sticker Creator
- Character Limits
- Text Visibility
- Caption Location
- Sources
- Video:
- DIY LINE Sticker
LINE Creators Stickers – How-To Guide – Who Said You Needed to Be Good at Drawing
Creating custom LINE stickers is a fun way to express yourself and share your creativity with friends. And who said you needed to be good at drawing to make your own stickers? With LINE Creators Stickers, you can easily design and customize stickers without any drawing skills.
Here’s a step-by-step guide on how to create LINE stickers:
Step 1: Prepare Your Images
The first thing you should do when preparing to create your own stickers is to gather the images you want to use. Remember to check that the images you choose are supported by LINE Creators Stickers.
Step 2: Customize Your Stickers
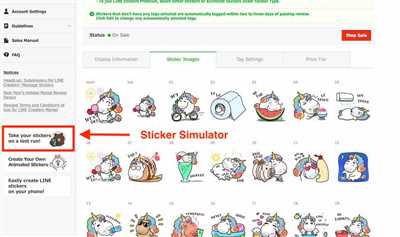
Open the LINE Creators Stickers website and sign in to your account. From there, you can start customizing your stickers. You can crop, edit, and add captions or letters to your images. You can also change the sticker’s location and visibility settings.
Step 3: Preview your Stickers
After customizing your stickers, you can preview how they will look within the LINE application. This will give you an idea of what your stickers will look like to your friends and other LINE users.
Step 4: Set a Price for your Stickers (Optional)
If you want to make revenue from your sticker creations, you can set a price for them. However, you can still choose to make them available for free to your friends and other LINE users.
Step 5: Submit Your Stickers
Once you are happy with your sticker design, you can submit them for review by LINE Creators Stickers. They will review your submission and let you know if any changes or adjustments are needed.
Creating LINE stickers is a creative and fun way to customize your chats. So, who said you needed to be good at drawing? With LINE Creators Stickers, anyone can design their own stickers and share them with the LINE community.
Part 1 What is LINE Sticker Creator or LINE Sticker Maker
If you are a fan of the LINE messaging app, you might have noticed the cute and animated stickers that you can send to your friends. These stickers are created by LINE users using the LINE Sticker Creator, also known as the LINE Sticker Maker. This tool allows users to make their own custom stickers and share them with others.
The LINE Sticker Creator was first introduced in April 2013 and quickly became popular among users, especially in the Japanese and Thai markets. It provides an easy and fun way to express yourself and communicate with your friends using customized stickers.
With the LINE Sticker Creator, you can design your own stickers from scratch or use pre-made images. You can also customize the stickers by adding captions or text to convey your message. The stickers can be static or animated, and you can choose their location within the sticker pack.
When creating stickers, there are some limits and guidelines that you should remember. The maximum size for a sticker is 370 x 320 pixels, and the recommended resolution is 72 dpi. The sticker images should be in JPEG or PNG format, and their file size should not exceed 100 KB. For the animated stickers, the maximum number of frames is 16, and each frame should be within 320 x 240 pixels.
The LINE Sticker Creator provides a preview function that allows you to check how your stickers will look when sent in a chat. You can also test the stickers on your own device by using the LINE app and syncing them from the Sticker Shop.
Creating stickers using the LINE Sticker Creator is free, and there are no revenue-sharing deals involved. However, LINE creators who have their stickers available in the Sticker Shop can earn an income from their sticker sales. The revenue is generated from the sales of stickers through LINE’s in-app purchase system.
In conclusion, the LINE Sticker Creator is a great tool for making custom stickers that can be used in the LINE messaging app. Whether you are a designer, artist, or just someone who wants to have fun creating stickers, this tool offers a lot of flexibility and creativity. Stay tuned for the next part of our guide, where we will dive into the step-by-step process of creating your own LINE stickers.
Things to Remember When Making Custom Stickers
Creating custom stickers can be a fun and creative way to express yourself and share your designs with the world. However, there are a few important things to keep in mind when designing and making your own stickers using Line Sticker Maker:
- Check the supported file formats: Line Sticker Maker supports JPG and PNG file formats for creating stickers. Make sure your images are in one of these formats and that they are within the maximum size limits.
- Prepare your images: Crop your images to the appropriate size and make any necessary edits or adjustments before importing them into Line Sticker Maker. This will ensure that your stickers look good and are the right dimensions.
- Choose the right location for your stickers: Stickers can be categorized under different themes or topics, so think about where your stickers would be most appropriate. Consider the target audience and the visibility that you want to achieve.
- Make use of captions: Adding captions or text to your stickers can enhance their message and make them more engaging. Line Sticker Maker provides options to customize the font, size, and color of the text, so take advantage of this feature.
- Sync your stickers to Line Creator’s Market: If you want to make your stickers available to a wider audience, consider syncing them to Line Creator’s Market. This will allow users from all over the world to discover and download your stickers.
- Be aware of revenue sharing: Line Creator’s Market offers the chance to earn revenue from your stickers. However, it’s important to understand the terms and limitations of this program before participating.
- Take inspiration from other line creators: There are many talented Line sticker creators out there, so take a look at their work for inspiration. You can also join Line sticker creator communities to connect with other creators and learn from their experiences.
- Double-check your sticker’s appearance: Line Sticker Maker provides a preview feature that allows you to see how your stickers will look in the Line messaging app. Take the time to check that the stickers are centered correctly, and that any captions or letters are legible.
- Share your stickers with friends: Line Sticker Maker allows you to share your stickers directly with friends. Send them a sample of your stickers and ask for feedback or suggestions.
By keeping these things in mind, you can create custom Line stickers that stand out and resonate with users. Have fun experimenting with different designs and themes, and let your creativity shine!
Preparing Your Custom Sticker Images
When creating line stickers, it’s important to have the necessary custom images ready. In this guide, we will walk you through the step-by-step process of preparing your sticker images.
This guide assumes that you already have a LINE account and that you have downloaded the LINE Sticker Maker app. If you don’t have these, make sure to create an account and download the app first before proceeding.
1. Designing Your Stickers
Before you start creating your sticker images, think about what kind of characters or objects you want to use. Take into account the market you’re targeting and what stickers would be popular among your friends or potential users.
You can either draw your own sticker images or use available resources, such as free-to-use images or stock images that you have the rights to use. Remember that LINE stickers have a square shape, so make sure your images are cropped to fit within a square.
Some things to keep in mind when designing your stickers:
- – Use clear and bold lines for better visibility
- – Avoid using too many small details, as they might not be visible when the stickers are sent or posted
- – Use bright and vibrant colors to make your stickers stand out
2. Editing and Customizing Your Images
Once you have your sticker images ready, open them in an image editing software or using the LINE Sticker Maker app. Make any necessary adjustments or edits to ensure that your stickers look good and represent your desired design.
You can also add captions or text to your stickers. Keep in mind that the text should be in Thai or Japanese if you’re targeting those markets. Place the text in a location that doesn’t obstruct the main focus of the sticker.
3. Preview and Check Your Stickers
Before finalizing your stickers, it’s important to preview and check how they look. Use the LINE Sticker Maker app to see how your stickers appear in the sticker preview section.
Check if any part of your sticker is being cropped or grayed out due to the sticker’s shape. Make sure all important elements are within the visible area of the sticker. Also, double-check any captions or text for spelling or grammar mistakes.
4. Synced with Sticker Creator
Once you are satisfied with your stickers, sync them with Sticker Creator. This will make them available for use within LINE and allow you to share them with your friends or other creators.
Remember that LINE has certain limits and guidelines for stickers, so make sure your stickers comply with these guidelines to avoid any issues when submitting them for revenue sharing or distribution.
Now that you know the step-by-step process of preparing your custom sticker images, you are ready to start creating your own line stickers!
Character Limits
When creating line stickers, it’s important to keep in mind the character limits for various elements of the sticker. These limits ensure that your stickers are displayed correctly and can be easily used by line users. Here are the different character limits to consider:
| Element | Character Limit |
|---|---|
| Sticker Name | 1-50 characters |
| Sticker Creator Name | 1-20 characters |
| Sticker Caption | 1-100 characters |
When designing and drawing your line stickers, remember to check the character limits for each element. For example, the sticker name should be between 1 and 50 characters, the sticker creator name should be between 1 and 20 characters, and the sticker caption should be between 1 and 100 characters.
It’s also good to keep in mind that vertical stickers have a smaller space for captions compared to horizontal stickers. The maximum number of characters for vertical sticker captions is around 15-25, while for horizontal stickers, it can go up to 100 characters.
Line offers a preview feature which allows you to see how your stickers will look like once they are sent to your friends or uploaded to the Line Sticker Market. This preview will show you if any of your captions or text are cropped or edited due to the character limits.
Line Sticker Maker is the tool provided by Line to create custom stickers. It provides a user-friendly interface where you can customize your sticker design and add captions and text. The character limits mentioned above should be followed within the Sticker Maker to ensure that your stickers are supported and visible correctly in the Line app.
Creators should also remember that there are revenue opportunities when making line stickers. Line offers a revenue share program for creators who meet certain requirements, such as having a certain number of stickers available and meeting certain market visibility criteria. If you’re a creator looking to make line stickers, it’s a good idea to check Line’s guidelines and requirements to make the most out of your sticker creations.
So, when creating your own line stickers, keep in mind the character limits for sticker names, creator names, and captions. Design your stickers accordingly and use the Line Sticker Maker to customize your stickers with text and captions. Play within the character limits, check the previews, and you’ll be on your way to making great line stickers!
Text Visibility
When designing line stickers, it’s important to consider the visibility of your text. The text on your stickers should be clear and easy to read, especially when the stickers are being used in a market where many different stickers are available.
To ensure good text visibility, there are a few things you can do:
| 1. | Remember to check the visibility of your text when creating your stickers. Open a sticker in the preview mode to see how it will look when sent to friends. |
| 2. | Customize the location, size, and color of your text to make it stand out. You can also add captions or add letters to your stickers. |
| 3. | When adding text to your stickers, keep in mind that certain colors may not be as visible as others. For example, using gray text on a gray background may make the text difficult to see. |
| 4. | Ensure that your text is within the maximum limits for sticker making. Line stickers have a maximum size of 370×320 pixels, so make sure your text is within these dimensions. |
| 5. | If you are using multiple lines of text, make sure the text is aligned properly. Center aligning your text can help improve readability. |
| 6. | Consider the background of your sticker when choosing the color of your text. Darker backgrounds may require lighter text colors for better visibility. |
By considering these tips, you can improve the visibility of the text on your line stickers, making them more appealing to users and potentially increasing your revenue as a sticker creator.
Caption Location
When creating line stickers, one important part is the caption placement. Captions are used to add text to your stickers, whether it’s a cute catchphrase or a witty comment. This guide will show you how to customize the location of your captions using the Line Sticker Maker.
First, open the Line Sticker Maker and start drawing or uploading your images. If you’re still in the process of designing your stickers, make sure you have edited and prepared all the necessary images beforehand.
Next, select the image where you want to add a caption. Click on the “Caption” button to open the caption customization panel. Here, you can input the desired text for your caption.
Line stickers support both horizontal and vertical captions. By default, captions are placed at the bottom-center of your stickers. However, Line Sticker Maker provides you with the flexibility to change the caption location.
To change the caption location, click on the “Location” dropdown menu within the caption customization panel. Here, you can choose from various options such as top-left, top-center, top-right, middle-left, middle-center, middle-right, bottom-left, bottom-center, or bottom-right. This allows you to place your captions anywhere you like within the sticker.
Keep in mind that there are some limitations when it comes to caption placement. For example, if your sticker has a custom character with a large head, you may need to adjust the caption location to avoid overlapping. Additionally, there are recommended locations for certain languages like Japanese and Thai to ensure good visibility of the captions.
After customizing the caption location, you can preview your stickers to see how the captions look. This is an important step to ensure that the captions are synced well with the design of your stickers.
Remember to check the maximum character limits for captions. Line stickers have a limit of 40 characters per line for English letters, 20 characters per line for Japanese characters, and 25 characters per line for Thai characters.
Once you’re satisfied with the caption location and design, you can proceed with making your stickers available for sale or free within the Line Sticker Market. Stickers that are sent using Line’s official sticker API can generate revenue for creators.
In conclusion, the Caption Location feature in Line Sticker Maker allows you to customize the placement of captions within your stickers. By choosing the right location, you can enhance the overall design and visibility of your stickers, making them more appealing to your friends or Line users in general.
Sources
When creating line stickers, there are several sources you can use to find the right images and characters for your stickers. Here are some of the sources that you should check out:
- Line Creators Market: Line Creators Market is a platform where you can create and sell custom line stickers. It allows you to upload your own designs or artwork and customize them with captions or text. Through this platform, you can earn revenue from your sticker sales.
- Line Character Creator: Line Character Creator is a free tool provided by Line where you can design your own Line characters. You can customize their appearance, from their hair color to their clothing. This tool is great for preparing the characters you want to use in your stickers.
- Japanese Sticker Creator: If you’re looking for Japanese-themed stickers, the Japanese Sticker Creator is a good source. It has a wide variety of Japanese characters, symbols, and images that you can use to create your stickers.
- Thai Sticker Creator: Similar to the Japanese Sticker Creator, the Thai Sticker Creator focuses on Thai-themed stickers. It offers many Thai characters, letters, and symbols that you can incorporate into your sticker designs.
- Line Sticker Maker: Line Sticker Maker is an official Line app that allows you to create stickers on your smartphone. It provides various editing tools and features, including resizing, cropping, and adding captions. With Line Sticker Maker, you can make stickers directly from your phone.
Remember, when creating line stickers, it’s important to stay within the limits set by Line. Line stickers should be a specific size, with a maximum width of 370 pixels and a maximum height of 320 pixels. Stickers should also have a transparent background.
Designing stickers with the Line Sticker Maker or other third-party applications gives you more options in terms of customization and visibility. Check their guidelines for creating stickers to ensure your designs meet their requirements.
These sources offer a wide variety of images and characters for you to choose from when making your line stickers. Take your time to find the right resources that suit your style and the theme of your stickers. Good luck!


