

If you need to print stickers or labels for your documents, products, or envelopes, Microsoft Word offers an easy way to do it. You can create custom sticker sheets using Word’s built-in templates, or you can design your own from scratch. In this article, we will guide you through the step-by-step process of printing stickers in Microsoft Word.
Step 1: Open Microsoft Word and create a new blank document. If you already have a document or template with the stickers you want to print, you can open it directly.
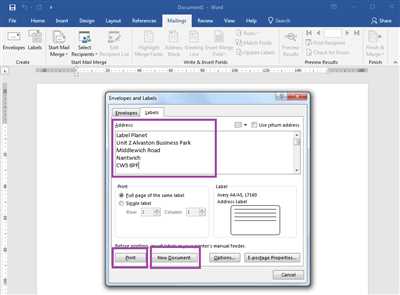
Step 2: Go to the ‘Mailings’ tab at the top of the screen. Click on ‘Labels’ in the ‘Create’ group. A new window will open with label options.
Step 3: In the ‘Label Options’ window, select the brand and product number of your sticker sheets. Avery® is a well-known brand that offers a wide range of sticker templates. If you are using Avery® labels, we recommend selecting the appropriate Avery® product number to ensure compatibility.
Step 4: Once you have selected the label options, click on ‘OK’ to apply the changes. Your document will now display a grid representing each sticker on the sheet.
Step 5: Design your stickers by adding text, images, or any other elements you want. You can format them using the tools available in Word’s ‘Home’ tab, such as font styles, colors, and alignment options.
Step 6: When you are satisfied with the design of your stickers, it’s time to print them. Make sure your printer is connected and loaded with sticker sheets. Go to the ‘File’ tab and click on ‘Print.’
Step 7: In the print options, select the number of copies you want to print. You can also choose to print all the stickers on the sheet or only a specific one by selecting the corresponding option.
Step 8: Finally, click on ‘Print’ to start printing your stickers. Once the printing process is complete, you can peel the stickers off the sheet and use them as desired.
By following these simple steps, you can easily create and print your own stickers using Microsoft Word. Whether it’s for personal or professional use, printing stickers has never been easier!
How to Print Avery® Labels in Word

If you need to print Avery® labels directly from Microsoft Word, it is known that the process can be a bit tricky. However, with the right steps and proper knowledge of Avery® label printing in Word, you can easily create and print your own stickers or labels.
Step 1: Open Microsoft Word and go to the “Mailings” tab. In the “Create” section, click on “Labels”.
Step 2: In the “Label Options” window, click on the “Label vendors” drop-down menu and select “Avery US Letter” or “Avery A4/A5” depending on your location and sheet size. Then, select the specific Avery® product number for the labels you are using. If you are unsure about the product number, you can find it on the packaging or the Avery® website.
Step 3: After selecting the Avery® product, click on the “OK” button to close the “Label Options” window.
Step 4: In the “Create Labels” window, you will see a blank document with a table that represents the layout of your Avery® labels. Each cell in the table corresponds to one label on the sheet.
Step 5: To customize the labels, you can make changes to the text, font, size, and alignment within each cell. You can also apply formatting options such as bold or italic using the options available in the “Home” tab.
Step 6: If you want to add your own design or logo to the labels, you can insert images or shapes using the options in the “Insert” tab.
Step 7: Once you have finalized the design of your labels, you can proceed to print. Make sure your printer is properly set up and loaded with the Avery® label sheets.
Step 8: Go to the “File” tab and choose “Print” from the options. In the print settings, verify that the correct printer and label size is selected. You may also need to adjust other print options such as the number of copies or the page range.
Step 9: Click on the “Print” button to start printing your Avery® labels. As the labels are printing, make sure to carefully align them on the sheet to avoid any misalignment.
By following these steps, you can easily create and print Avery® labels in Word. Whether you are printing stickers, mailing labels, or any other type of labels, using the Avery® templates and options provided in Word will help you achieve professional-looking results.
Step 1: Open a Blank Document in Word
To print stickers or labels using Microsoft Word, you will first need to open a blank document in Word. Word provides pre-designed templates for various types of labels, making it easy to create and print stickers.
To open a blank document, you can follow these steps:
- Open Microsoft Word on your computer.
- Click on the “File” tab located in the top left corner of the screen.
- From the menu that appears, click on “New.”
- A new window will open with various template options. In the search bar at the top of the window, type in “labels” or “stickers” to find templates specifically for creating stickers or labels.
- Scroll through the available templates and select the one that best matches the size and layout of your stickers. You can also use a blank template and configure the settings manually.
- Once you have chosen a template, click on it to open a new document based on that template.
By opening a blank document in Word and using the available templates, you can easily print stickers or labels without having to create the layout from scratch. The templates provided by Microsoft Word are known to work well with Avery® products, but you can also make manual changes to the settings if you are using a different brand or size of labels.
It is important to note that the exact steps and options may vary slightly depending on the version of Microsoft Word you are using.
Step 2
After selecting the appropriate sticker template, it’s time to make any necessary changes to the document. Open the template in Microsoft Word or directly in Avery®’s online platform. This step is crucial as it allows you to personalize the stickers to your specific needs.
If you’re using Microsoft Word, simply click on the “File” tab, then select “Open” to browse your computer for the template file. Once opened, you’ll be able to edit the text, change fonts, colors, and add any desired images or graphics.
If you prefer using Avery®’s online platform, simply enter the template code found on the sticker package or from Avery®’s website. From there, you can make the necessary changes to the blank template provided.
It’s recommended to create a test print on a blank sheet of paper before using a sheet of sticker labels. This way, you can ensure that all the changes you made appear correctly on the labels.
When making changes to the template, be mindful not to go over the edge of the label. Stickers printed with text or images that extend beyond the label borders may not adhere properly or may appear unprofessional.
Avery® provides various templates, including their well-known 2″ x 4″ label template. However, there are more options available from other sources as well. Templates can be found on the Avery® website, but you can also find a wide variety of sticker templates from other websites or software programs.
Once you’ve made all the necessary changes to the template, save the document and proceed to the next step.
CREATE LABELS – STEP FOUR PRINT YOUR LABEL TEMPLATE

Once you have created your label template in Microsoft Word, it is time to print it and start applying your labels to your products, envelopes, or other items. Follow these steps to print your label template:
- Open the document in Microsoft Word that contains the label template you created.
- In Word, click on the “File” menu and select “Print” from the drop-down menu.
- In the Print dialog box, select the printer you want to use to print your labels from the list of available printers.
- Make any necessary changes to the printing options, such as the number of copies or the page range. If you are using Avery® templates, make sure to enter the correct Avery® code in the options.
- If you are printing on a sheet of labels or stickers, make sure to load a blank sheet into your printer with the label side facing down. If you are printing on individual labels, make sure to feed them one by one into your printer.
- Click on the “Print” button to start printing your labels.
It is always recommended to do a test print on a plain sheet of paper before using your label template to ensure that the formatting and layout are correct. This way, you can make any necessary adjustments before wasting any labels or stickers.
Remember to check the printer settings and properties to ensure that it is configured correctly for printing labels. Some printers have specific settings that need to be enabled for optimal label printing. Refer to your printer’s user manual or online sources if you are unsure about the printer settings for label printing.
Sources
When it comes to printing stickers using Microsoft Word, there are a number of sources that you can use to find templates and step-by-step instructions. Here are four known sources:
| 1 | Avery® Templates | The most widely used source for printing stickers is Avery®. They offer a wide range of templates for their products that can be directly used in Word. You can open their website and search for the template you need by entering the Avery® product code or by selecting the product category. |
| 2 | Microsoft Word Templates | Microsoft Word also provides its own templates for printing labels and stickers. To access these templates, open Word and click on the “File” tab. Then, select “New” from the left-hand options and search for “labels” or “stickers” in the search bar. Word will provide you with a variety of blank templates that you can customize for your needs. |
| 3 | Online Template Websites | There are various online websites that offer templates for printing stickers and labels. Some popular websites include Template.net, Canva, and Word Templates Online. These websites provide a wide range of design options and customizable templates to choose from. |
| 4 | Printing Services and Local Stores | If you prefer not to print stickers at home, you can always visit printing services or local stores that offer printing services. They usually have their own templates and can help you with the printing process. |
Regardless of the source you choose, it is important to follow the printing instructions provided with the template. Make sure to make any necessary changes to the template according to your needs, such as adding text or images. Once you have customized the template, you can then print it using a compatible printer and the appropriate sticker paper or label sheet.


