
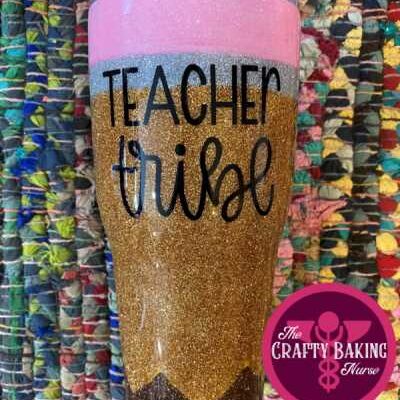

If you’re a craft lover, you must have come across epoxy tumblers online. These glamorous and eco-friendly tumblers are all the rage right now, and it’s easy to see why. They sparkle, they shine, and they’re a great way to show off your artistic side. But how do you make these beauties yourself? Don’t worry, we’ve got you covered!
The first and most important step in making epoxy tumblers is to ensure your safety. Epoxy resin can be harmful if not used properly, so it’s crucial to follow safety guidelines. Make sure to wear protective goggles and gloves to keep your eyes and skin safe. You must also work in a well-ventilated area to avoid inhaling any harmful fumes.
Now, let’s talk about the components you’ll need. The main ingredient is epoxy resin, and we recommend using Alumilite, as it’s one of the most reliable brands out there. You’ll also need a tumbler, some glitter or bioglitter for added sparkle, and a mixing container. Make sure to read the instructions on the epoxy kit to know the correct ratio of resin and hardener.
Here’s how it all comes together. First, clean your tumbler thoroughly and let it dry. Then, mix the epoxy components in the correct ratio as mentioned on the product sheets. Be really careful here as the ratio must be exact to ensure the epoxy cures properly. You could also add some glitter or bioglitter to the mixture for that extra touch of sparkle.
After mixing, simply pour the epoxy into the tumbler and rotate it slowly to cover all areas evenly. You might need to use a heat gun or torch to remove any air bubbles that may have formed. Leave it to cure for the recommended time, usually 24 hours, or as specified by the epoxy manufacturer.
When you’re done, make sure to keep your tumblers in a safe place where they won’t get damaged. Epoxy can be delicate, so avoid banging or dropping them. With proper care, your epoxy tumblers will last for years and continue to add a touch of sparkle to your everyday life.
So, now that you know how to make your own epoxy tumblers, it’s time to get creative! Leave us a comment below and let us know what you’re going to make. And remember, always use epoxy and glitter in a responsible and eco-friendly way!
Epoxy Safety: How to Make Tumblers Safely
When it comes to making epoxy tumblers, safety should always be your top priority. Whether you’re a seasoned crafter or new to the world of epoxy, it’s important to know how to work with this product safely and avoid any potential harm. Here, we’ll talk about some key safety measures you can take to ensure a safe and enjoyable tumbler-making experience.
First and foremost, it’s crucial to read and follow all safety instructions provided by the manufacturer of the epoxy product you’re using. This means familiarizing yourself with the Material Safety Data Sheet (MSDS), which contains important information about the potential hazards and necessary precautions. By understanding the potential risks associated with epoxy, you will be better equipped to handle the product safely.
One important safety precaution when working with epoxy is to wear the appropriate protective gear. This includes gloves, safety glasses, and a respirator mask if needed. The chemicals in epoxy can be harmful if they come into contact with your skin, eyes, or lungs, so wearing the right protective equipment is crucial.
Another safety tip is to work in a well-ventilated area. Epoxy emits fumes during the curing process, which can be harmful if inhaled in a confined space. If possible, set up a fan or open a window to improve air circulation and reduce the concentration of fumes in the room.
When mixing the epoxy components together, it’s important to follow the correct ratio. Each epoxy product will have its own specific mixing instructions, so be sure to measure and mix the components accordingly. Using the wrong ratio can result in an improperly cured tumbler, which may not be as strong or durable as intended.
Additionally, if you choose to add glitter or other embellishments to your tumblers, make sure they are safe for use with epoxy. Some glitters or pigments may contain harmful chemicals that can react negatively with the epoxy, so it’s important to do your research and use eco-friendly, biodegradable alternatives if possible.
After you’re done making your epoxy tumbler, it’s important to properly clean up and dispose of any leftover materials. Follow the manufacturer’s instructions for cleaning tools and equipment, and dispose of any waste according to local regulations. This helps to keep both yourself and the environment safe.
Remember, when working with epoxy, your safety should always be the top priority. By taking the necessary precautions and following proper procedures, you can enjoy the process of making beautiful tumblers without compromising your well-being. Stay informed, stay safe, and happy crafting!
What Do You Need to Make a Glitter Tumbler without Epoxy
You may be wondering if it’s possible to create a beautiful glitter tumbler without using epoxy. Well, good news! It is possible and there are alternative options that are both safe and eco-friendly. In this section, we will discuss what you need to make a glitter tumbler without epoxy.
- Alumilite Mold Putty: This is an important component for making a glitter tumbler without epoxy. It helps keep the glitter in place and creates a smooth surface for your tumbler.
- Bioglitter Sheets: Instead of traditional glitter, opt for bioglitter sheets. These sheets are made from eco-friendly materials and are safe for both humans and the environment.
- Glitter Sheets: If you want to add some sparkle to your tumbler, glitter sheets are a great option. They come in various colors and can be easily cut into different shapes.
- Safety Instructions: Since you won’t be using epoxy, it’s important to follow the safety instructions provided by the manufacturer of the products you’re using. Always wear protective gear such as gloves and safety glasses to protect your eyes and skin.
- Ratio Chart: Most products will come with a ratio chart that tells you the recommended amount of mold putty and glitter sheets to use. Follow these ratios to ensure the best results.
Now that you know what you need to make a glitter tumbler without epoxy, let’s talk about how it’s done. Start by preparing your tumbler. Clean it thoroughly and make sure it’s dry before you begin. Then, mix the mold putty according to the instructions provided. Press the putty into the tumbler, making sure to cover the entire surface. Leave it to set for the recommended amount of time.
Next, cut the bioglitter sheets and glitter sheets into the desired shapes and sizes. Apply an adhesive to the cutout shapes and carefully stick them onto the tumbler. You can arrange them however you like to create your own unique design. Press them firmly to ensure they stick properly.
Once you’re done applying the glitter sheets, leave the tumbler to dry completely. This could take a few hours or overnight, depending on the product you’re using. Avoid touching or moving the tumbler during this time to avoid any smudging or displacement of the glitter.
After the tumbler is completely dry, you can add a sealant if desired. This will help protect the glitter and make it last longer. Make sure to choose a sealant that is safe to use on the materials you’ve used for your tumbler.
With all these steps and precautions in mind, you can now safely and creatively make a glitter tumbler without epoxy. Remember to read and follow the instructions provided by the manufacturer of the products you use, and always prioritize your safety and environmental impact when crafting.
Epoxy for Glitter Tumbler
When it comes to making epoxy tumblers, adding glitter to the mix can really make your project sparkle. Glitter tumblers are a popular craft that creates a stunning visual effect.
If you want to add glitter to your tumbler, the first thing you’ll need is epoxy resin. Epoxy resin is made up of two components, a resin and a hardener, that need to be mixed together in the right ratio. You can find epoxy resin online or at most craft stores.
Once you have your epoxy resin, you’ll also need some glitter. There are many different types and colors of glitter available, so you can get really creative with your designs. Some people like to use bioglitter, which is an eco-friendly and safe alternative to traditional glitter that doesn’t harm the environment.
Before you start working with epoxy resin and glitter, it’s important to talk about safety. Epoxy resin can be harmful if it comes into contact with your skin or eyes, so it’s important to wear protective gear such as gloves and goggles. Make sure to read the instructions that come with your epoxy resin to know how to safely use it.
Now that you’re ready to get started, here are a few steps to follow:
- Prepare your tumbler by cleaning it thoroughly and sanding it to create a rough surface for the epoxy to adhere to.
- Mix the epoxy resin and hardener together according to the instructions. Use a disposable measuring cup and stir the components until they are fully combined.
- Add your glitter to the epoxy mixture. You can add as much or as little as you like, depending on how much sparkle you want.
- Stir the glitter into the epoxy mixture until it is evenly distributed.
- Pour the epoxy mixture onto your tumbler, making sure to cover the entire surface.
- Use a heat gun or torch to remove any air bubbles from the epoxy. Be careful not to overheat the epoxy, as this could cause it to crack or bubble.
- Leave your tumbler to dry and cure according to the instructions on your epoxy resin. This usually takes about 24 hours.
Once your epoxy is fully cured, you can admire your glitter tumbler and show it off to your friends and family. Glitter tumblers are a fun and creative craft that allows you to personalize your own drinkware with a touch of sparkle.
To keep your glitter tumbler looking its best, avoid using abrasive cleaners or scrubbing too hard. This could damage the epoxy coating and remove the sparkle. Instead, gently hand wash your tumbler with mild soap and water.
Now that you know how to make an epoxy tumbler with glitter, you can get started on your own project. Have fun and let your creativity shine!
You’re Done Making Your Glitter Tumblers

Congratulations! You’ve completed the exciting and creative process of making your own glitter tumblers. The glitter adds a beautiful sparkle to your tumbler, making it stand out and catch everyone’s eyes. It creates a stunning effect that will make your tumbler look unique and eye-catching.
From the first step to the last, you followed the instructions carefully and made sure to measure the right ratio of epoxy and glitter. Both are essential components when it comes to creating a high-quality and long-lasting product. The epoxy not only adds a glossy finish but also ensures the glitter stays in place.
Safety is the most important aspect in this craft. As you were making your tumbler, you must have noticed the safety instructions on the epoxy packaging. It is crucial to wear protective gear, such as gloves and a face mask, while working with epoxy. This helps reduce any harmful effects on your skin and respiratory system.
Avoid leaving the epoxy and glitter open for too long, as it may cause them to dry out. Make sure to keep them in a closed container when not in use. Since the epoxy is an eco-friendly product, it is safe to dispose of it according to the instructions provided on the packaging.
Now that you’re done with your glitter tumbler, it’s time to enjoy the beautiful result of your hard work. Hold it up to the light and see how it sparkles and shines. Whether you’re gifting it to someone special or keeping it for yourself, this tumbler is sure to impress.
If you have any questions or want to share your experience, feel free to leave a comment below. It’s always great to talk to other craft enthusiasts and learn from each other. And who knows, you could inspire someone else to make their own glitter tumbler!
| Suggested Materials: | Suggested Tools: |
|---|---|
| – Glitter sheets | – Epoxy resin |
| – Alumilite glitter | – Protective gloves |
| – Bioglitter | – Face mask |
Leave a Comment
To safely use glitter in your craft, you can opt for bioglitter, which is an eco-friendly alternative. Bioglitter reduces the impact on the environment and creates a safer crafting experience. Make sure to keep your work area clean and use bioglitter responsibly.
Another important step is to mix the epoxy resin and hardener in the correct ratio. Most epoxy products come with instructions on how to mix them, so make sure to read and follow those instructions carefully. Mixing the components in the wrong ratio could result in a failed tumbler.
It’s also important to wear gloves when working with epoxy to protect your skin. Since epoxy is a strong adhesive, it can be difficult to remove from your hands once it dries. So, always wear gloves to keep your hands safe.
If you’re making an epoxy tumbler without a tumbler turner, it’s important to rotate the tumbler manually to ensure even coating. This can be done by hand, but it may take more time and effort. Tumbler turners are available online and can make the process easier and more efficient.
Remember to leave a comment to let us know what you think about this tutorial or if you have any questions. We’re here to help and provide guidance to make your epoxy tumbler making experience safe and enjoyable!
Источники
When it comes to making epoxy tumblers, it’s important to have the right sources and materials. Here are some sources you can rely on to create beautiful and safe tumblers:
1. Alumilite: Alumilite is a popular brand that creates high-quality epoxy resin. Their products are known for their clarity and durability, making them perfect for tumblers.
2. Glitter and bioglitter: Adding glitter to your epoxy tumbler can give it a sparkle and shine. Make sure to use cosmetic-grade glitter or bioglitter, which is eco-friendly and safe for use.
3. Safety sheets: Safety sheets provide important instructions and guidelines for using epoxy resin safely. They also talk about the ratio you need to follow when mixing the components together.
4. Online instructions and tutorials: There are many online resources available that provide step-by-step instructions on how to make epoxy tumblers. These resources can help you understand the process and ensure you’re doing it correctly.
5. Safety equipment: Safety is paramount when working with epoxy resin. You must wear gloves, protective eyewear, and a mask to protect yourself from any harmful fumes or skin contact. It’s also important to work in a well-ventilated area.
6. Eco-friendly options: If you’re concerned about the environmental impact of epoxy resin, there are eco-friendly options available. Look for products that are labeled as eco-friendly or biodegradable to reduce your carbon footprint.
By using these sources and following the instructions carefully, you can make beautiful and safe epoxy tumblers that will leave everyone’s eyes amazed.


