

When it comes to creating word forms, there are a few key steps to follow. In this article, we will explain how to make a fillable form in Word and customize it to meet your specific needs. Whether you’re a developer looking to create an accessible form for users or simply want to learn how to create a form for a specific task, this step-by-step guide will help you get started.
First, open Microsoft Word on your Windows computer. Once Word is open, click on the “File” tab in the top left corner of the screen. From there, select “New” to create a new document.
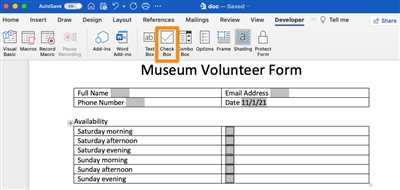
In the new document, navigate to the “Developer” tab. If you don’t see this tab, you may need to enable it by going to “File,” selecting “Options,” and then clicking on the “Customize Ribbon” section. From there, check the box next to “Developer” and click “OK.”
Once you’re on the “Developer” tab, click the “Design Mode” option in the “Controls” section. This will enable the various controls you can use to create your form.
Now, you can start adding form controls to your document. To add a text field, click on the “Text Box” control in the “Controls” section. Click and drag on the document to create a text field where users can input their information.
If you want to create a drop-down menu, click on the “Combo Box” control. Again, click and drag on the document to create a drop-down menu. You can then customize the choices that appear in the menu.
For other types of form controls, such as check boxes or radio buttons, you can find them in the “Controls” section as well. Click on the control you want to add, and then click and drag on the document to place it where you want it to appear.
Once you have added the form controls you need, you can then format and customize the appearance of your form. You can change the font, size, and color of the text, add pictures or tables, and apply styling to make your form visually appealing.
Finally, when your form is complete, you can save it as a Word document or convert it to a PDF file for easier distribution. To save it as a Word document, simply click on the “File” tab, select “Save As,” and choose the desired location on your computer.
That’s it! You have now learned how to make a fillable form in Microsoft Word. Whether you’re creating forms for business purposes, educational exercises, or other specific needs, customizing and creating forms in Word is a valuable skill to have.
How to Make a Fillable Form in Word
Creating fillable forms in Microsoft Word can be a useful skill to have. Whether it’s for training purposes, to reinforce learning, or to collect data from users, fillable forms allow you to gather information in a structured and organized way. In this section, we will explain step by step how to make a fillable form in Word.
- Open a new or existing Word document.
- Click on the “Insert” tab in the Word toolbar.
- Select the “Form” option from the menu.
- In the “Form” section, choose the type of control you want to add, such as a text field, drop-down list, or check box.
- Place the control on the page where you want it to appear.
- Select the control and choose the “Properties” option from the “Form” section of the toolbar. Here, you can customize the control’s properties, such as its title, type, and default value.
- Add other form controls and customize them as needed.
- To add a combo box control, select where you want it to appear on the form and choose the “Combo Box” option from the “Form” section of the toolbar. Then, choose the “Properties” option to customize the control’s properties.
- Highlight the text or content you want to include as options for the drop-down list or combo box.
- In the “Properties” dialog box, click on the “Add” button under the “Choices” section. Enter each item on a new line.
- Continue to customize and add form controls until you have created the desired form.
- Once you have finished creating the form, save the file.
- To make sure that the form is accessible to all users, use the “Save As” option and select the “PDF” format. This will convert the Word document into a PDF, which can be read using various PDF reader programs.
- You can also add styling and formatting to your form by using the various formatting options available in Word.
- When you are ready to distribute the form, print copies for users to fill out or share the file electronically.
By following these step-by-step instructions, you can easily create a fillable form in Microsoft Word. Remember to customize the form to fit the specific needs of your audience and the data you want to collect.
Creating the accessible form in MS Word – Step 1
In this section, we will explain how to create an accessible form in Ms Word. Step 1 relates to the initial setup of the document.
First, open Ms Word and create a new document or open an existing one. Then, choose the location where you want to place the form on the page. You can select a specific section or leave it at the beginning of the document.
Next, you need to insert a table to create the form. Go to the “Insert” tab in the toolbar, click on the “Table” button, and choose the number of rows and columns you want. You can also customize the table styling if needed.
Once the table is inserted, you can start adding form controls. To do this, click on the location within the table where you want to add a field. You can add different types of controls such as text boxes, check boxes, drop-down menus, and combo boxes.
To add a text box, click on the desired cell in the table and go to the “Developer” tab in the toolbar. Click on the “Design Mode” button to activate the developer mode. Then, click on the “Text Box” button to add a fillable text field.
Similarly, you can add other form controls by selecting the appropriate options from the “Developer” tab. For example, you can add check boxes for yes/no choices or drop-down menus for multiple options. These controls will allow users to interact with the form and provide the necessary data.
After adding the form controls, you can customize their properties by right-clicking on each field and selecting the “Properties” option. Here, you can change the field type, add a title and description, and specify any other specific settings.
Once you have finished adding and customizing the form controls, you can save the document and print it if needed. This accessible form will now be ready for people to fill out and submit. In the next step, we will explain how to make the form even more accessible for users with disabilities. Stay tuned!
Reinforce your knowledge gained through the learning process with exercise files
In the process of learning, it is important to actively engage with the content to ensure a better understanding and retention of the material. One effective way to do this is by using exercise files.
An exercise file is a document or form that allows you to apply what you have learned in a practical and interactive manner. It provides a structured format where you can practice different concepts, answer questions, and reinforce your understanding of the subject matter.
When creating exercise files, developers often utilize different form controls like checkboxes, drop-down lists, fillable fields, and more. These controls allow users to input their answers or make selections from provided options, creating an interactive experience.
For example, you can create a fillable word form with a table that contains questions related to a specific topic. Users can then read the question, select the correct answer from a drop-down list, and insert the answer in the table field. This way, they can actively engage with the content and check their understanding.
You can also customize exercise files to make them more appealing and user-friendly. You can highlight important information, use rich text formatting, insert pictures or data tables, and provide explanations for each question. By doing this, you create a more engaging and practical learning experience.
Exercise files can be provided in different formats, such as PDF or MS Word documents, and can be made accessible to users using screen readers or other assistive technologies. This ensures that everyone, regardless of their abilities, can benefit from the interactive exercises.
To use exercise files, simply download the file and open it using the appropriate software. Depending on the file type, you may need to choose the specific section or page you want to display. Once the file is open, you can read the instructions, answer the questions, and check your answers. The exercise files provide an opportunity to reinforce your knowledge and identify areas that require further study.
In summary, exercise files are a valuable tool for reinforcing knowledge gained during the learning process. They provide an interactive and practical way to apply what you have learned, engage with the content, and check your understanding. By using exercise files, you can solidify your knowledge and improve your overall learning experience.
Add content to the form
Now that you have created a basic form, it’s time to add content to it. In this section, we’ll explain how you can write text and place it in different sections of your form.
To add text to your form, you can use the text control. This control allows users to type in plain text and is accessible to everyone. You can add a text control by clicking on the “Text” option in the controls menu.
Once you have added a text control, you can customize it by changing its title and placeholder text. The title is what will be displayed next to the text field, explaining to the user what they should enter. The placeholder text is the default text that will be displayed in the text field until the user starts typing.
Another way to add content to your form is by using the file control. This control allows users to upload files from their computer. You can add a file control by clicking on the “File” option in the controls menu.
If you want to give users specific choices to select from, you can use the combo box control. This control displays a drop-down menu with a list of items. Users can select one item from the list. You can add a combo box control by clicking on the “Combo Box” option in the controls menu and then selecting the “Choices” tab to enter the items you want to display.
In addition to these basic controls, there are many other options you can explore to add content to your form. For example, you can insert pictures, add tables, or even create a rich text field where users can format their input. Each control relates to a specific type of content and serves a different purpose in your form.
Remember to explain to your users what each field is for and how they should fill it in. You can do this by adding a title and placeholder text to each control, as mentioned earlier. Additionally, you can provide instructions in a separate section or display them next to each control.
By adding content to your form, you make it more engaging and useful for your users. They will know what information they need to provide and how to do it. This will improve the overall user experience and increase the chances of receiving accurate and relevant data.
Now that you know how to add content to your form, let’s move on to the next step: styling and customizing your form.


