

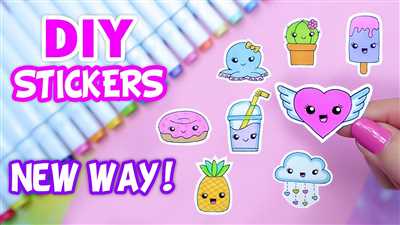
Are you looking to add a personalized touch to your planner or want to create unique labels for your belongings? Making your own stickers can be a fun and creative way to add some flair to your everyday life. In this article, we will guide you through the process of making beautiful stickers with just a few materials and tools.
Materials and Tools You Will Need
Before you get started, make sure you have all the necessary materials and tools. You will need a computer with design software, such as Adobe Illustrator or Canva, a printer, adhesive paper or waterproof sticker paper, scissors, and a pencil. Additionally, if you have access to a cutting machine like a Cricut or Silhouette, it can make the process even easier.
Step 1: Plan and Design
The first step in making beautiful stickers is to brainstorm and come up with ideas for your designs. Think about the theme or style you want to create and keep in mind the purpose of your stickers. Are they for personal use or will you be giving them as gifts to friends and customers? Once you have a clear idea in mind, start sketching your designs with a pencil.
Step 2: Use Design Software
If you’re comfortable using design software, you can import your hand-drawn sketches and refine them digitally. This step is optional, but it can make your stickers look more polished and professional. There are many design software options available, both free and paid, so choose one that suits your needs and budget.
Step 3: Print and Cut
Once you’re happy with your designs, it’s time to print them. Make sure you have a good quality printer and use adhesive paper or waterproof sticker paper for the best results. If you have a cutting machine, this is where it comes in handy. Simply load your printed sheets onto the machine and let it do the cutting for you. If you don’t have a cutting machine, you can use scissors to carefully cut out your designs.
Step 4: Apply Adhesive
If you’re using adhesive paper, you can skip this step. However, if you’re using waterproof sticker paper, you’ll need to apply adhesive to the back of each sticker. There are many adhesive options available, such as glue sticks or adhesive sprays. Make sure to carefully follow the instructions for the adhesive you’re using to ensure the best results.
Step 5: Enjoy Your Stickers
Once your stickers are ready, it’s time to enjoy them! Use them to decorate your planner, personalize your stationery, or give them as gifts to friends and customers. Stickers are a great way to add some fun and creativity to your everyday life, so feel free to experiment and let your imagination run wild!
Creating beautiful stickers can be a rewarding and enjoyable activity. With just a few materials and some creativity, you can make unique stickers that reflect your personal style. So why not give it a try? Start making your own stickers today and see where your creativity takes you!
How to Make Stickers at Home With Minimal Supplies
If you want to make your own stickers at home but don’t have a lot of supplies or equipment, don’t worry! With just a few simple materials and some basic steps, you can create beautiful stickers right in the comfort of your own home.
Here is a step-by-step guide to help you get started:
Step 1: Plan Your Designs
The first thing you need to do is plan out your sticker designs. Decide what images or drawings you want to turn into stickers. You can either draw them yourself or import them from your computer.
Step 2: Get the Right Materials
Next, you’ll want to gather the minimal supplies you’ll need. You’ll need adhesive paper or a waterproof sticker sheet, scissors, and a pencil. Make sure your adhesive paper is transparent or white, depending on the look you want for your stickers.
Step 3: Design Your Stickers
Now, if you don’t have professional graphic design software, don’t worry! There are simple and user-friendly programs and apps you can use to create your sticker designs. Some popular programs include Silhouette Studio (for Silhouette machines like the Cameo) and software like Adobe Illustrator or Photoshop. You can also consider using free online programs or enrolling in a design course to learn more.
Step 4: Print and Cut
Once you have your designs ready, you can print them out using a regular printer. Make sure to set the printer settings to high-quality prints for the best results. After printing, use your scissors to carefully cut out each sticker shape.
Step 5: Apply to Surfaces
Now comes the fun part! Peel off the backing of the adhesive paper and stick your stickers to any surface you want. They can be used on notebooks, laptops, water bottles, and more. Let your creativity run wild!
With these minimal supplies and easy steps, you can create beautiful homemade stickers that are both unique and personal. Your friends and customers won’t even believe you made them yourself!
So, what are you waiting for? Start making your own stickers at home today!
What You Need: Materials and Equipment
When it comes to making beautiful stickers, having the right materials and equipment is crucial. Here are some essential items you’ll need to get started:
- Printer: To print your sticker designs, you’ll need a good quality printer. Inkjet printers are generally most suited for this task.
- Paper: Use a high-quality matte or glossy paper for best print results. Make sure the paper is compatible with your printer.
- Drawing tools: If you’re starting from scratch and want to draw your own designs, you’ll need a pencil and some drawing tools.
- Computer: A computer is necessary to design and import your sticker designs. Make sure you have the appropriate software installed.
- Software: There are many programs and apps available for sticker design. Some popular ones include Adobe Illustrator, Procreate, and Canva.
- Cutting machine: If you want to create more intricate designs or cut out shapes precisely, consider investing in a cutting machine like a Cricut or Silhouette Cameo.
- Exacto knife: Sometimes you may want to hand-cut your stickers. In that case, an Exacto knife will come in handy.
- Laminate or adhesive: Depending on the finish you want for your stickers, you may need laminate sheets or adhesive. These help protect the stickers and give them a professional look.
These are the basic tools and materials you’ll need to make beautiful stickers. Depending on your vision and the complexity of your designs, you may find yourself needing additional equipment or tools. Keep in mind that sticker-making can be a fun and creative process, so don’t be afraid to experiment with different techniques and materials to achieve the desired results.
1 Design or Illustration Tools
When it comes to designing or illustrating your own stickers, having the right tools is essential. Here are some tools that can help bring your vision to life:
1. Pencil and Paper: The most basic and essential tools for any creative work. Start by sketching out your designs on paper before moving them into digital software.
2. Design Software: To create professional-looking stickers, you’ll need design software such as Adobe Illustrator or Photoshop. These programs offer a wide range of features and tools to manipulate, edit, and perfect your designs.
3. Drawing Tablets: If you want to take your illustrations to the next level, consider investing in a drawing tablet like Wacom Intuos. These tablets allow you to draw directly on the screen, giving you more precision and control over your artwork.
4. Cutting Machines: If you’re looking to mass-produce your stickers or want to create intricate designs, a cutting machine such as the Cricut can be a great addition to your toolkit. These machines can accurately cut out your designs from various materials.
5. Scissors or Exacto Knife: For smaller-scale projects or when you’re just starting, a pair of scissors or an exacto knife can be handy for cutting out your stickers.
6. Laminators: To protect your stickers from wear and tear, consider laminating them. A laminator machine will give your stickers a professional and glossy finish.
7. Printers: Having a reliable printer is crucial for printing your stickers. Make sure you choose one that is capable of producing high-quality prints and is compatible with your chosen sticker paper.
8. Sticker Paper: You can’t make stickers without sticker paper! There are various types of sticker paper available, but for most purposes, white matte sticker paper is a good choice.
9. Additional Supplies: Depending on the techniques and styles you want to explore, you may need additional supplies such as paint, markers, or other decorative elements.
It’s important to note that while these tools can enhance your sticker-making process, they won’t guarantee beautiful stickers. The time, effort, and creativity you put into your designs are what will make your stickers truly stunning. So don’t be discouraged if you don’t have all the equipment mentioned above – start with what you have and learn along the way!
In the next section, we will dive deeper into each of these tools and provide links to some recommended software, machines, and additional resources for you to explore.
2 Design Software Programs
If you want to create beautiful stickers, you will need design software programs to help you bring your vision to life. Here are two popular programs to consider:
1. Adobe Illustrator: Adobe Illustrator is a powerful design program that is generally considered the industry standard when it comes to creating stickers. It can also be used for other projects where having transparent backgrounds and vector images is important. With Adobe Illustrator, you have precise control over every aspect of your design, from the colors to the shapes. You can also add text, links, and comments to your design. Adobe Illustrator is a paid program, so if you are just starting out and don’t want to purchase additional software, it may not be the best option for you.
2. Silhouette Studio: Silhouette Studio is a design program that comes with the Silhouette Cameo cutting machine. It is specifically designed for creating stickers and other types of paper crafts. Silhouette Studio is a simple and user-friendly program, making it a good choice for beginners. It allows you to draw, import, and manipulate images, and it also has a built-in trace tool that can turn any image into a sticker. Silhouette Studio comes in a free version as well as a paid version with additional features.
When choosing a design software program, keep in mind what you want to accomplish and what tools you have at your disposal. If you’re creative and want to explore different techniques, Adobe Illustrator may be the better choice. If you’re just starting out and want a simple way to create stickers at home, Silhouette Studio could be the perfect fit for you. Regardless of which program you choose, both Adobe Illustrator and Silhouette Studio will give you the tools you need to design and print your own stickers.
3 Sticker Paper
If you want to make beautiful stickers, you will need the right materials. One of the most important materials is sticker paper. Sticker paper is what you will print your designs onto before cutting them out and sticking them wherever you want. In this section, we will go over three types of sticker paper that you can consider using for your sticker-making projects.
| Sticker Paper Type | Features |
|---|---|
| Matte Sticker Paper | Matte sticker paper has a non-glossy finish, giving your stickers a more subtle and natural look. It is great for adding a personal touch to your planner or stationery. Matte sticker paper can be a good choice if you want your stickers to look more understated. |
| Glossy Sticker Paper | Glossy sticker paper has a shiny finish, which can make your stickers look more vibrant and eye-catching. It is ideal for creating stickers that you want to stand out, such as stickers for labeling products, giving as gifts, or decorating windows. If you prefer a glossy and professional look, glossy sticker paper might be the right choice for you. |
| Waterproof Sticker Paper | If you need your stickers to withstand water or moisture, waterproof sticker paper is the way to go. This type of sticker paper is coated or made with a material that repels water, making it perfect for outdoor stickers, water bottle labels, or any application where the sticker might come in contact with liquids. Waterproof sticker paper will help ensure that your designs stay intact even when exposed to water. |
Before you choose the type of sticker paper, you should consider factors such as the application, environment, and your customers’ preferences. Each type has its own advantages, so think about which one will work best for your specific needs. Now that you know about the different types of sticker paper, you can get started on designing and printing your own beautiful stickers!
4 Printer
One of the most important tools you will need when making beautiful stickers is a digital printer. This section will give you some additional information on printers and how to choose the right one for your sticker-making needs.
If you’re just starting out, a simple inkjet printer will work fine for your sticker prints. You can import your designs into programs like Adobe Illustrator or Apple Pages and print them out on regular paper. However, if you want your stickers to have a more professional look and feel, you may want to consider investing in a vinyl cutter machine like the Silhouette Cameo or Cricut. These machines can cut out your designs precisely and can even laminate them for added durability.
When it comes to printers, there are a few key things to keep in mind. First, consider the size and type of prints you will be creating. If you plan on having larger stickers, make sure your printer can accommodate them. Additionally, if you’re going to be printing frequently, you may want to invest in a printer that has a larger ink or toner capacity to avoid frequent replacements.
Another important factor to consider is whether you want a printer that works with cloud-based printing or one that requires a direct connection. Cloud-based printers allow you to print from anywhere by connecting directly to the internet, while printers that require a direct connection will need to be physically connected to your computer. Consider your workflow and where you plan on doing most of your sticker-making when making this decision.
Finally, don’t forget to take a look at the cost of ink or toner replacements and other supplies for your printer. Some printers may be more expensive upfront but have cheaper consumables, while others may have a lower purchase price but more expensive supplies. Additionally, consider the availability of supplies. You don’t want to find yourself halfway through a project only to realize you can’t find the specific ink or toner your printer requires.
In conclusion, a printer is a crucial tool for making beautiful stickers. Whether you start with a basic inkjet printer or invest in a vinyl cutter machine, make sure to consider your needs, budget, and intended sticker designs when choosing a printer.
5 Cutting Tools
When it comes to creating beautiful stickers, having the right cutting tools is essential. Whether you’re a beginner or an experienced designer, these tools will help you bring your vision to life. Here are five cutting tools to consider:
- Scissors: Scissors are a simple and accessible tool that most people already have at home. They are versatile and can be used to cut various materials, making them suitable for any sticker design.
- Exacto Knife: An Exacto knife, also known as a craft knife, is a precision cutting tool. It can be used to make intricate cuts and precise details in your sticker designs.
- Cricut: The Cricut is a popular cutting machine that is perfect for creating stickers. It allows you to import digital designs and cuts them with precision. Keep in mind that you will need to purchase adhesive materials suited for your Cricut machine.
- Silhouette Cameo: Similar to the Cricut, the Silhouette Cameo is another cutting machine that will give you professional-quality stickers. It also requires adhesive materials specific to the machine.
- Waterproof Vinyl Printer: If you want to make waterproof stickers, investing in a waterproof vinyl printer is a good idea. This equipment will ensure that your stickers won’t smudge or fade when exposed to water.
Each cutting tool has its advantages and disadvantages, so consider your needs and budget when deciding which one to use. If you’re on a minimal budget, start with scissors and an Exacto knife. If you’re looking for a more automated and precise process, the Cricut or Silhouette Cameo might be the way to go.
Keep in mind that the cutting tool is just one part of the sticker-making process. You’ll also need good drawing software, such as Adobe programs, to create your designs. Additionally, ensure you have the right materials, such as waterproof or white adhesive paper, to print your designs on.
Now that you know about these five cutting tools, it’s time to get creative and start making beautiful stickers!
Step 2: The Adhesive
Once you have your designs ready, it’s time to think about the adhesive you’ll use for your stickers. The type of adhesive you choose will have an impact on how long your stickers last, how well they stick to surfaces, and whether they can withstand exposure to water and other elements.
There are several options when it comes to adhesive for stickers:
- Permanent adhesive: This type of adhesive is the most commonly used for stickers. It provides a strong and long-lasting bond, making it ideal for items that will be exposed to harsh conditions or need to stay in place for an extended period.
- Removable adhesive: If you want your stickers to be easily removable without leaving any residue, this adhesive is the way to go. It allows for easy repositioning and doesn’t damage the surface when removed.
- Matte adhesive: A matte adhesive gives your stickers a non-glossy finish. This can be a good option if you want a more subtle or vintage look for your stickers.
- Waterproof adhesive: If you plan to use your stickers outdoors, near water, or in wet conditions, a waterproof adhesive is essential. It will ensure that your stickers stay intact and don’t get damaged by moisture.
- Laminate adhesive: Adding a laminate layer to your stickers can provide extra protection and durability. It can also give your stickers a professional, glossy finish.
The type of adhesive you choose will depend on the purpose of your stickers and your personal preferences. Take into consideration the environment in which the stickers will be used and the durability you expect from them.
Once you’ve decided on the adhesive, you can print your designs using a digital printer or a vinyl cutter like Cricut or Silhouette Cameo. These machines allow you to print on various materials, such as vinyl, paper, or transparent sheets.
Keep in mind that if you’re using a digital printer, you may need to adjust the settings to achieve the desired print quality. You can import your designs into a program like Adobe Illustrator or use software specifically designed for your printer.
When printing, make sure you have enough adhesive paper or vinyl sheets on hand. It’s always a good idea to order more than you need to avoid running out in the middle of your sticker-making process.
Once your prints are ready, you can start the process of cutting each sticker. Use a cutting tool like an exacto knife or scissors to carefully cut out your designs. If you’re working with intricate or detailed designs, having a good vision and steady hands are essential.
Note that some printer ink may not be waterproof, so be cautious when exposing your stickers to water or moisture.
After your stickers are cut, you can peel off the backing and apply the adhesive side to your chosen surface. Make sure to smooth out any air bubbles for a clean finish.
With these steps in mind, you’re ready to move on to the final step of creating your own beautiful stickers – Step 3: Giving Your Stickers a Finishing Touch!
Step 3: Laminate It
Once you have your prints ready, it’s time to protect them by laminating. Laminating will give your stickers a glossy and professional finish, making them more durable and long-lasting. Here are a few ways to laminate your stickers:
1. Laminate with a Laminating Machine: If you have a laminating machine at home, this is the easiest and most common method. Simply insert your prints into a laminating pouch, then run them through the machine. The machine will seal the pouch and protect your stickers.
2. Use Self-Adhesive Laminate Sheets: Another option is to use self-adhesive laminate sheets. These come in various sizes and are generally transparent. Simply peel off the backing and carefully apply the laminate sheet onto your stickers.
3. Opt for Matte Laminate: If you prefer a matte finish, you can use matte laminate sheets instead of glossy ones. Matte laminate will give your stickers a more subdued and elegant look.
4. Hand-Laminate with Clear Tape: For a more budget-friendly option, you can laminate your stickers by hand using clear tape. Cut a piece of transparent tape slightly larger than your sticker, then carefully lay it on top, smoothing out any air bubbles or creases.
Regardless of the method you choose, make sure to trim off any excess laminate material to achieve an exact fit for your stickers. You can use scissors or an exacto knife for this step.
Now that your stickers are laminated, they are ready to be cut and used. In the next step, you will learn how to cut your stickers using a cutting tool or machine.
ENROLL NOW

If you’re interested in creating beautiful stickers, now is the time to enroll in our exclusive program. With the right tools and materials, you can start designing and printing your own stickers from the comfort of your own home.
First things first, you’ll need the right software to bring your vision to life. There are several options available, such as Adobe Illustrator, Paint Tool SAI, or even simple drawing apps on your computer or tablet. Choose the one that suits you best.
Once you have the software, it’s time to start creating your designs. You can use a pencil and paper to sketch out your ideas, or jump straight into digital ilustration using a tablet like the Wacom Intuos. The choice is yours.
When you’re happy with your designs, it’s time to print them out. You can use a regular printer, but keep in mind that the quality may not be as good as a dedicated sticker printer. One popular option is the Silhouette, which also comes with additional software for cutting out your stickers.
Now that you have your prints, it’s time to cut them out. Grab a pair of scissors and carefully follow the outline of each sticker. If you want a more precise and professional look, consider investing in a cutting machine like the Cricut.
Before you stop here, it’s a good idea to laminate your stickers to protect them from wear and tear. A matte laminate will give your stickers a smooth and professional finish. It’s also a good idea to purchase adhesive sheets that are suited for stickers, as regular glue may not work as well.
Alternatively, if you’re going for a transparent look, you can skip the laminate and just use adhesive sheets with a transparent backing.
Finally, it’s time to organize and package your stickers. Use a sticker planner or a storage box to keep them ordered and easy to find. You can also offer different sticker sets to your customers, with a variety of designs.
Remember, having quality materials is key to creating beautiful stickers. Invest in good adhesive, paper, and printing equipment to ensure your stickers last and look stunning. Keep in mind that waterproof stickers are also in demand, so consider purchasing waterproof paper.
Now that you have a step-by-step guide, start creating your own stickers today. Don’t wait any longer, enroll now and unleash your creativity!
Sources
When it comes to making beautiful stickers, you will need a few sources to help you along the way. Here are some of the key sources to consider:
| 1. Tools and Supplies If you want to create stickers, you will need some basic tools and supplies. These include a computer, a printer, adhesive paper or labels, a pair of scissors, and a good glue. |
| 2. Design Software To design your stickers, you will need a program that allows you to create and manipulate images. Adobe Illustrator is one of the most commonly used programs for this purpose. It gives you the freedom to draw and design your stickers using a variety of tools and features. |
| 3. Cutting Machine If you want to take your sticker-making to the next level, consider investing in a cutting machine. The Cricut is one of the most popular options. It allows you to import your designs into the machine and it will cut them out with precision. |
| 4. Additional Software In addition to design software, you may also need additional software for specific purposes. For example, if you want to create transparent stickers, you will need a program like Adobe Photoshop to remove the background of your design. |
These sources will provide you with the tools and knowledge you need to create beautiful stickers. Keep in mind that sticker making can be a creative and fun process, so don’t be afraid to experiment and try different methods and ways to make your stickers unique.


