

In today’s digital age, it is essential to have an effective and secure way of signing documents. Gone are the days of printing, signing, and scanning. Now, with the help of technology, you can easily create a digital signature word.
To get started, you need to download a reliable eSignature tool like PandaDoc or DocuSign. These platforms offer free options for creating legally binding electronic signatures. Once you have downloaded the software, follow these simple steps to set up and use your digital signature word.
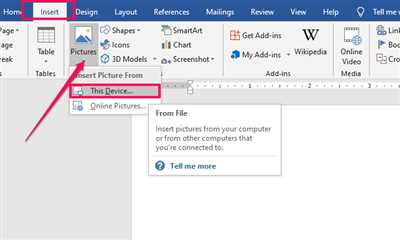
First, open the document that you need to sign using Microsoft Word. Then, click on the “Insert” tab and select “Signature Line” from the drop-down menu. A setup window will appear, where you can enter your name, title, and any other desired information.
Next, click on the “OK” button, and a line with the text “Sign here” will appear in your document. You can move and resize this line to the desired location. Once you have placed it correctly, save the document.
Now, you can add your digital signature word. Click on the signature line, and a dialog box will appear, prompting you to insert your signature. You have several options to choose from. You can either type your name, draw your signature using a mouse or touchpad, or upload an image of your handwritten signature.
After you have inserted your signature, make sure to review and edit it if needed. It is crucial to ensure that your digital signature word is correct and reflects your handwritten signature accurately. You can also add your initials or other additional information if required.
Finally, when you are satisfied with your digital signature word, click on the “Save” button. Your signature will now be added to the document, and you can proceed to sign other documents digitally without the need for printing and scanning.
By following these simple tips, you can create a digital signature word that is not only legally binding but also easy to use and secure. Try out different eSignature tools like PandaDoc or DocuSign to find the one that best suits your needs. With the ability to sign documents digitally, you can save time, paper, and effort, while ensuring the confidentiality and integrity of your important documents.
- How to create an electronic signature in Word
- Add a Digital Signature Using a Signature Line
- Creating an electronic signature to add to a Word document
- Try eSignature Now for Free
- Tips for Creating an Effective Signature in Microsoft Word
- How to sign a Word document without printing it
- Video:
- How to Create Digital Signatures in Word – Quick and Easy Tutorial – Transparent Background
How to create an electronic signature in Word

If you need to sign documents electronically, Microsoft Word provides an easy and convenient way to create an electronic signature. With just a few clicks, you can create your own digital signature and use it for signing your desired documents. Here are some tips on how to create an electronic signature in Word using different methods.
Method 1: Using Microsoft Word’s built-in signature feature
Step 1: Open the document you want to sign in Microsoft Word.
Step 2: Click on the “Insert” tab at the top of the Word window.
Step 3: Within the “Text” group, click on the “Signature Line” button. This will open a pop-up window.
Step 4: In the pop-up window, fill in your desired signature details such as your name, title, and email address.
Step 5: Check the boxes for any additional instructions you want to include, such as allowing the signer to add a comment or specifying the purpose of the document you are signing.
Step 6: Click the “OK” button to insert the signature line into your document.
Step 7: To sign the document digitally, place the cursor where you want your signature to appear. Then, on the “Signature Setup” tab that appears, click on the “Sign” button.
Step 8: If you haven’t set up a digital certificate yet, Word will prompt you to do so. Follow the instructions to set up a certificate. If you already have a certificate, select it from the list and click “OK”.
Step 9: Word will place your electronic signature within the signature line, and you can also add any additional text or elements you need.
Step 10: Save the document and it is now ready to be digitally signed and shared.
Method 2: Using third-party eSignature tools
If you need more advanced features or want to try different electronic signature options, you can use third-party tools such as DocuSign, PandaDoc, or HelloSign. These tools let you upload your document, create your signature, and add it digitally without the need for a digital certificate.
Step 1: Visit the website of the eSignature tool you want to use (e.g., docusign.com).
Step 2: Sign up for a free account or log in if you already have one.
Step 3: Upload the document you want to sign and follow the provided instructions to add your signature.
Step 4: Customize your signature by choosing the desired font, size, and style. You can also add additional elements like initials or even draw your signature using your trackpad or mouse.
Step 5: Preview the document and make any necessary edits or changes.
Step 6: Once you’re satisfied with the signature, click the “Sign” button to digitally sign the document.
Step 7: The eSignature tool will add your electronic signature to the document, and you can save or download the signed file.
Using these methods, you can quickly and effectively create and use electronic signatures within Microsoft Word or with the help of third-party eSignature tools. Whether you’re signing a document for personal or professional purposes, electronic signatures provide a secure and efficient way to sign and share documents without the need for printing and scanning.
Add a Digital Signature Using a Signature Line
If you need to insert a digital signature into a Word document, you can setup a signature line for easier and more efficient signing. This allows you to add your digital signature without the need for printing or scanning documents. Follow these steps to create and add a signature line:
- Open the Word document that you need to sign.
- Place your cursor in the desired location where you want to add the signature line.
- Click on the “Insert” tab at the top of the Word window.
- Within the “Text” section of the toolbar, click on the “Signature Line” button.
- A drop-down menu will appear. From there, click on “Microsoft Office Signature Line.”
- In the dialog box that appears, you can enter the signer’s name, title, and email address. You can also include instructions for the signer, such as how to sign electronically.
- If you have a digital certificate to authenticate your signature, you can check the box to include it. Otherwise, you can leave it unchecked.
- Click on the “OK” button to insert the signature line into your document.
- You can then edit the signature line by right-clicking on it and selecting “Edit Signature” from the drop-down menu. This allows you to change or upload an image of your signature or initials.
- Hold the “Ctrl” key on your keyboard and click on the signature line to digitally sign the document.
- If you haven’t already created a digital signature, you can try using tools like PandaDoc or DocuSign to create one for free. These tools offer more features and options for customizing your e-signature.
- Once you click on the signature line, a dialog box will appear prompting you to sign the document. Click on the “Sign” button to sign it digitally.
- If you need to add more than one signature to the document, you can repeat steps 1-11 for each additional signature.
- After signing the document, you can save it and send it electronically without the need for printing or scanning. The digital signatures ensure the authenticity and integrity of the document.
- To verify the digital signatures in Word, you can click on the signature line and select “View Signatures” from the drop-down menu. This will display the details of the signers and the date and time of signing.
- If you need to download or print the signed document, you can click on the signature line and select “Export to PDF” or “Print” from the drop-down menu.
By following these effective tips, you can create and add a digital signature using a signature line in Microsoft Word. This allows you to sign documents electronically, making the process faster and more convenient.
Creating an electronic signature to add to a Word document
When it comes to creating and adding an electronic signature to your Word documents, it’s important to know the steps and tools involved. By using a digital signature, you can ensure the authenticity and integrity of your documents, making them more trustworthy and effective.
One option to create an electronic signature is to use an eSignature service like PandaDoc. With PandaDoc, you can set up a free account and easily create your own digital signature. Simply upload an image of your desired signature or initials, or even draw your signature directly on the screen. PandaDoc then lets you save your signature for future use, making it convenient and easily accessible.
If you prefer using Microsoft Word for creating your signature, there’s a built-in feature that allows you to add an electronic signature. To do this, go to the “Insert” tab and click on the “Signature Line” button. A pop-up window will appear, asking you to enter your name and any additional information you want to include. Once you click “OK,” Word will insert the signature line in your document.
After inserting the signature line, you can double-click on it to further customize it. You can change the name that appears, add a title or certificate, and even include instructions for the signee. This way, you can ensure that the recipient knows exactly what they need to do in order to sign the document correctly.
When it’s time to actually sign the document, you can do so digitally right within Word. Just click on the signature line, and a special Sign pane will open on the right side of the window. If you haven’t added your signature yet, you can click the “Sign” button and choose “Add Signature” or “Add Initials.” Word will prompt you to create your electronic signature using a mouse, touch-screen, or a stylus.
If you’re concerned about the security of your electronic signature, both PandaDoc and Microsoft Word utilize advanced encryption techniques to ensure that your signature is protected. This means that even if someone were to try and alter your signature or counterfeit it, they would not be able to do so without your private key.
In summary, creating an electronic signature to add to a Word document is a simple and straightforward process. Whether you choose to use an eSignature service like PandaDoc or utilize Word’s built-in tools, you can easily make your documents more professional and legally binding. So why not give it a try and start adding digital signatures to your Word documents today?
Try eSignature Now for Free
When it comes to digital document signing, one of the most popular and trusted tools is DocuSign. With DocuSign, you can easily add an electronic signature to any document with just the click of a button. Whether you need to sign a contract, insert your signature into a Word document, or even create a digital signature for your emails, DocuSign has you covered.
Using DocuSign is simple and intuitive. All you have to do is upload the document you want to sign, and then follow a few simple steps to add your signature. You can even edit and ensure the text within the document is correct before signing. With multiple options for creating your signature, such as typing your name, drawing it with your mouse, or even inserting an image of your signature, you have the flexibility to choose a signature that best fits your needs.
DocuSign also offers tips and guides to help you create an effective electronic signature. They understand the importance of a signature and how it can hold legal weight. That’s why they provide a certificate of completion with each signature, ensuring that your documents are signed correctly and securely.
And the best part? You can try eSignature with DocuSign for free! Without any setup or need to download software, you can start signing documents electronically right away. Give it a try today and experience the convenience and efficiency of electronic signatures for yourself!
In addition to DocuSign, there are other free tools available for creating electronic signatures. One such tool is PandaDoc, which allows you to create, edit, and sign documents digitally. With PandaDoc, you can even change and add initials to your documents with just a few clicks.
So why hold on to printing and scanning documents for signatures when you can do it all digitally? Try eSignature now for free and discover how easy, efficient, and secure the process can be.
Tips for Creating an Effective Signature in Microsoft Word
Creating a signature for your Microsoft Word documents is essential, especially when it comes to digitally signing or printing them. With the right setup, you can easily add your desired signature without the need for printing or scanning documents. Here are some tips to ensure you create an effective signature using Microsoft Word:
- Try Electronic Signature Tools: If you haven’t already, consider using electronic signature platforms like PandaDoc or DocuSign. These tools let you digitally sign your documents with ease and even offer options to upload your own signature image.
- Use the Insert Signature Button: Microsoft Word provides an “Insert Signature” button that lets you add a digital signature line within your document. Simply click on the button, and a signature line will appear where you can type or draw your signature.
- Download a Signature Font: If you want a more personalized signature, you can download signature fonts from various websites. These fonts mimic different handwriting styles and allow you to create a unique signature for your documents.
- Ensure Correct Signature Format: When creating a digital or printed signature, it’s essential to ensure that the format is correct. Make sure to include your full name, initials, or any additional details that you want to be a part of your signature.
- Edit and Change Your Signature: Microsoft Word lets you edit and change your signature easily. If you’re not satisfied with your current signature, simply click on the signature line, hold the mouse button, and make the desired changes. You can even add or remove text from your signature.
- Make Use of Certificates: If you want to create more secure signatures, you can make use of certificates. Certificates help establish the authenticity of your signature and ensure that it cannot be tampered with.
- Consider Free eSignature Services: If you don’t have access to a paid electronic signature platform, you can try out free eSignature services like PandaDoc, DocuSign, or even Microsoft Word itself. These services let you sign your documents electronically without any additional cost.
- Hold Your Signature Electronically: Once you’ve created your signature, make sure to hold it securely. If you’re using an electronic signature platform, it will store your signature securely. However, if you’re inserting your signature directly into a Word document, ensure that you have a backup of your signature.
By following these tips, you can create an effective signature in Microsoft Word that can be used for both digital and printed documents. Remember to consider the legal requirements and regulations of your region when using electronic signatures.
How to sign a Word document without printing it
If you need to sign a Word document but don’t want to bother with printing it out, there are effective solutions that let you add your signature electronically. With the advancements in technology, you can now sign documents digitally and ensure that they are legally binding.
One option is to use a program like Microsoft Word, which lets you insert electronic signatures directly into your documents. To do this, simply open the document you want to sign and click on the “Insert” tab. Then, click on the “Signature Line” button and follow the setup instructions to create your desired signature.
Another option is to use online platforms like PandaDoc or DocuSign, which offer free eSignature services. These platforms allow you to upload your Word document and add digital signatures to it. Just upload your document, insert your signature where desired, and then save or download the digitally signed document.
If you are using Microsoft Word, there are a few tips to ensure that your digital signing process is correct. First, make sure you have an electronic certificate set up within Word. This certificate will hold your digital signature and verify its authenticity. You can try it out by creating a new document, going to the “Insert” tab, and clicking on the “Signature Line” button again.
When signing a document, you may need to change your signature or initials. To do this, click on the signature line within your document and then click on the “Change” button. From there, you can edit your signature or initials as needed.
Remember that digitally signing your Word document is more than just typing your name at the end. It is a legally binding process, so make sure you take it seriously. Whether you use Microsoft Word, PandaDoc, or DocuSign, follow the correct procedures to digitally sign your documents.
Now that you know how to sign a Word document without printing it, you can try it out and see how easy and convenient it is to sign documents electronically. Instead of wasting time and paper, you can make your business processes more efficient with digital signatures.
| Word | Microsoft Word |
| PandaDoc | PandaDoc |
| DocuSign | DocuSign |
| certificate | certificate |
| electronically | electronically |
| signatures | signatures |
| upload | upload |
| digital | digital |
| create | create |
| signing | signing |
| documents | documents |
| change | change |
| signature | signature |
| even | even |
| button | button |
| tips | tips |
| digitally | digitally |
| more | more |
| electronic | electronic |
| ensure | ensure |
| correct | correct |
| need | need |
| make | make |
| try | try |
| just | just |
| from | from |
| hold | hold |
| for | for |
| within | within |
| then | then |
| initials | initials |
| eSignature | eSignature |


