

If you’re looking for a quick and simple way to build and deploy your own website, GitHub Pages is the perfect solution. It only takes a few steps to create your very own webpage using this powerful tool.
First, you’ll need a GitHub account. If you don’t have one already, head over to the GitHub website and sign up for a new account. Once you’ve created your account, make sure to clone the repository to your computer.
Now it’s time to make some changes. Open up your favorite text editor and navigate to the local copy of your repository. Inside this folder, you can start editing the files to build your website. For example, you can create a new markdown file and give it a title, add content, and even include images.
Once you’re done making changes, it’s time to deploy your website. To do this, you’ll need to commit your changes and push them to GitHub. Simply run a few command-line instructions, submit your changes, and wait a few minutes for GitHub to build and deploy your site. It’s that easy!
Now that your website is up and running on GitHub Pages, you can customize it further by adding themes. GitHub offers a variety of pre-made themes that you can use to give your site a unique look and feel. Just choose a theme, make the necessary changes, and your website will be ready to go.
With GitHub Pages, you don’t need to be an expert in web development to create a professional-looking website. It’s a user-friendly tool that allows you to create and deploy your site with ease. So get started today and see what GitHub Pages can do for you!
GitHub Pages
GitHub Pages is a simple way to create a webpage using GitHub. It takes just a few minutes to get started and it’s a great way to test and deploy changes to your websites.
With GitHub Pages, you can create a new repository on GitHub and simply push your markdown files to it. Each markdown file will be converted into a webpage with a title and a heading.
To create a GitHub Pages site, you first need to have a repository on GitHub. If you don’t have one, you can just click the “New” button on GitHub’s website and follow the steps to create a new repository.
Next, you’ll need to clone your repository locally on your computer. You can do this by clicking the “Clone” button on your repository’s page and copying the HTTPS URL. Then, open your terminal or command prompt and run the command:
git clone [HTTPS URL]
This will create a local copy of your repository on your computer. You can then make changes to your markdown files using your favorite text editor.
Once you’ve made your changes, you can commit and upload them to your GitHub repository by running the following commands in your terminal or command prompt:
git add .
git commit -m “Add changes”
git push origin master
After you’ve pushed your changes, you’ll need to wait a few minutes for GitHub to build and deploy your website. Once it’s done, you’ll be able to see your website by visiting https://[your-username].github.io/[repository-name] in your web browser.
GitHub Pages also provides a number of pre-made themes that you can use to customize the look and feel of your website. You can choose a theme by adding a `_config.yml` file to your repository and specifying the theme in the file.
That’s it! Now you have your own simple website up and running using GitHub Pages. You can continue to make changes to your repository locally and simply push them to GitHub to update your website.
Simple Website
Creating a simple website using GitHub Pages is just a few steps away. It’s a quick and easy way to showcase your webpage to the world. In this guide, we will take you through the process in just 10 minutes.
| Step 1: | Create a GitHub repository for your website |
| Step 2: | Clone the repository to your local computer using Git |
| Step 3: | Create a new file named index.html, and copy your webpage’s code inside |
| Step 4: | Commit and push your changes to GitHub repository |
| Step 5: | Wait for a few minutes, and your website will be live at https://[yourgithubusername].github.io/[repositoryname] |
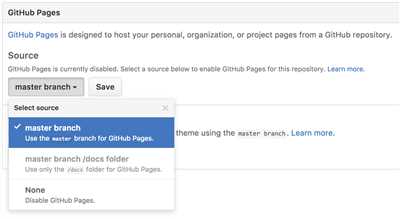
That’s it! Now you have a simple website up and running using GitHub Pages. You can also customize your website by using pre-made themes provided by GitHub. Just click on the Settings tab of your repository and scroll down to the GitHub Pages section to choose a theme for your site.
If you want to test changes locally before deploying them to GitHub Pages, you can use Jekyll. Jekyll is a static site generator that converts Markdown and other pre-processable files into HTML. It takes only a few minutes to set up Jekyll on your computer.
By following this guide, you can easily create a simple website using GitHub Pages and showcase your work to the world.
Step 8 Commit your changes
Now that you have made your changes locally, it’s time to upload them to GitHub. This step is pretty simple and just takes a few minutes.
First, go back to the GitHub repository that you cloned earlier. On the repository page, you should see a button that says “Upload files” or “Create new file”. Click on that button to get started.
You will be taken to a page where you can upload your changes. To do this, click on the “Choose your files” button and select the files that you want to upload. You can upload multiple files at once by holding down the Shift key on your computer while selecting the files.
Once you have selected the files that you want to upload, you can add a title and description for the commit. This is optional, but it can be helpful to provide some context for the changes that you are making. You can also choose to create a new branch for your changes if you want to keep them separate from the main branch.
When you are ready to commit your changes, click on the “Commit changes” button. This will upload the files to your GitHub repository and create a new commit.
After you have committed your changes, you may need to wait a few seconds or minutes for the changes to be deployed to your GitHub Pages site. Once the changes have been deployed, you can visit your site by navigating to https://githubs_username.github.io/repository_name, where “githubs_username” is your GitHub username and “repository_name” is the name of your repository.
That’s it! You have now successfully uploaded your changes to GitHub and your website should reflect the updates that you made. You can continue to make changes to your site by following the same process outlined in this guide. Happy coding!
Step 9 Wait for your site to build
Once you have committed and pushed your changes to your GitHub repository, it’s time to wait for your GitHub Pages site to build. This process may take a few minutes, and you can monitor its progress by scrolling down inside your repository.
While waiting, you can make sure that your local changes are running correctly by testing your webpage locally. You can do this by simply running the Markdown files using a pre-made Jekyll environment on your computer. Remember that you need to have Jekyll installed locally for this step.
If you want to give your site a new look, you can also browse and select from a variety of pre-made themes that GitHub Pages provides. To do this, go to the Settings tab inside your repository, scroll down to the GitHub Pages section, and click on the Choose a theme button. From there, you can select a theme and customize it to your liking.
Once your site has finished building, you can check it out by clicking on the link provided by GitHub. It should be in the format of https://your-username.github.io/your-repository-name/. This is the URL where your site will be live on the web.
Now that your site is live, you can continue to make changes to your files locally by committing and pushing them to your repository. GitHub Pages will automatically deploy the changes, and you just have to wait a few minutes for them to be built and updated on your site.
Remember to always test your changes locally before uploading them to GitHub. This way, you can ensure that everything looks and works as expected.
Step 10 Upload new background image
Now that you have your GitHub Pages site up and running, it’s time to customize it to make it truly yours. One way to do that is by changing the background image of your website. In this step, we will guide you on how to upload a new background image to your GitHub Pages site.
Before we get started, make sure you have a background image that you want to use. It could be a pre-made image that you found online or a picture that you have created yourself. Save this image locally on your computer.
- First, go to your GitHub repository that you have been using to build your GitHub Pages website.
- Click on the “Upload files” button.
- A new page will open where you can drag and drop files or choose files from your computer. Locate the background image that you want to upload and select it.
- Wait for the upload to finish.
Once the upload is complete, you will see the uploaded file listed in the repository. Now, we need to make some changes to our Markdown file to use this background image on our GitHub Pages site.
- Inside your repository, locate the Markdown file (usually named index.md, readme.md, or similar) that serves as the main content for your GitHub Pages website.
- Click on the file to view its contents.
- On the top-right of the file, click on the pencil icon to enter the editing mode.
- Within the Markdown document, locate the section where you want to add the background image. This could be at the top of the file or inside a specific section.
- Using the Markdown syntax, add the following line of code to insert the background image:

Replace image-url with the URL of your uploaded background image. You can obtain this URL by clicking on the uploaded image in your repository and then clicking on the “Copy path” button. Make sure to include the image file extension (.jpg, .png, etc.) in the URL.
- Once you have added the background image line to your Markdown file, scroll down to the bottom of the editing page.
- Provide a brief description of your changes in the “Commit changes” section.
- Click on the “Commit changes” button to save your changes.
Wait a few minutes for the changes to be deployed to your GitHub Pages website. After that, you can visit your website using the URL provided in your GitHub repository. You should now see your new background image applied to your webpages.
Congratulations! You have successfully uploaded a new background image to your GitHub Pages site. Don’t forget to make any necessary adjustments to the image size or positioning using CSS if needed.
Clone your repository to make a local copy

Step 9: Locally deploying your webpage
Now that you have your GitHub Pages site all set up, it’s time to make a local copy of your repository. This way, you can make changes and test them out before you commit and deploy your site to the web.
- Inside your repository on GitHub, click the “Code” button.
- Click on the “Open with GitHub Desktop” option.
- Wait a few moments for the GitHub Desktop application to launch.
- On the GitHub Desktop application, click the “Clone” button.
- Choose a location on your computer where you want to save your local copy of the repository.
- Click the “Clone” button to start the cloning process.
- Wait for a few minutes while GitHub Desktop clones the repository.
Once the cloning process is complete, you will have a local copy of your GitHub repository on your computer. This allows you to make changes to your website and test them out before uploading them to your GitHub Pages site.
What you do next with your locally cloned repository is up to you. You can use it for testing, making changes, or even creating a new branch to work on different features.
By cloning your GitHub repository locally, you can have the flexibility to work on your website with ease and have a backup of your code on your computer.
Now that you have your repository cloned, you can proceed to the next step to build and deploy your GitHub Pages site.
Running and Testing Locally
To get started with creating your GitHub Pages, you need to first clone your repository to your computer. You can do this by clicking on the “Clone or download” button on your GitHub repository page and copying the HTTPS link.
Once you have cloned the repository to your computer, you can make any changes to your pages using your favorite text editor. You can create new pages or modify existing ones using simple HTML or Markdown syntax. GitHub Pages also supports pre-made themes, which you can apply to your site by modifying the `_config.yml` file.
To see your changes reflected on your GitHub Pages site, you need to run a local server. There are many options available for running a local server, but one simple step is to use the `http-server` package. You can install this package by running the command `npm install http-server -g`. Once installed, you can navigate to the root directory of your repository using the command prompt or terminal and run the command `http-server`. This will start a local server on your computer, and you can view your site by navigating to `http://localhost:8080` in your web browser.
While running the local server, you can continue to make changes to your pages and see the updates in real-time. Once you are satisfied with your changes, you can commit them to your repository using Git and push them to GitHub. This will trigger a build process on GitHub’s servers, and in a few minutes, your changes will be deployed to your GitHub Pages site.
Now you can test and run your GitHub Pages site locally, without waiting for the changes to be deployed. This is useful for checking how your site looks and functions before making it public. You can also use this to troubleshoot any issues that may arise during the development process.
Sources
Here are some helpful sources to get you started on creating a GitHub Page:
1. GitHub Pages: This is the official website for GitHub Pages, where you can find detailed information and a step-by-step guide on how to create your own webpage.
2. GitHub Pages Guide: This guide provides a background on what GitHub Pages is and how to use it to build your website.
3. Markdown Tutorial: Markdown is a simple way to format text that can be used for creating webpages. This tutorial will teach you the basics of Markdown.
4. Google Fonts: If you want to add some style to your webpage, you can browse a wide variety of fonts on Google Fonts and easily embed them into your GitHub Page.
5. Jekyll: Jekyll is a popular static site generator that GitHub Pages uses under the hood. If you want to further customize your website, you can learn how to use Jekyll to create your own themes.
6. GitHub Repository: This is the official GitHub website where you can create and manage your repositories. You will need to have a repository to host your GitHub Page.
7. W3Schools: W3Schools is a great resource for learning HTML, CSS, and JavaScript. If you want to add more advanced features or interactivity to your webpage, this site has many tutorials and examples.
8. Stack Overflow: If you run into any issues or have questions while creating your GitHub Page, Stack Overflow is a community of developers where you can ask for help and find solutions to common problems.
9. YouTube: YouTube has many video tutorials on creating GitHub Pages. If you prefer visual learning, you can search for specific videos that walk you through the process.
10. MDN Web Docs: MDN Web Docs is a comprehensive resource for learning about web development. If you want to dive deep into specific topics or concepts, this site has detailed explanations and examples.


