

Hosting your own domain can be a key step in establishing your presence on the internet. Whether you’re a business owner looking to create a professional website or an individual wanting to showcase your work, having your own domain can help you stand out from the rest. In this guide, we’ll walk you through the process of hosting your own domain from start to finish.
Step 1: Choose the right domain name
The first step in hosting your own domain is purchasing a domain name. This is the unique address that users will type into their web browser to access your website. When choosing a domain name, it’s important to find a name that reflects your brand or website’s purpose. Make sure it’s easy to remember and isn’t too similar to others in your industry. For example, if your website is about 12 step test, consider a domain name like www.yourdomain.com
Step 2: Find a domain registrar
Once you’ve chosen a domain name, you’ll need to find a domain registrar to purchase and manage your domain. A domain registrar is a company that acts as the middleman between you and the organization that controls domain names. There are many domain registrars available, so make sure to do some research before making a decision. Some popular domain registrars include GoDaddy, Namecheap, and Google Domains.
Step 3: Setup your domain
After purchasing your domain, you’ll need to set it up to work with your website. This involves configuring the domain’s DNS settings to point to the correct server. DNS stands for Domain Name System and is responsible for translating domain names into IP addresses. Your domain registrar will provide you with the necessary DNS information, which you can then enter into the DNS settings of your website host. This process may vary depending on your website host, so be sure to follow their instructions or seek help if needed.
Step 4: Redirect your domain
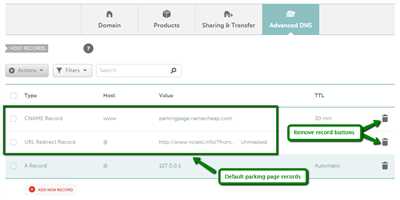
Once your domain is setup, you may want to redirect it to a specific page of your website. This is useful if you have multiple domains pointing to the same website, or if you want users to land on a specific page when they type in your domain. Most website hosts provide tools for easily setting up redirects, so you can choose where your domain name goes and ensure a seamless user experience.
Step 5: Cache and test
After making any changes to your domain’s settings or website setup, it’s important to clear your cache and test that everything is working correctly. Your cache is a temporary storage location on your computer or browser that saves website data to load the site faster. Clearing your cache ensures that you are viewing the most recent version of your website. Additionally, testing your domain by typing it into your web browser will help you identify any issues or errors that need to be resolved.
By following these simple steps, you’ll be able to host your own domain and have complete control over your website. Whether you’re a beginner or have some experience with website hosting, hosting your own domain can be a rewarding and empowering experience.
- Domain vs Hosting Definition and Differences
- Purchasing a domain name
- How to host a domain name
- Step 1: Purchasing a domain name
- Step 2: Setting up your hosting
- Step 3: Configuring your domain name
- Step 4: Testing your setup
- Step 5: Understanding the differences between www.yourdomain.com and yourdomain.com
- Step 6: Redirecting your domain name
- Step 12: Test the website
- Sources
Domain vs Hosting Definition and Differences
In order to understand how to host your own domain, it is important to have a clear understanding of the differences between domain and hosting. Many people use these terms interchangeably, but they are actually two separate things.
A domain name is the unique address that is entered into a web browser in order to access a website. It acts as a shortcut to help others find and access your site on the internet. Domain names are purchased from domain registrars, and they typically end with extensions such as .com, .org, .net, and so on. For example, if you purchased the domain name “www.yourdomain.com”, it would act as the address for your site.
Hosting, on the other hand, refers to the process of setting up and hosting the files and data that make up your website. When you host your domain, you’re essentially renting server space for your website to be stored and accessed by others. Hosting can be done on different platforms – such as shared hosting, virtual private servers (VPS), or dedicated servers – based on your requirements and budget.
The relationship between domain and hosting can be understood by considering the following example. When you enter the domain name of a website in your browser’s address bar, your computer sends a request to the hosting server where the website is hosted. The server then retrieves the files and data of the website and sends it back to your computer, which allows you to view the website in your browser. In a way, the domain name acts as a “sign” that points to the hosting server where your website is hosted.
In summary, the key differences between domains and hosting are:
– Domains are the unique addresses used to access a website, while hosting is the process of storing and managing the files and data of a website.
– Domains are purchased from domain registrars, while hosting is typically provided by hosting providers.
– Domains act as a shortcut to help others find and access your site, while hosting allows your website to be viewed by others on the internet.
So, when you host your own domain, you’re essentially setting up the files and data of your website on a hosting server, and then associating your domain name with that server so others can access your site by entering your domain name into their browser.
Purchasing a domain name
When you want to host your own domain, the first step is to purchase a domain name. A domain name is the address that people type into their internet browser to access your website, such as “www.yourdomain.com”. It is important to choose a domain name that is memorable and relevant to your website’s content or purpose.
There are several sources where you can purchase a domain name. Domain registrars are companies that manage the reservation of domain names. They have databases that link domain names to IP addresses and cache them so that when someone enters a domain name in their browser window, it can redirect them to the correct IP address of the host server where the website is hosted.
Purchasing a domain name is a simple process. You can search for available domain names on the registrar’s website and choose one that meets your requirements. After selecting a domain name, you will need to provide your personal information and payment details to complete the purchase.
Once you have purchased a domain name, you can set up hosting for your website. Hosting is the process of storing your website’s files and making them accessible to visitors. You can choose to host your website with the same registrar where you purchased your domain name, or you can use a different hosting provider.
There are some differences between hosting your website with the same registrar and using a different hosting provider. When you host your website with the same registrar, the setup process is often easier and more streamlined. The registrar will automatically link your domain name to your hosting account, and you can start uploading your website files right away.
On the other hand, if you choose to host your website with a different provider, you will need to manually configure the DNS settings to point your domain name to the hosting server. This process may require some technical knowledge and can take up to 48 hours to complete. However, hosting with a different provider can give you more flexibility and options for your website’s setup.
After your website is hosted and set up, you can test it by typing your domain name in a browser window. If everything is configured correctly, your website should load within a few seconds.
In summary, purchasing a domain name is the first step in hosting your own website. There are several sources where you can purchase domain names, and the process is straightforward. You can choose to host your website with the same registrar or use a different hosting provider. Both options have their own requirements and differences. Once your website is hosted and set up, you can test it to ensure everything is working properly.
How to host a domain name
Hosting a domain name involves a series of steps and requirements to make your website accessible on the internet. In this guide, we will walk you through the process of hosting your own domain name.
Step 1: Purchasing a domain name
The first step to hosting your own domain name is to purchase a domain from a registrar. A domain name is a unique address that users will enter into their web browsers to access your website. Examples of domain names include example.com or yourdomain.com. There are many domain registrars available, so choose one that best fits your needs.
Step 2: Setting up your hosting
After purchasing your domain name, you will need to set up your hosting environment. This involves finding a web hosting provider and signing up for a hosting plan that fits your requirements. Hosting providers will provide you with the necessary tools and resources to host your website.
Step 3: Configuring your domain name
Next, you will need to configure your domain name to point to your hosting provider’s servers. This typically involves setting up DNS (Domain Name System) records that associate your domain name with your hosting provider’s IP address. This step allows visitors to access your website when they enter your domain name into their browsers.
Step 4: Testing your setup
Once you have configured your domain name, it’s essential to test your setup to ensure that everything is working correctly. You can do this by entering your domain name into a web browser and checking if your website loads as expected. This step also allows you to identify and fix any issues that may occur during the setup process.
Step 5: Understanding the differences between www.yourdomain.com and yourdomain.com
When setting up your domain, you may notice that there are two variations of your domain name: with or without “www.” prefix. Both versions are valid and can be used interchangeably. However, using one version consistently is crucial for search engine optimization and user experience.
Step 6: Redirecting your domain name
In some cases, you may want to redirect your domain name from one address to another. This can be useful if you have multiple domain names and want them all to point to a single website. Many hosting providers offer tools or settings to help you set up domain redirects.
Following these steps will help you successfully host your own domain name and make your website accessible to users on the internet.
Step 12: Test the website

After you have completed the setup process and have hosted your own domain, it’s important to test your website to ensure everything is functioning correctly.
To test your website, follow these steps:
- Open a new browser window and enter your domain name with the following prefixes:
- http://www.yourdomain.com
- http://yourdomain.com
- https://www.yourdomain.com
- https://yourdomain.com
- Check if your website loads properly in each of these URLs. There may be slight differences, as some websites handle the “www” part differently.
- If your website doesn’t load correctly in any of the URLs, it may be due to DNS caching. Wait for some time, clear your browser cache, and try again.
- If you have set up any redirects, make sure they are working as intended. Check if the redirect takes you to the correct page or location.
- Test the functionality of all the links on your website. Click on each link to make sure they open the intended pages.
- Make sure your website is accessible from different internet connections. Test it using a different network or ask friends and colleagues to access your website and provide feedback.
- If you have multiple domains or subdomains hosted under your main domain, repeat the testing process for each of them.
- Check if your website complies with the requirements set by your hosting provider or domain registrars.
- If you encounter any issues during testing, refer to the documentation or contact the relevant support channels for help.
By following this testing process, you can ensure that your website is hosted properly and functioning correctly for all visitors.
Sources
When it comes to hosting your own domain, there are several sources that can help you through the process. Here are some sources you can refer to:
- Domain Registrars: These are companies that sell domain names, and they often have hosting services as well. Some popular domain registrars include GoDaddy, Namecheap, and Bluehost.
- Web Hosting Providers: These companies specialize in hosting websites and offer a variety of hosting plans to meet different requirements. Some popular web hosting providers include SiteGround, HostGator, and DreamHost.
- Online Tutorials and Guides: There are many online tutorials and guides available that provide step-by-step instructions on how to set up a domain and hosting. Websites like W3Schools and HostingAdvice provide detailed guides that can be helpful for beginners.
- Forums and Communities: Online forums and communities can be a great source of information and help when it comes to hosting your own domain. Websites like Stack Overflow and Reddit have active communities where you can ask questions and get help from experienced users.
- Online Documentation: Most domain registrars and web hosting providers have online documentation that explains the process of hosting a domain. These documents often include FAQs, troubleshooting steps, and definitions of key terms.
By utilizing these sources, you can gain a better understanding of the differences between domain names and web hosting, and follow the necessary steps to set up your own domain. Remember, it is important to follow the guidelines provided by your domain registrar or web hosting provider in order to have a successful setup.


