

If you frequently work with electronic documents, it is essential to know how to electronically sign Word documents. Electronic signatures have become increasingly popular in today’s digital world, offering a secure and efficient way to sign documents without the need for printing and manual signing.
Microsoft Office provides a built-in feature called digital signatures that allows you to sign Word documents electronically. By using this feature, you can insert a signature line into your document and add your electronic signature, making it legally binding.
To sign a Word document electronically, you will need to have the necessary technical requirements. First, you need to have a sha-1 certificate installed on your computer. This certificate ensures the security and authenticity of your signature. If you don’t have a sha-1 certificate, you can consult Microsoft’s official website for information on how to obtain one.
Once you have the required certificate, open the Word document that you want to sign. In the Word document, go to the location where you want the signature line to appear. Click on the Insert tab and then select Signature Line from the dropdown menu. A signature line will be added to your document.
Next, double-click on the signature line, and a dialog box will open with the title Add Signature Services. In this dialog box, you can choose to either sign the document using a docusign signature or insert an esignature line for others to sign. Select the option that fits your needs.
If you choose to sign the document, a new window will open, allowing you to create your electronic signature. You can draw your signature using a mouse or a touchscreen, or you can type your name using one of the available fonts. Once you are done, click OK to insert your signature into the document.
If you choose to insert an esignature line, a placeholder for the signature will be added to the document. You can then send the document via email or any other medium, and the recipient can digitally sign the document by clicking on the signature line.
It is important to note that electronically signed Word documents are legally binding and provide a secure way to exchange information without the need for printing and physical mailing. By following the steps outlined above, you can sign your Word documents electronically and streamline your document signing process.
Now that you know how to electronically sign Word documents, you can save time and effort by signing your documents without the need for printing or mailing. Take advantage of Microsoft’s built-in digital signature feature and enjoy the benefits of secure and efficient document signing!
How to sign a Word document without printing it
Signing a Word document is usually done by printing it out, physically signing it, and then scanning it back into your computer. However, there is a more efficient and environmentally friendly way to sign Word documents electronically without the need for printing.
There are several digital signature solutions available today that allow you to sign Word documents electronically. One popular option is DocuSign, which is widely used for adding eSignatures to documents.
Here is a step-by-step guide on how to sign a Word document without printing it:
- Open the Word document that you want to sign.
- Consult the sources below for information on how to make your Office Word document secure and digitally signed. Microsoft’s post on signing documents with a SHA-1 of 1 explains the technical details of how this works.
- If you don’t have DocuSign installed on your computer, you will need to install it. Open your browser and go to the DocuSign website to install the software.
- Once installed, open the Word document again.
- Click on the “Insert” tab in the top navigation bar.
- Within the “Text” section, click on the “Signature Line” button. This will open a window where you can add your electronic signature.
- Enter your name in the “Suggested signer” field and any other information that you want to include, such as the date and title.
- Click on the “OK” button. Your electronic signature will now appear in the Word document.
- If you want to remove the signature, right-click on it and select “Remove Signature.”
- Save the document. You now have a digitally signed Word document without the need for printing it.
By electronically signing Word documents, you can save time and paper while still ensuring the documents are legally binding. Remember to consult any specific legal requirements or regulations regarding electronic signatures in your jurisdiction.
Electronically signing within a Word document with DocuSign eSignature
Today, electronic signatures have become an essential part of how we work, allowing us to securely sign documents without the need for printing or physical signatures. With the advancement of technology, it is now possible to electronically sign Word documents using platforms like DocuSign eSignature.
DocuSign eSignature is a trusted and widely-used digital signature solution that seamlessly integrates with Microsoft Office, including Word. Here’s how you can electronically sign a Word document using DocuSign eSignature:
- Install the DocuSign eSignature add-in for Microsoft Office. Consult the DocuSign website for detailed instructions on how to install the add-in.
- Open the Word document you want to electronically sign in Microsoft Word.
- Go to the “Insert” tab and click on “Signature Line” in the “Text” group. You will see a window pop up.
- In the window that opens, fill in the necessary information, such as the name and email address of the person signing the document.
- Click on “OK” to insert the signature line into the Word document.
- Next, go to the “Add-ins” tab and click on “DocuSign” in the “DocuSign eSignature” group. This will open the DocuSign eSignature pane on the right side of the screen.
- In the DocuSign eSignature pane, click on the “Sign” button to start the signing process.
- DocuSign eSignature will prompt you to sign in using your account credentials. If you don’t have an account, you can easily create one for free.
- Once signed in, you will be able to see a preview of your Word document. If everything looks good, click on the “Continue” button.
- In the next window, you can add any additional information or instructions for the recipient. You can also choose whether to send the document for immediate signature or at a later time. Click on “Send” when you’re ready.
- DocuSign eSignature will send an email to the recipient with a link to sign the document electronically. The recipient can sign the document using a computer or mobile device without needing to install any additional software.
- Once the document is signed, you will receive a confirmation email from DocuSign eSignature, and the signed document will appear in your DocuSign account.
By adding electronic signatures to Word documents, you can streamline your workflow, save time, and eliminate the hassle of printing, signing, and scanning documents. With DocuSign eSignature, you can enjoy the benefits of secure and legally binding electronic signatures within the familiar Microsoft Office environment.
It is important to note that DocuSign eSignature uses advanced security measures to ensure the integrity and authenticity of your electronically signed documents. It complies with industry standards and protocols, and it has transitioned away from using the less secure SHA-1 cryptographic hash function. This means that your electronic signatures are secure and meet the highest technical and legal standards.
To remove a signed document from your DocuSign account, you can simply delete it or consult the DocuSign support for further instructions.
Now that you know how to electronically sign a Word document with DocuSign eSignature, you can start using this convenient and reliable solution for all your document signing needs.
Adding a signature line to a document in Microsoft Word
Electronic signatures have become a popular way to securely sign documents without the need for printing and physical signing. If you want to add an electronic signature line to a document in Microsoft Word, it can be done easily using the software’s built-in features.
To add a signature line to a Word document, first, open the document in Microsoft Word. Then, go to the location where you want to insert the signature line within the document.
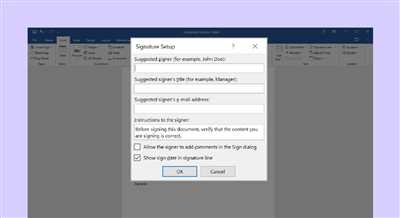
Next, click on the “Insert” tab at the top of the Word window. In the “Text” section of the ribbon, you’ll find an option labeled “Signature Line.” Clicking on this option will open a window where you can enter information about the signature line, such as the signer’s name, title, and email.
Within this window, you also have the option to check a box that will allow the signer to add comments if needed. Additionally, you can choose to show the signer’s instructions, which can provide further guidance on the signing process.
Once you have entered the necessary information and made any desired settings, click “OK” to insert the signature line into the document. The signature line will appear as a horizontal line with a placeholder for the signature.
When someone opens the document, they will be able to click on the signature line, which will open a dialog box for signing. The signer can either sign the document using a digital signature or type their name and select from a pre-defined set of signature styles.
It is important to note that while adding a signature line to a Word document provides a convenient way to gather electronic signatures, it does not provide the security and verification features offered by specialized eSignature solutions like DocuSign or Adobe Sign. For more secure and legally binding electronic signatures, it may be advisable to consult the usage of these services.
In conclusion, adding a signature line to a document in Microsoft Word can be done quickly and easily. It provides a simple way to gather electronic signatures without the need for printing and physical signing. However, for more secure and legally binding electronic signatures, considering specialized eSignature solutions may be necessary.
The Usage of Electronic Signature in Word
Today, the usage of electronic signatures in Word has become increasingly popular. With the need to securely sign documents, many individuals and businesses have turned to electronic signatures as a convenient and efficient way to streamline their workflow.
There are several sources for electronic signatures, with one of the most widely used being DocuSign. By adding a digital signature line to a Word document, you can easily sign and send it via email without the need for printing and scanning.
To add an electronic signature line in Word, you can follow these steps:
- Open the document you want to sign in Microsoft Word.
- Go to the location within the document where you want the signature line to appear.
- Click on the “Insert” tab in the Word ribbon menu.
- In the “Text” group, click on the “Signature Line” button.
- A signature setup window will open, where you can consult with your technical support or IT department for further instructions on how to install and configure the signature settings.
- Once the settings are properly configured, a signature line will appear in the document. You can remove or modify the line by right-clicking on it and selecting the appropriate options.
- To sign the document, either consult with your IT department for guidance on using a secure eSignature service or manually insert your signature using a digital pen or stylus.
- Once the document is signed, save it in a secure format, such as PDF, to prevent tampering with the signature.
By using electronic signatures in Word, you can make the signing process faster and more secure. It eliminates the need for printing, signing, and scanning physical documents, saving both time and resources.
It’s important to note that electronic signatures are legally binding in many countries, including the United States and the European Union. However, it’s always recommended to consult with legal professionals to ensure compliance with local regulations and laws.
In conclusion, the usage of electronic signatures in Word is a convenient and efficient way to sign documents without the need for printing and paper. By following the steps outlined above, you can easily add, sign, and secure your documents using electronic signatures.
Remove a Digital Signature

If you have a digitally signed Microsoft Word document that you want to remove the digital signature from, there are a few steps you need to follow. Removing a digital signature is a technical process that requires careful attention to detail, so make sure you consult the usage guidelines provided by Microsofts Office for instructions specific to your version of Word.
To remove a digital signature from a Word document, follow these steps:
| Step 1: | Open the signed Word document with Microsoft Word on your computer. |
| Step 2: | Click on the “File” tab in the top left corner of the Word window, and then click on “Info” in the left-hand menu. |
| Step 3: | In the “Info” window, you will see a section called “Signatures” which displays information about the digital signatures present in the document. |
| Step 4: | Click on the “Signatures” button below the information section. A new window will appear showing the details of the signatures. |
| Step 5: | Within the signatures window, select the signature you want to remove and click on the “Remove” button. |
| Step 6: | Confirm that you want to remove the signature by clicking “Yes” in the pop-up window. |
| Step 7: | Once the signature is removed, save the document by clicking “File” and then “Save” or by using the Ctrl + S keyboard shortcut. |
By following these steps, you will be able to remove a digital signature from a Word document. It is important to note that removing a digital signature does not affect the content or formatting of the document itself, it simply removes the electronic signature that was added to it.
Remember, the usage of electronic signatures, such as those done with DocuSign, is becoming more and more common today for secure and efficient document signing. If you want to securely sign your Word documents without the need to print, sign, and post them, you may consider installing a trusted eSignature solution like DocuSign.
Sources
-
Consult the official Microsoft documentation on how to sign a Word document electronically. This resource provides step-by-step instructions on how to add a digital signature to your Word documents.
-
Docusign is a popular electronic signature service that can be used to securely sign Word documents. You can sign documents within the Docusign interface and then insert the signed document into Word.
-
If you are using Microsoft Word, you can sign documents directly within the application. To do this, go to the “Insert” tab and click on “Signature Line” in the “Text” group. Follow the prompts to insert a signature line into your document and then sign it.
-
For more advanced settings and options, you may need to consult the documentation for your specific version of Word. Microsoft’s website has a wealth of technical information on how to sign Word documents electronically.
-
To remove an electronic signature from a Word document, open the document and go to the “File” tab. Click on “Protect Document” and then select “Remove Personal Information”. Follow the prompts to remove the signature from the document.
-
If you want to sign a Word document without printing it, you can use the “Sign” feature in Microsoft Word. This feature allows you to sign the document using your digital signature, without the need for printing or scanning.
-
There are also third-party software applications available that specialize in electronic signatures. These applications often provide additional features and functionality beyond what is available in Microsoft Word.
-
If you frequently need to sign documents electronically, you may want to consider installing a digital signature certificate on your computer. This will allow you to quickly and securely sign Word documents, without the need for additional software.
-
To make sure your electronic signatures are secure, it is important to use a certificate that is based on the SHA-1 cryptographic hash function. This will ensure that your signatures are resistant to forgery and tampering.
-
If you receive a Word document with electronic signatures, you can open and view the signatures by going to the “Review” tab and clicking on “Signatures” in the “Tracking” group. This will open a window that displays all the signatures in the document.


