Are you looking to add a touch of professionalism to your designs? Do you want to know how to create transparency in your artwork? Look no further! In this article, we will show you a simple and effective method to create transparent PNGs using a popular online image editor – Fotor’s transparent PNG maker.
Transparency is quite common in designs nowadays. It allows you to have more creative freedom, as you can fully or partially remove the background of an image. This method is particularly useful when you want to transfer your designs onto different backgrounds or fill them with customized colors.
So, how does Fotor’s transparent PNG maker work? It’s super simple! Start by opening the Fotor mobile or desktop app, or use the online editor on their website. Then, duplicate the image you want to make transparent, and open it in the editor. Click on the “Edit” tab and select the “Basic” option. There, you will find the “Fill” and “Auto” options, which will help you to speed up the process of creating transparent PNGs.
Now, let’s dive into the step-by-step process. First, open the image you want to make transparent in Fotor. If you are using the mobile or online version, make sure to create an account to save your progress. Then, duplicate the image, as this will serve as your reference image to compare the changes with. Next, click on the “Edit” tab and select the “Basic” option. Here, you will find the “Fill” and “Auto” options.
In order to create a transparent PNG, you should start by adjusting the underbase. This option will help you to remove any easy-to-use pixels that have the same or similar color as the background. By saturating the underbase, the more colored areas of your design will appear on the transparent background. However, you should be careful not to oversaturate, as this might also affect the color balance of your design. It’s always a good idea to check the changes in real-time and make any necessary adjustments to achieve the desired result.
When using Fotor’s transparent PNG maker, you have the freedom to choose between different formats and options. You can save your file as a PNG or as a base64 encoded PNG. The latter option is particularly useful when you need to embed the image directly into HTML or CSS code. Both options support transparency, so you can pick the one that best suits your needs.
There you have it – a step-by-step guide on how to create transparent PNGs using Fotor’s transparent PNG maker. Now you can easily remove backgrounds, adjust the levels of transparency, and create stunning designs with ease. So why wait? Start experimenting with transparency today and take your artwork to the next level!
How to Convert PDF to Transparent PNG on Windows Mac and Mobile
Converting a PDF file to a transparent PNG image can be useful in various scenarios, such as when you want to use the image with other designs, or when you want to remove the white background and make it appear translucent. In this article, we will show you how to convert a PDF file to a transparent PNG using different methods on Windows, Mac, and mobile devices.
| Method | Description |
|---|---|
| Using Adobe Photoshop | 1. Open the PDF file in Adobe Photoshop. |
| Using Adobe Illustrator | 1. Open the PDF file in Adobe Illustrator. |
| Using Online Tools | 1. Go to a reliable online tool such as Fotor’s PDF to PNG converter. |
| Using Third-Party Software | 1. Download and install a third-party software like Fotor’s PNG Maker. |
Note: The methods mentioned above may have slight variations based on the software or online tool you are using. Please read the documentation or follow the provided instructions for complete guidance.
Method 1: Using Adobe Photoshop
1. Open the PDF file in Adobe Photoshop.
2. In Photoshop, go to “File” > “Save As” and choose the PNG format.
3. In the dialog box that opens, make sure the “Transparency” option is checked.
4. Click “Save” to convert the PDF file to a transparent PNG.
Method 2: Using Adobe Illustrator
1. Open the PDF file in Adobe Illustrator.
2. Select the artwork or the specific areas you want to convert to PNG.
3. Go to “File” > “Export” > “Export As” and choose PNG as the format.
4. In the options that appear, make sure the “Transparency” checkbox is selected.
5. Click “Export” to save the selected artwork as a transparent PNG file.
Method 3: Using Online Tools
1. Go to a reliable online tool such as Fotor’s PDF to PNG converter.
2. Upload the PDF file you want to convert.
3. Choose the PNG format and select the desired options such as color saturation.
4. Click “Convert” and then “Download” to save the transparent PNG file to your device.
Method 4: Using Third-Party Software
1. Download and install a third-party software like Fotor’s PNG Maker.
2. Open the software and select the PDF file you want to convert.
3. Set the output format as PNG and choose the transparency options.
4. Click “Convert” or a similar button to convert the PDF to a transparent PNG.
By using these methods, you can easily convert a PDF file to a transparent PNG on Windows, Mac, and even on mobile devices. These methods provide flexibility and give you the ability to customize the transparency levels, color saturation, and other options to meet your design needs. So next time you need to convert a PDF, consider using one of these methods for transparent PNGs.
Easy-to-use Online Transparent PNG Maker
If you’re looking to create transparent PNGs for your designs, whether they’re for mobile or desktop use, an easy-to-use online transparent PNG maker is a great option. Instead of having to use complex software or check multiple options, these online tools make the process simple and efficient.
One such tool is Fotor’s transparent PNG maker. With Fotor, you can easily convert your images to fully transparent PNGs. All you have to do is open your picture in Fotor’s online editor, and then duplicate it on a new layer. From there, you can fill in the areas you want to keep transparent with the “white” color. The underbase layer should then appear on the right side of your artwork. Once you have completed these steps, you can save your image as a PNG file with full transparency.
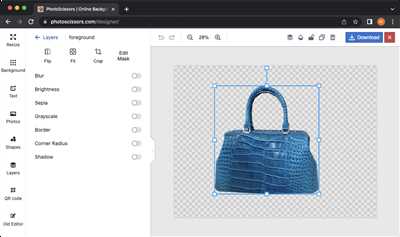
Another easy-to-use option is using a website that allows you to make transparent PNGs, like the one offered by Photopea. This online tool works similarly to Fotor, allowing you to open your image and convert it to a transparent PNG. However, Photopea also gives you the option to invert the colors, saturate them, or change them in other ways.
When creating transparent PNGs, there are a few considerations to keep in mind. First, transparent PNGs can have multiple layers, so be sure to check that your design doesn’t have any extra layers before saving. Also, note that transparent PNGs can be larger in file size than other formats, like JPEGs, so it’s important to consider the speed at which your website or app will load these images. If your transparent PNGs are too large, you can try different optimization methods to reduce their size without sacrificing quality.
Overall, an easy-to-use online transparent PNG maker can save you time and effort when working with transparent images. Whether you’re designing for mobile or desktop, these tools offer a simple and efficient way to convert your designs into transparent PNGs. With just a few clicks, you can create high-quality, fully transparent PNGs that will enhance your artwork and make your designs stand out. So, if you’re in need of transparent PNGs, give one of these online tools a try and see the difference they can make!
Transfer speed considerations
When it comes to creating transparent PNG images, there are a few key considerations to keep in mind. One important consideration is the transfer speed, which can affect how quickly your images load on a website or digital platform.
If you’re designing artwork or illustrations with transparency, you may find yourself working with large files. High-quality images with many layers or a high color depth can result in larger file sizes, which may take longer to transfer over the internet or open on a computer.
One way to optimize transfer speed is to reduce the file size of your PNGs. This can be done by adjusting compression options when saving your file. In some cases, you may also want to consider converting your PNGs to a different file format, such as JPEG, which typically has smaller file sizes than PNG.
Another consideration is the number of colors and levels of transparency in your image. PNGs support up to 24-bit color depth and offer true transparency, which means you can have smooth transitions between semi-transparent areas. However, note that this can result in larger file sizes.
If you only need transparent or semi-transparent areas in your image, you could consider using the indexed color mode instead. This reduces the number of colors in your image and can result in smaller file sizes. Keep in mind, though, that transparent areas will be limited to a single color.
It’s also worth mentioning that some online platforms or applications may have limitations on the maximum file size or file format they support. This is especially true for mobile devices or platforms with limited processing power. So, if you’re targeting a specific platform, be sure to check its requirements and guidelines.
In some cases, you may need to convert your PNGs to a different format for compatibility purposes. For example, if you’re working on a Mac, you may need to convert PNGs to JPEGs or other formats for certain software applications or devices. Conversely, if you’re using Windows, you may encounter situations where PNGs are the preferred format.
When it comes to transparency in PNGs, it’s important to remember that not all software or applications support this feature. If transparency is a critical aspect of your design, make sure to test your files in different programs and platforms to ensure they display correctly.
Finally, if you’re sharing your PNGs online, consider using a cloud storage or file-sharing service to transfer your files. This can help speed up the transfer process and ensure that your images reach the intended recipients in a timely manner.
In summary, when creating transparent PNG images, consider the transfer speed and file size. Optimize your images by adjusting compression options or converting to a different format if necessary. Be mindful of the number of colors and levels of transparency in your image. Check compatibility requirements for specific platforms or applications. Test your files in different programs and platforms to ensure transparency is supported. Use cloud storage or file-sharing services for efficient transfer.
Change the transparency of a picture or fill color
When working with graphic design, it’s important to know how to adjust the transparency of certain areas or colors in your artwork. Whether you’re designing a logo, creating illustrations, or editing photos, being able to change the transparency can greatly enhance your overall design.
One method to change transparency is to copy the layer or area that you want to adjust. This is because making changes directly to the original layer will permanently alter the colors and saturation levels. By duplicating the layer or area, you can experiment with different transparency options without affecting the original design.
There are several tools and software available that can help you change the transparency of your pictures or fill colors. One popular online tool is Fotor, which is known for its easy-to-use interface and powerful editing capabilities. It supports various file formats, including PNG, which is ideal for transparent images. Another option is using image editing software like Adobe Photoshop or GIMP, which provide more advanced editing features.
To change the transparency of a picture or fill color, you can convert it to a transparent PNG. This format supports transparency by using an additional channel called the alpha channel. By adjusting the levels of this channel, you can control the transparency of each pixel in your image. However, it’s important to note that not all image formats support transparency. PNG is the most widely used format for transparent images, but you can also consider using GIF or SVG formats for certain designs.
If you’re using Windows, you can change the transparency of pictures or fill colors by using the built-in Paint program. Simply open the image you want to edit, select the area you want to adjust, and choose the “Transparent selection” option under the “Select” menu. On Mac, you can use the Preview app to adjust the transparency of images. Open the image, click on the “Markup” button, and select the “Adjust Color” tab. From there, you can use the sliders to adjust the transparency.
It’s worth noting that when you change the transparency of an image, there are a few considerations to keep in mind. Firstly, files with transparency are often larger in size than their non-transparent counterparts. This is because the alpha channel information adds more bytes to the file. If you’re working with large images or need to optimize the file size, you should consider compressing or converting the image to a different format.
Another consideration is the base color of your image. Transparent images work best on a white or light-colored background. If you plan on using the image on a dark background, you may need to add an underbase color to ensure the transparency appears as intended. This involves adding a filled layer behind your transparent image, using a color that matches your intended background.
In conclusion, changing the transparency of a picture or fill color can greatly enhance your designs. Whether you’re creating professional artwork or simply adjusting the opacity of a photo for a social media post, knowing how to adjust transparency levels can give your designs a more polished and professional look.