

If you’re an Outlook or Office user, you might have experienced the frustration of having important emails end up in your spam folder. This means you’ll have to constantly check your spam folder to make sure you don’t miss any important messages. However, there’s a way to avoid this hassle – whitelisting.
Whitelisting is a means of allowing emails from specified sources to bypass your email filter and go straight to your inbox. By whitelisting certain email addresses or domains, you can ensure that important emails, like marketing campaigns or time-sensitive information, never get marked as spam.
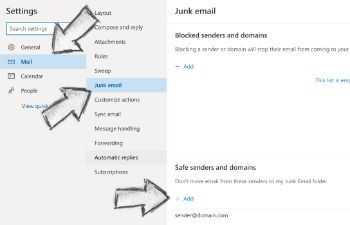
Adding emails or domains to your whitelist is relatively easy and can be done in a few simple steps. For Outlook users, begin by clicking on the gear icon in the top-right corner of your inbox page. From there, select “Options” and then “Mail” from the left-hand menu. Under the “Junk Email” section, you’ll find the “Safe Senders and Domains” option. Clicking on this will open a page where you can add the whitelisted email addresses or domains.
If you’re an Office user, the process is quite similar. Open your Outlook application and click on the “File” tab at the top left. From there, select “Options” and then “Mail” from the left-hand menu. Under the “Junk Email” section, you’ll find the “Safe Senders and Recipients” option. Here, you can add the email addresses or domains you wish to whitelist.
For Gmail users, the process is even simpler. Open your Gmail and click on the gear icon in the top-right corner. Select “Settings” from the dropdown menu and click on the “Filters and Blocked Addresses” tab. From there, click on “Create a new filter” and you’ll be able to set up whitelisting by clicking on the “Never send it to Spam” checkbox.
It’s important to understand that whitelisting emails or domains does come with certain risks. By allowing emails from these sources through, you run the risk of potentially receiving spam or phishing emails. It’s crucial to verify that the sources you’re whitelisting are trustworthy and legitimate.
By following these simple steps, you’ll be able to add important email addresses or domains to your whitelist and ensure that you never miss any critical messages. So, next time you’re struggling to find an email in your inbox, remember the power of whitelisting!
How to Whitelist an Email in Gmail, Outlook, Yahoo, and More
When it comes to managing your email, it’s important to have a good system in place for sorting and prioritizing your messages. One way to ensure that you never miss an important email is to whitelist certain senders, which will allow their messages to bypass your spam filter and go straight to your inbox.
In this guide, we’ll show you how to whitelist an email in Gmail, Outlook, Yahoo, and other popular email clients. Follow the steps below to get started:
- Gmail
- Log in to your Gmail account.
- Click on the gear icon in the top right corner and select “Settings” from the dropdown menu.
- Click on the “Filters and Blocked Addresses” tab.
- Scroll down and click on “Create a new filter”.
- In the “From” field, enter the email address or domain you want to whitelist.
- Click on the “Create filter” button.
- Check the box next to “Never send it to Spam”.
- Click on the “Create filter” button to save your changes.
- Outlook
- Open Outlook and go to your inbox.
- Right-click on the email from the sender you want to whitelist.
- Hover over “Junk” and select “Never Block Sender” from the dropdown menu.
- Yahoo
- Log in to your Yahoo Mail account.
- Click on the gear icon in the top right corner and select “More Settings” from the dropdown menu.
- Click on “Filters” in the left sidebar.
- Click on “Add new filters”.
- Enter a name for the filter.
- In the “From” field, enter the email address or domain you want to whitelist.
- Under “Perform the following actions:”, select “Inbox” from the dropdown menu.
- Click on the “Save” button.
By following the steps outlined above, you’ll be whitelisting the specified email addresses or domains, ensuring that their messages bypass the spam filter and land safely in your inbox. Remember that whitelisting means you’re explicitly allowing these senders to reach you, so be sure to only whitelist sources you trust.
It’s important to understand that whitelisting emails comes with its own set of risks. While it may be convenient for receiving important emails, you might also be exposed to potential spam or phishing attempts. Always exercise caution when clicking on links or downloading attachments from whitelisted senders.
Additionally, keep in mind that some email clients may have limitations on whitelisting. For example, in Office 365, you can only whitelist a maximum of 250 email addresses or domains. Make sure to check the limitations of your specific email client.
Whitelisting can be a useful tool for managing your email, especially if you’re dealing with a high volume of marketing emails or if you’re a beginner’s user. It allows you to take control over which emails you receive and ensures that important messages don’t get lost in the shuffle. So, take some time to set up your whitelist and enjoy a more organized inbox!
A Beginner’s Guide to Email Marketing
Email marketing is one of the most effective means of reaching your target audience and promoting your products and services. However, with all the risks and limitations that come with it, it’s important to understand how to ensure your emails end up in the recipient’s inbox and not in their spam folder.
One way to improve the deliverability of your emails is by whitelisting. Whitelisting is the process of adding certain email addresses or domains to a list of “safe” senders. This tells email clients like Gmail, Yahoo, and Outlook that you trust these senders and want to receive their emails.
To whitelist an email address in Gmail, follow these steps:
1. Click on the gear icon in the top right corner of your Gmail page.
2. Select “Settings” from the dropdown menu.
3. Go to the “Filters and Blocked Addresses” tab.
4. Click on “Create a new filter”.
5. In the “From” field, enter the email address you want to whitelist.
6. Click on “Create filter”.
7. Check the box next to “Never send it to Spam”.
For Yahoo Mail, the process is slightly different:
1. Click on the gear icon in the top right corner of your Yahoo Mail page.
2. Select “More Settings” from the dropdown menu.
3. Go to the “Filters” tab.
4. Click on “Add new filters”.
5. Enter a name for the filter and the email address you want to whitelist.
6. Select “Inbox” as the specified folder.
7. Click on “Save”.
In Outlook, you can whitelist senders by:
1. Clicking on the settings icon located at the top right corner of the page.
2. Select “View all Outlook settings”.
3. Go to the “Mail” tab and click on “Junk email”.
4. Under the “Safe senders and domains” section, click on “Add”.
5. Enter the email address or domain you want to whitelist.
6. Click on “Add”.
By whitelisting the email addresses you trust, you’ll ensure that important emails from these senders don’t get filtered out as spam. This is especially crucial for email marketing campaigns, as you want your subscribers to receive your emails in their inbox.
Remember to regularly check your whitelist and update it as needed. And if you’re a beginner in email marketing, take the time to understand the various aspects and best practices associated with it. There are many online resources and guides available that can help you improve your email marketing strategies.
In conclusion, whitelisting is a simple but effective way to ensure that your emails reach your intended audience. By following the steps outlined above, you’ll be able to whitelist email addresses in Gmail, Yahoo, and Outlook, and increase the chances of your emails being delivered successfully.
You’re all set
By following this guide, you have successfully added the specified email addresses to your whitelist. This means that emails from these sources will no longer be filtered into your spam folder, ensuring that you receive all important communications.
It’s important to understand that whitelisting comes with some risks. While it will prevent most spam emails from being filtered, it also means that any potential threats or malicious emails might make their way into your inbox. Always check your emails and exercise caution when clicking on any links or downloading attachments.
If you’re using Gmail, click on the “Settings” gear icon at the top right of the page, then select “See all settings”. Navigate to the “Filters and Blocked Addresses” tab and create a new filter by clicking on “Create a new filter”. In the “From” field, enter the email addresses you want to whitelist, and click “Create filter”.
If you’re using Outlook, go to the “File” tab in the Office ribbon, then click on “Options”. In the “Mail” tab, select “Junk Email” and click on the “Safe Senders” tab. Click on “Add” and enter the email addresses you want to whitelist. Click “OK” to save your changes.
If you’re using Yahoo Mail, click on the “Settings” gear icon in the top right corner of the page, then select “More Settings”. In the left-hand menu, click on “Filters”. Click on “Add new filters” and give your filter a name. In the “Sender” field, enter the email addresses you want to whitelist, and click “Save”.
Remember that whitelisting is not a foolproof solution and there might still be some limitations. Emails from new or unknown sources may still be filtered or flagged as spam. Additionally, be aware that whitelisting only applies to the email address, not the URL or content of the email. If you receive emails from different addresses but they all link to the same URL, you will need to whitelist each individual email address.
By whitelisting the email addresses, you’re taking control of your inbox and ensuring that important emails are never missed. Follow this beginner’s guide to whitelist emails in Gmail, Outlook, and Yahoo, and you’ll be all set to receive all essential communications from trusted sources.
6 Check “Never send it to Spam” in the checkbox

When you add an email address to your whitelist, you’re essentially telling your email provider that you trust that sender and want their emails to always go to your inbox, rather than be filtered as spam.
If you’re using Gmail, follow these steps to add an email address to your whitelist:
- Open Gmail and go to your inbox.
- Select the email you want to whitelist.
- Click the three dots icon located in the top right corner of the email.
- In the drop-down menu, click “Filter messages like these”.
- In the “From” field, you’ll see the sender’s email address. This will be pre-populated with the sender’s email address.
- Click “Create filter”.
- Check the box next to “Never send it to Spam”.
- Click “Create filter” to save the changes.
By following these steps, you’re setting up a whitelist for that specific email address, which means all future emails from that sender will go straight to your inbox.
If you’re using Yahoo Mail, the process is similar:
- Open Yahoo Mail and go to your inbox.
- Select the email you want to whitelist.
- Click the three dots icon located in the top right corner of the email.
- In the drop-down menu, click “More”.
- Select “Filter emails like this”.
- In the “From” field, you’ll see the sender’s email address. This will be pre-populated with the sender’s email address.
- Click “Add sender to contacts”.
- Click “Save” to save the changes.
Whitelisting emails is a way to ensure that important and trusted emails make it to your inbox. It’s especially useful if you’re using email for work or have specific emails that you don’t want to miss.
Keep in mind that there are limitations to whitelisting, and it’s important to understand the risks. Whitelisting all emails means that you may also receive potentially harmful or spam emails. Be cautious when whitelisting emails and only do so for trusted senders.
Adding senders to your whitelist is a beginner’s guide to email filtering. As you become more familiar with email systems and their features, you might want to explore more advanced filtering options and tools.
By following these steps, you’re setting up a whitelist for that specific email address, which means all future emails from that sender will go straight to your inbox.
7 Click “Create filter”
After you’ve specified all of the criteria and options for your filter, it’s time to click “Create filter”. This will tell Gmail to begin filtering the incoming emails according to your whitelist settings.
By clicking “Create filter”, you’re effectively telling Gmail to whitelist the specified email addresses and/or domains. This means that any emails coming from those sources will automatically be sent to your inbox, rather than being marked as spam or filtered out.
It’s important to understand the limitations and risks of whitelisting. While it can be a helpful tool for managing your email inbox, whitelisting can also make you more susceptible to email marketing and phishing attempts. Be sure to check your spam folder regularly and exercise caution when opening emails from unfamiliar sources.
If you’re a beginner’s guide to whitelisting, it’s a good idea to review the sources you plan to whitelist before adding them to your filter. Take the time to check the email addresses and URLs to ensure they are legitimate and trustworthy.
Once you’ve double-checked everything and are ready to proceed, simply click on the “Create filter” button. Gmail will wrap up the process by exporting your filter settings and applying them to your incoming email.
Now you’re all set to receive whitelisted emails directly in your inbox, without any additional steps.
Add URLs to Whitelist
When it comes to managing your email inbox, it’s important to have control over which emails get delivered to your inbox and which ones end up in your spam folder. One way to ensure that important emails from trusted sources never get lost is by adding specific URLs to your whitelist.
To add URLs to your whitelist, you’ll need to follow these steps:
- In your email client, such as Gmail or Outlook, navigate to the settings page.
- Look for the section that allows you to manage your spam filters or whitelist.
- Click on the “Create Whitelist” or similar button to begin.
- On the whitelist page, you’ll see a form where you can add URLs or email addresses.
- Specify the URLs you want to whitelist by entering them in the provided input field.
- Check the checkbox or select the option that indicates you want to whitelist these URLs.
- Click the “Add” or “Save” button to finalize the whitelist settings.
It’s important to understand the limitations of whitelisting and the risks it might pose. When you add URLs to the whitelist, it means you’re explicitly telling your email client to trust emails from those sources. This could potentially expose you to phishing or other email-based attacks if the whitelisted URLs are compromised.
Also, keep in mind that whitelisting a URL doesn’t guarantee that all emails from that source will be delivered to your inbox. Some email clients have their own filtering mechanisms in place, and whitelisting a URL only reduces the chances of emails going to spam.
Exporting your whitelist settings can be useful when switching email clients or if you want to have a backup. Make sure to check if your email client provides an option to export whitelist settings, and if so, follow the provided instructions.
By following this guide, you’ll be able to whitelist URLs in your email client and ensure that important emails from trusted sources end up in your inbox.
Understand the Risks and Limitations of Whitelisting

Whitelisting is a useful tool for managing your inbox and ensuring that important emails don’t get lost in a sea of spam. However, it’s important to understand the risks and limitations associated with whitelisting.
- When you whitelist an email address or domain, you’re essentially giving that source permission to send emails directly to your inbox. This means that any emails from whitelisted sources will bypass your spam filter, so you’ll need to be careful about who you whitelist.
- Whitelisting can be especially risky if you’re not familiar with the source. Clicking on links or opening attachments from whitelisted sources can expose you to potential security threats, such as phishing attempts or malware. It’s important to exercise caution and verify the legitimacy of the email before clicking on any included links or attachments.
- Another limitation of whitelisting is that it only applies to the specified email client or service that you’re using. If you have multiple email accounts, you’ll need to set up whitelists for each account individually.
- Whitelisting also means that you’ll never receive emails from sources that aren’t on your whitelist. This can be a problem if you’re expecting emails from new contacts or if you’re signing up for newsletters or marketing materials from new sources. You may end up missing out on important information or updates.
- Exporting and importing whitelists can be a time-consuming process, especially if you’re using multiple email clients or services. You’ll need to create a whitelist on one device or client, export it, and then import it into another device or client. Keep in mind that not all email clients or services support whitelist importing and exporting, so you’ll need to check the documentation or support resources for your specific email client.
- It’s important to regularly review and update your whitelist. Over time, email addresses or domains that were once trusted sources may become compromised or start sending spam. By periodically checking and removing whitelisted sources that are no longer relevant or trusted, you can keep your inbox organized and secure.
Before you begin whitelisting emails, it’s important to understand the risks and limitations associated with this process. Whitelisting can be a useful way to prioritize your inbox, but it’s important to exercise caution and use it wisely.
Wrap up
In this beginner’s guide, we have discussed how to add emails to a whitelist in various email providers such as Gmail, Yahoo, and Outlook. Whitelisting means specifying a list of trusted senders whose emails will not be filtered as spam. By whitelisting an email address or domain, you’ll ensure that all emails from them will be delivered directly to your inbox.
To create a whitelist in Gmail, you can follow these steps:
- Click on the gear icon in the top right corner of the Gmail page.
- Select “See all settings” from the dropdown menu.
- Go to the “Filters and blocked addresses” tab.
- Click on “Create a new filter”.
- In the “From” field, enter the email address or domain you want to whitelist.
- Click on “Create filter”.
- Select the checkbox next to “Never send it to Spam”.
- Click on “Create filter” again to save the changes.
Similarly, if you’re using Yahoo Mail, you can follow these steps:
- Click on the gear icon in the top right corner of the Yahoo Mail page.
- Select “More Settings” from the dropdown menu.
- Go to the “Security and Privacy” tab.
- Click on “Add” in the “Safe senders” section.
- Enter the email address or domain you want to whitelist.
- Click on “Save” to add it to the whitelist.
In Outlook, you can whitelist emails by:
- Clicking on the gear icon in the top right corner of the Outlook page.
- Selecting “View all Outlook settings” from the dropdown menu.
- Going to the “Junk email” tab.
- Clicking on “Safe senders and domains”.
- Adding the email address or domain you want to whitelist.
- Clicking on “Add” to save the changes.
It’s important to understand that whitelisting has its limitations and risks. By whitelisting an email, you’re essentially saying that you trust the sender and that their emails should never be considered spam. However, this means that emails from unknown sources might get through, so it’s important to be cautious.
Before whitelisting emails, make sure you’re familiar with the risks and means of protection. Always check the URLs and verify the legitimacy of emails before clicking on any links or downloading attachments. Exporting or forwarding whitelisted emails from your office or personal accounts might also pose security risks.
By following this guide, you’ll be able to whitelist emails and ensure that important messages make their way to your inbox. Remember to regularly review and update your whitelist to stay protected against potential threats.
Sources
When it comes to whitelisting, there are several sources from which you can add emails to your whitelist. Here are some of them:
- Office email: If you’re using an office email, such as Outlook or Gmail, you’ll have the option to add specific email addresses or domains to your whitelist. This means that emails from these sources will never be marked as spam and will always show up in your inbox.
- Marketing emails: If you’re subscribed to marketing emails and want to ensure that you receive all of them, you can add the sender’s email address or domain to your whitelist. This will bypass any spam filter and guarantee that these emails will be delivered to your inbox.
- Relative URLs: If you have a website or a web page and want to whitelist certain URLs, you can specify the URLs in your whitelist. This means that any emails containing these URLs will not be flagged as spam and will be delivered to your inbox.
- Exporting whitelist: Some email services, like Yahoo, allow you to export your whitelist. This can be useful if you want to transfer your whitelisted contacts to another email account or if you want to create a backup of your whitelist.
- Checkbox and filters: In some email services, you have the option to create filters or checkboxes that enable whitelisting. This gives you more control over which emails are whitelisted and how they are handled.
- Beginner’s guide: If you’re a beginner and don’t fully understand how whitelisting works, you can refer to a beginner’s guide. This will walk you through the process step by step and help you set up your whitelist effectively.
- User-defined sources: Depending on your specific email service, you might have the flexibility to add emails to your whitelist from user-defined sources. These could be emails that you specify or sources that you trust and want to whitelist for particular reasons.
Keep in mind that whitelisting has its limitations and risks. Although it ensures that you receive all desired emails, it also means that any emails from these whitelisted sources will bypass the spam filters, increasing the chances of receiving unsolicited or potentially harmful emails. Always check the sender and content of an email before adding it to your whitelist.


