

Creating a digital ID is an essential approach in today’s digital world, where electronic signatures have become a standard method of signing documents. Whether you need to sign a document or purchase something online, having a digital ID will come in handy. In this article, we will discuss the basics of digital IDs and guide you through the process of creating and managing your own digital ID.
To start with, you will need the right tools to create a digital ID. One of the most popular software applications for creating and managing digital IDs is Adobe Acrobat. Depending on the version of Windows you are using, the steps may vary slightly, but the general process remains the same.
First, you will need to install Adobe Acrobat on your computer. Once installed, open the program and go to the “Sign” tab. From there, select “More Sign Options” and choose “ID Sign & Certify” from the drop-down menu. This will open a new window where you can create your digital ID.
In this window, you will find fields to enter information such as your name, email address, and organization (if applicable). Fill in these fields as needed, and select the level of assurance you wish to assign to your digital ID. Depending on your needs, you can choose to have your digital ID self-signed or certified by a trusted third-party. Note that self-signed digital IDs may not be recognized for certain cross-border documents.
Once you have filled in all the necessary information, click the “OK” button to complete the creation of your digital ID. At this point, your digital ID will appear in the list of available signatures within Adobe Acrobat.
To use your digital ID, simply open the document you wish to sign, right-click on the signature field, and select “Sign with Digital ID”. Choose your digital ID from the list, enter your password (if prompted), and your digital signature will be applied to the document.
Managing your digital ID and keeping it secure is also important. You can delete or change your digital ID within Adobe Acrobat by going to the “Manage Trusted Identities” section. From there, you can delete your digital ID or modify its details as needed.
In conclusion, having a digital ID is a simple and effective way of managing your digital identity and ensuring the security and authenticity of your electronic signatures. By following the steps mentioned above, you can easily create your own digital ID and use it for various purposes.
Understand the Basics of Digital Signatures in Adobe Acrobat X
When working with digital documents, it is important to have a way to ensure their authenticity and integrity. Adobe Acrobat X provides a solution to this problem through its digital signature feature. This article discusses the basics of digital signatures in Adobe Acrobat X and how to make use of them.
To begin, open the document that you wish to sign in Adobe Acrobat X. Once the document is open, navigate to the “Sign” option in the toolbar. From there, select “Place Signature”. This will open a window where you can choose the type of digital ID that you will be using to sign the document.
There are three types of digital IDs that can be used in Adobe Acrobat X: self-signed, certified, and verified. Depending on your needs and the level of assurance required for your signatures, you can select the appropriate type.
If you already have a digital ID, you can select it from the list of available IDs. If not, you can click on the “Get a Digital ID” link, which will take you to the Adobe website to purchase or obtain a free digital ID.
Once you have selected the digital ID, you can proceed to sign the document. Right-click on the area where the signature should appear and select “Sign Document”. This will prompt you to enter your password and, if needed, any additional information required by the digital ID.
After the signing process is complete, the signature will appear within the document. It is worth noting that digitally signed documents can be verified even if the certificate used to sign it is deleted from the user’s accounts, since the verification is based on the digital signature itself.
Digital signatures are particularly important when managing cross-border documents, as they provide a means to ensure the authenticity and integrity of the document, regardless of its physical location. They also serve as proof of identity and intent for the person who signed the document.
In summary, understanding the basics of digital signatures in Adobe Acrobat X is a simple yet essential step in managing and signing documents. By making use of this feature, you can ensure the authenticity and integrity of your digitally signed documents, as well as provide assurance to others that the document has not been tampered with.
Note that while this article specifically discusses Adobe Acrobat X, the basics of digital signatures apply to other software and platforms as well.
Types of accounts

When it comes to making a digital ID, there are different types of accounts that you can create depending on your needs and the level of assurance you require.
1. Self-signed accounts: These are basic accounts that you can create on your own. They do not require any verification from external sources and are generally used for simple tasks such as signing documents within your own organization.
2. Certified accounts: These accounts are created with the help of a certification authority (CA), which verifies your identity and provides you with a digital certificate. This certificate is used to sign documents and is verified by other parties when needed. Certified accounts provide a higher level of assurance compared to self-signed accounts.
3. Adobe ID: Adobe ID is used for managing your Adobe products and services. It allows you to access various Adobe applications such as Acrobat and sign documents digitally. Adobe ID accounts can be used for both personal and professional purposes.
4. Windows accounts: Windows accounts are created and managed through Microsoft’s Windows operating system. They can be used to sign documents digitally using Windows-specific features.
5. Cross-border accounts: Cross-border accounts are used when you need to sign documents with parties from different countries. These accounts include additional features that allow for cross-border authentication and signing.
6. Verified accounts: Verified accounts are created and verified by trusted third-party sources, such as government agencies or professional organizations. They provide a higher level of assurance and are commonly used for official purposes.
Note: The specific types of accounts and their features may vary depending on the platform or software you are using. For example, the Alberta.ca account is specific to the government of Alberta, Canada.
In conclusion, depending on your needs and the level of assurance you require, there are various types of accounts that you can use to make a digital ID. It is important to understand the basics of each approach and choose the right type of account for your specific requirements.
Managing Self-Signed Digital IDs

When it comes to digital identities, there are various types available, including self-signed digital IDs. This article discusses the basics of managing self-signed digital IDs and how to use them effectively.
Self-signed digital IDs are certificates that are created by the individual themselves, rather than being verified by a trusted third-party authority. While they do not have the same level of assurance as a verified digital ID, they can still be useful for certain purposes.
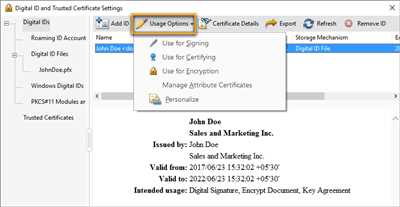
If you wish to create a self-signed digital ID, there are several methods you can use depending on the software you have available. For example, Adobe Acrobat has a feature that allows you to create and manage digital IDs. To do this, simply open Adobe Acrobat and select “Edit” from the menu bar, then choose “Preferences.” From there, click on “Signatures” on the left-hand side and then select “Identities & Trusted Certificates.”
Within the digital IDs section, you can add, delete, and manage your self-signed digital IDs. After you have created your digital ID, you can use it to sign documents digitally or send digitally signed documents to others. It is important to note that since self-signed digital IDs are not verified by a trusted authority, they may not be recognized or trusted by others.
To use your self-signed digital ID to sign a document, simply open the document in Adobe Acrobat, select “Sign” from the menu bar, and then choose “Place Signature.” Depending on the version of Adobe Acrobat you are using, the process may vary slightly, but the general approach is the same.
Self-signed digital IDs are a simple and cost-effective way to manage your digital identity. However, it is important to understand the limitations of these types of digital IDs and consider using a verified digital ID for cross-border or other high-assurance transactions.
Why is it needed
Digital ID, also known as a digital certificate, is needed to verify the authenticity of electronic documents and signatures. It ensures the integrity and security of digital transactions and communications in the online world.
Since digital documents are becoming more prevalent in various fields, such as business, government, and personal use, it is important to have a way to establish trust and confidence in these digital documents. Digital ID provides that level of trust and assurance.
When you create a digital ID, you can use it to sign and certify your documents. This points to the fact that the document has not been altered since it was signed, giving it legal validity. Digital IDs are commonly used in Adobe Acrobat to sign digital documents.
Depending on the purpose, there are different types of digital IDs that may be needed. For a simple personal use, a self-signed digital ID will suffice. But for more complex applications, such as cross-border transactions or managing multiple accounts, a verified digital ID from a trusted source may be required.
Why should you make a digital ID? Well, first and foremost, it provides a secure and tamper-proof way to send and receive electronic documents. When you digitally sign a document, it appears in a special pane and is marked as ‘Signed and All Changes Saved’.
Moreover, digital IDs simplify the task of managing multiple accounts and online identities. With a digital ID, you can sign in securely and access various online services without the need to remember different usernames and passwords.
It is worth noting that not all digital IDs are created equal. Some digital IDs may have limited functionality or may only be valid for a certain period of time. Therefore, it is important to choose the right digital ID depending on your needs.
To make a digital ID, you can purchase one from a trusted provider or create a self-signed certificate using software applications like Adobe Acrobat. If you are using Windows, you can right-click on a document and select ‘Sign with Digital ID’ to initiate the process.
In conclusion, digital ID is needed for the secure and verified management of electronic documents and signatures. It ensures the authenticity and integrity of digital transactions and communications, making it an essential tool in today’s digital world.
Sources
In the digital identity management, there are various sources available for creating a digital ID. These sources provide different types of digital IDs depending on the intended use. Here are some sources you can consider:
1. Adobe Acrobat
Adobe Acrobat is a widely used tool for creating, managing, and signing digital documents. It offers a simple and intuitive interface for creating digital IDs, which can be used for digitally signing documents. When creating a digital ID in Adobe Acrobat, note that there are two main types of digital IDs: self-signed and other-signed. Self-signed digital IDs are typically used for personal or non-commercial purposes, while other-signed digital IDs provide a higher level of assurance and are generally used for cross-border or commercial transactions.
To create a digital ID in Adobe Acrobat, open the application and go to “Edit” > “Preferences” > “Signatures”. Within the “Identities & Trusted Certificates” section, click on “More…” button. In the “Digital IDs” tab, click on “Add ID” button. Follow the prompts and fill in the required fields. Once the digital ID is created, it will appear in the list of available digital IDs for signing documents.
2. Alberta.ca
If you are a resident of Alberta, Canada, the Alberta government provides a digital ID service through their website alberta.ca. This digital ID can be used for various online services, such as accessing government accounts and managing personal information.
To get a digital ID from Alberta.ca, visit their website and follow the instructions provided. You will need to complete an online registration process and provide necessary information to verify your identity. Once the registration is complete and your identity is verified, you will be able to use the digital ID for various online activities.
These are just a few examples of the sources available for creating a digital ID. Depending on your needs and preferences, you can select the source that best suits your requirements. It is important to understand the basics of digital identity management and choose a reliable source for creating and managing your digital ID.
Note: The information discussed in this section is based on the general approach to creating digital IDs. The specific steps and requirements may vary depending on the source you choose.


