

Creating a collage wall can be a simple and fun way to add a unique touch to your home decor. It allows you to display a collection of photos, artwork, or other items that reflect your personal style and interests. Whether you want to achieve a cohesive and organized look or prefer a more abstract and eclectic aesthetic, there are certain steps you can follow to make sure your collage wall looks great and is a reflection of your own individual taste.
The first step in creating a collage wall is to select the right wall in your home. Consider the size and color of the wall, as well as the overall aesthetic of the room. You want to choose a wall that is big enough to accommodate your collage, but not too overwhelming. Once you’ve selected the wall, measure the area to determine the size of the collage you want to create.
Next, gather all the pieces you want to include in your collage. These can be photos, artwork, or any other items that hold meaning to you. Lay them out on the floor or a large table to get a sense of how they will look together. This will also help you determine the best arrangement and placement of each piece. You can play with different sizes, shapes, and colors to create a visually appealing composition.
Once you’ve decided on the arrangement, you can start hanging your pieces on the wall. Use a pencil to lightly outline each piece’s position on the wall before making any permanent marks. This will help you ensure that everything is evenly spaced and aligned. Use tape or adhesive strips to temporarily hang your pieces, making adjustments as needed to achieve the desired look.
If you’re hanging larger or heavier items, such as frames or artwork, it’s a good idea to use nails or wall anchors for extra support. Consider using wire or other hanging mechanisms to help distribute the weight and ensure that your pieces are securely hung.
Before you start hanging, take a step back and look at the overall composition. Make any final adjustments or re-arrangements to achieve the perfect look. It’s okay to experiment and try different configurations until you are happy with the result. Once everything is in place, step back and admire your beautiful collage wall.
Create a Photo Collage Wall in 8 Easy Steps

When it comes to creating a photo collage wall in your home, there are a few simple steps you can follow to ensure that your display looks great and adds a unique touch to your space. Whether you’re looking to hang pictures in a certain aesthetic or just want to showcase your favorite photos, this guide will help you plan, measure, and hang your collage with ease.
Step 1: Select the Right Wall
Before you begin, select the wall where you want to create your photo collage. Take into account the size and shape of the wall, as well as its color and other elements within the room to ensure a cohesive look.
Step 2: Measure and Plan
Measure the wall and determine the size of the collage you want to create. Consider the types of photos you have and how they will fit together. You can choose to go for a more abstract look with different sizes and shapes, or create a gallery-like display with photos of the same size and shape.
Step 3: Outline the Space
Using a pencil, lightly outline the boundaries of the collage on the wall. This will help you visualize the layout and figure out where each photo will be hung.
Step 4: Prepare the Photos
If you have many photos to include in your collage, select the ones that you want to use and clean them if necessary. You can also open up the photos on your computer or phone and arrange them digitally before printing.
Step 5: Hang the Larger Pieces
Start by hanging the larger photos or pieces of art that you want to include in your collage. Use a nail or wire to hang them securely on the wall, referring to your outline to ensure they are placed in the right positions.
Step 6: Hang the Smaller Photos
Once the larger pieces are in place, hang the smaller photos around them. This will help fill in any gaps and create a more cohesive look.
Step 7: Hang and Adjust
Hang the photos with a certain distance between each other, creating a balanced and visually appealing collage. Step back and assess the overall look to see if any adjustments need to be made.
Step 8: Add Borders or Tape
If you want to add borders or tape to your photos, you can do so at this stage. This can help frame each photo and give the collage a more finished look.
By following these 8 easy steps, you’ll be able to create a stunning photo collage wall in your home. Whether it’s in the living room, bedroom, or any other area of your house, this DIY project will add a personal touch to your décor that you can enjoy for years to come.
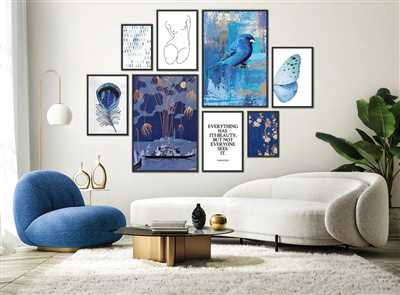
A photo collage in many shapes and sizes
Creating a photo collage on your wall is a great way to display your favorite memories and add a unique touch to your home decor. Whether you have a small apartment or a larger house, a photo collage can work in any space. With the right planning and measurements, achieving cohesion and a polished look is easier than you may think. In this article, we will outline the steps to create a photo collage in various shapes and sizes, and provide you with some ideas to help you get started.
Before you begin, it’s important to select the photos you want to include in your collage. Take the time to go through your pictures and choose the ones that hold special meaning to you. Once you have your photos ready, measure the wall where the collage will be hung. This will help you determine the size and shape of your collage.
| For a simple and easy collage, you can create a rectangular or square shape using tape or pencil to outline the borders. This is a great option if you want a clean and organized look. | If you’re feeling more creative, you can go for an abstract shape. Use wire or string to create the outline of your chosen shape. This will add a unique touch to your collage and allow you to express your artistic side. |
Once you have the shape in mind, it’s time to hang the photos on the wall. Start by placing the larger pieces in the corners or important areas of the collage. Then, fill in the open spaces with smaller photos. This will help create balance and visual interest.
Before nailing the photos to the wall, make sure to clean the area and sponge off any dust or dirt. This will ensure that the photos stick properly and look their best. When hanging the photos, keep a certain distance between each piece to create a gallery-like effect.
When it comes to color, you can either choose photos that complement each other or go for a more eclectic look. Whatever you decide, make sure the colors match with the rest of your decor to achieve a cohesive and polished look.
Whether you’re making a smaller collage for a bedroom or a larger one for the living room, following these steps will help you create a photo collage that is unique to your own home. So why wait? Gather your favorite photos, measure your wall, and start planning your photo collage today!
Sources:
– https://www.houzz.com/magazine/how-to-create-an-art-gallery-collage-stsetivw-vs~54394743
– https://www.apartmenttherapy.com/how-to-create-a-photo-collage-on-your-wall-217079
Achieving Cohesion with Abstract Wall Art
When it comes to creating a collage wall, abstract wall art can add a touch of sophistication and cohesion to your decor. Abstract art can be a great way to create a more cohesive look in your home, as it often features shapes and colors that can tie different pieces together. Whether you’ve been collecting photos, artwork, or other items to include in your collage, selecting a few abstract pieces can help bring the whole look together.
Before you start hanging your collage, it’s important to plan out the placement of each piece. Take measurements of the wall and the size of each item to ensure a better looking final result. You can use a pencil to outline where each piece will go, or you can use tape to create an abstract outline on the wall.
Once you have the placement and measurements ready, it’s time to hang your pieces. Start by cleaning the wall and floor in the areas where you’ll be working. This will help ensure that the pieces adhere properly and that the wall looks clean and ready for decoration. You can use a sponge to gently clean the wall and remove any dirt or dust.
When it comes to hanging the pieces, there are a few different methods you can use. One simple and easy option is to use nails or wire to hang each piece directly on the wall. If you want a more gallery-like aesthetic, you can hang your pieces in frames. This can create a more cohesive look, especially if you select frames that match the color or style of the abstract art.
Before hanging anything on the wall, it’s a good idea to lay out your pieces on the floor first. This will help you see how they look together and make any adjustments before hanging them on the wall. You can try different arrangements and see what works best for your space.
When hanging your pieces, consider the size of each one and the overall look you’re going for. Larger pieces can create a focal point, while smaller ones can add interest to open areas. It’s also important to consider the distance between each piece to achieve a balanced and cohesive look.
Abstract wall art can be a great addition to any collage wall, whether you’re creating a more eclectic look or a more minimalist one. The key is to select pieces that complement each other and the overall aesthetic you’re going for. With a little planning and creativity, you can achieve a cohesive and beautiful collage wall that will enhance the look of your home.
Hang Photos on the Wall
When it comes to creating a collage wall, hanging photos on the wall is a crucial step. Here are some helpful steps to guide you in achieving the perfect look for your gallery wall:
- Select the photos or pieces of art you want to hang. Consider the size and shape of each item, as well as the color and aesthetic it will bring to your wall.
- Before hanging, lay the photos or art pieces on the floor and arrange them in a certain order or pattern to see how they will look together. This will help you plan and visualize the overall look of your collage.
- Measure the wall where you want to hang the photos. Be sure to take into account any borders or other items that may be on the wall.
- Using a pencil, mark the spots on the wall where you want each photo to be hung.
- If you’re hanging larger photos, it’s better to use nails or picture-hanging wire. For smaller photos, tape or adhesive hooks can work just fine.
- Clean the wall and make sure it’s ready for the photos to be hung.
- Start hanging your photos one by one, following the measurements and marks you made on the wall.
- When hanging, consider the distance between each photo. You can create a clean and organized look by evenly spacing them or create a more open and eclectic look by placing them closer together.
- If you’re unsure about the placement of certain photos, try using a sponge or piece of cardboard as a mockup before committing to a nail in the wall.
- Step back and assess your progress as you go along. Make adjustments if needed to ensure the overall look is cohesive.
By following these steps, you’ll be well on your way to creating a beautiful collage wall in your home. Whether you’re looking for a simple and clean look or a more eclectic and abstract vibe, these ideas and steps will help you achieve the perfect gallery wall.
Sources
When creating a collage wall, you’ll need a few key sources to help you achieve the perfect look. Here are some items that will come in handy:
- Photos: Select your favorite photos that you want to include in the collage. It could be pictures of your family, friends, or even abstract art.
- Time: Set aside some time to work on your collage. Depending on the size of the wall and the number of pictures you have, it may take a while to complete.
- Nail and hammer: Before hanging anything on the wall, make sure you have the necessary tools, like nails and a hammer, to secure the pictures in place.
- Tape measure: Measure the size of the wall and the pictures to ensure they fit well within the space.
- Pencil and paper: Plan out the layout of your collage by outlining the size and shape of each piece on a piece of paper with a pencil.
- Wire or string: Use wire or string to hang your pictures. This will give you the flexibility to adjust the placement later if needed.
- Sponge or rag: Before starting to hang your pictures, clean the wall surface to remove any dust or dirt.
- Color scheme: Decide on a color scheme or theme for your collage to create a cohesive and aesthetically pleasing look.
- Various sizes and types of frames: Select frames of different sizes and types to add variety to your collage. You can also mix in other decorative items, such as mirrors or artwork.
- Gallery walls: If you’re looking for inspiration, research different gallery wall ideas to see what styles and arrangements you like.
By gathering these sources and following the steps outlined in this article, you’ll be well on your way to creating a beautiful collage wall in your home.


